Multi disc for Sony Playstation and Sega Saturn using M3U files

I also just realized why my m3u files had absolute paths - the RocketLauncher module writes them that way for PSX (which works fine).

I don’t think I can get RocketLauncher to play nice with this core, if it crashes on load with m3u files with absolute paths. :frowning:

ok thanks. depending on the game, you can set how much black borders by adjusting horizontal overscan mask in core settings.

1 Like

Do you know if there’s a way to make the core read m3u files with absolute paths, like the mednafen PSX core does?

im not sure who added m3u support, last time i was editing that core was these adjustments to viewport and stuff and disk swapping and m3u was still not working that time.

@aorin1

This is the only code that needs to change in the RetroArch.ahk module, change:

If (StringUtils.Contains(retroID, “LibRetro_PSX”) && romTable.MaxIndex() && mgValidExtension) { ; See if MultiGame table is populated

To this:

If (StringUtils.Contains(retroID, “LibRetro_PSX|Libretro_Sat”) && romTable.MaxIndex() && mgValidExtension) { ; See if MultiGame table is populated

However, unless the ability to read absolute paths is added to this core, it still won’t work. I know that it does in fact work, because I changed the resulting .m3u file to ‘read only’ so that the RetroArch module wouldn’t overwrite it - and changing the discs from Pause works perfectly. The module also auto-writes your m3u files - it just uses absolute paths. Which make the core crash.

I’m going to make an issue on github, maybe we can get this fixed.

1 Like

@aorin1, retrowertz fixed it, so if you follow the instructions on my previous post, RocketLauncher will auto-create m3u files for you, and have the ability to swap discs.

All you need to do is update the Sega Saturn core. :slight_smile:

1 Like

Hey Aorin, question for you since I know you are using HyperSpin and had that above example.

How are you going about setting up the XML?

I normally use Don’s hyperspin tools to generate an XML based on file extensions in my game folders. So let’s say for PSX, I’d have it scan the folder and create an xml entry for everything with a .chd file extension.

I can have it do .chd & .m3u but then I’d actually have all the same entries in the wheel, plus the m3u file’s entry; as it would be:

Myst 2 - Riven

Myst 2 - Riven (Disc 1)

Myst 2 - Riven (Disc 2)

Myst 2 - Riven (Disc 3)

Myst 2 - Riven (Disc 4)

Myst 2 - Riven (Disc 5)

(I know, I have a weird naming scheme)

Do you use another method to generate XMLs? Or are you hand-altering your existing ones? Just seems like a lot of games to alter specifically.

Hey @SkyHighGam3r, yeah I’m on Hyperspin. When it come to multi discs that can be used as single discs for PS1 and Saturn, and I hope for some other systems in the future, I use only one entry, in the Riven case the entry is:

Riven - The Sequel to Myst (USA)

If a system has lots of multi disc games, in the PS1 case, I use HyperspinChecker tool, I mainly use it to crop databases down to only available roms.

I need to point the rom folder in HyperHQ and set its extensions, configure the paths in HyperspinChecker, audit the system and then I can crop the database.

But first, I need to edit the main database and remove the (Disc 1) tag using notepad++ and replace all at once for nothing, only leaving alone the regional tag.

HyperspinChecker will find the games in your paths, and you can crop it pressing a simple button, once you have all the m3u files named accordingly to your way, in this case "Riven - The Sequel to Myst (USA).m3u, all other entries for the other discs will be removed.

Note that some multi disc games aren’t games that require the first discs to work, so Resident Evil 2, Gran Turismo 2, Street Fighter Collection and some others have their original “(Disc)” tags.

You’ll probably need to do lots of things by hand, but using notepad++ it will be faster than it seems.

It’s funny you mention that, because strangely enough Resident Evil 2 was the main reason I wanted to go through this process lol. It was driving me nuts that I had to have both discs in my favorites list.

I actually figured out another way to do the XML though that made my life way easier.

So, after setting up the m3u’s and putting them in the game folder, I just did a folder search for the phrase "Disc " (with a space at the end and WITH QUOTES to avoid things like Discworld or Disciples, etc…) and then moved all the results to a temporary folder.

Then I ran the Don’s HyperSpin Tool for generating XMLs with m3u and chd extensions, then moved the game files back to the game folder and viola presto alakazaaaaaam lol worked wonders.

I hadn’t heard of hyperspin checker before though, it looks pretty versatile, so thanks for pointing me there.

2 Likes

Hi @aorin1

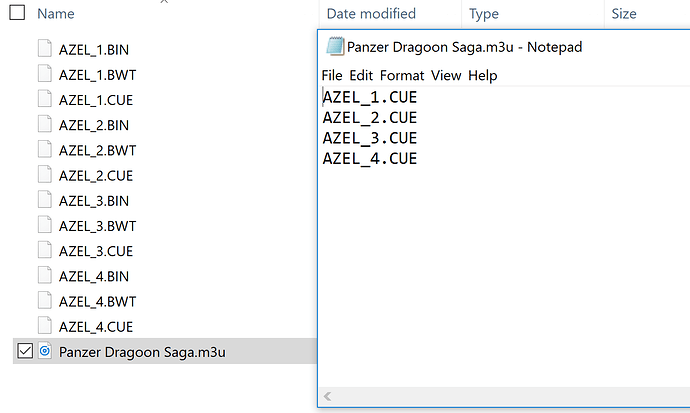
That’s a really neat step by step guide, I was hoping you could help me with a Saturn guide for Panzer Dragoon Saga.

I’ve created a .m3u file containing the name of the relevant ISOs, as follows:

When I load the .m3u file, the game is starting fine.

I tried to load up an existing save and a save state to try the disk swapping part (I had saved just at the end of disk one with both).

Unfortunately, that ‘trick’ didn’t work, which means I have a bit of a slog to get back to where I was before!

No matter as it is a great game, but before I start again, have I done anything wrong above?

I’m also not totally sure what is meant by an ‘absolute path’ in this context.If I am simply loading the .m3u file will I be doing everything correctly?

Probably worth mentioning I am only using Retroarch.

Incidentally, is there any way I can re-use my existing save/save state or is that impossible now?

Many thanks.

You should check in your CUE file if it has the corresponding iso file, any typo will lead to error. Anyways, I’m not sure what image formats this method works with, I’d try bin+cue files since they are the ones that always work for this and PSX as well.

Thanks for the Guide

Aorin1,

Absolutely fantastic tutorial and write up! Thank you so much. I have a question however…

Can the m3u files be associated with .cue file format or do they have to use .chd? If the latter, is there a similar solution for the .cue format? Please excuse me if someone else has already asked this.

~EDIT~

I see a few replies above that you already answered this. I will seek advice elsewhere and also test this out. Thanks again for this write up!

Thanks,

Sinistradian

Hey, thanks. As for listing cue files inside the m3u file, some other user will have to answer that since I never tried bin+cue, all my disc games are compressed in chd.

I learned that in Lakka there seems to be a limit to 8 discs you can swap between on the PSX emulator. If you place any more than 8 in the .m3u file, Lakka will ignore any additional cue files on the list past 8 cue files. Is there anyway around this limit or is something that is part of retroarch that cannot easily be changed?

It would have to be changed in the source and recompiled, I suspect. But why is this something you want to do?

1 Like

I noticed, that disk swapping through the GUI is not working (observed on Windows with beetle PSX - Parasite Eve II (USA).m3u)
Only after a new start of the core the right disc is recognized.
This applies only for the GUI.
In windowed mode, top menu bar, Command - Disc Options, disc swapping works as expected

There are 2 games called monster rancher and monster rancher 2 that relies upon disc swapping to obtain extra monsters. I thought it would have been nice to create a humungous library to pull monsters at any time from but it’s not necessary.

2 Likes

Just FYI, I tried changing discs in Chrono Cross and the game would just hang when “pause on menu” wasn’t enabled (when it was enabled and the game was running in the background, the disc change went smoothly). To have “pause on menu” enabled and swap discs, I found this method to work which was posted by a dev (Radius4) on Reddit about a year ago:

-   Quick menu 
-   Disk Control Interface 
-   Eject (this step is important) 
-   If you have pause on menu enabled go back to the game for a second (I'll improve this too soon) 
-   Go to menu again 
-   Disk Image append 
-   Select the second disk  It should change the index automatically and throw you back into the game

Obviously there’s no “Disk Image Append” anymore, so you just swap discs and insert. Hopefully this process will get smoothed out in the future :slight_smile:

2 Likes

I noticed the same thing as well. I commented with a workaround in the GUI itself.

1 Like