You are right, there was an even newer (the latest) version:
Here is the download link (fixed presets):

You are right, there was an even newer (the latest) version:
Here is the download link (fixed presets):
Yo everyone, I return once again bearing new updated gifts. I already snatched up the latest guest.r shader update and went straight to work. Continuing right from my last sample pack I tweaked a few things around and this may be my new potential look for my next release. Try them out and see what you think.
I also fixed that res switch issue as well.
https://www.mediafire.com/file/vqrszvf4o2bjsrp/new-sonkun-preset-samples-08-10-2026.zip/file
These samples use the latest guest.r update so be sure to grab that here and install before using my presets.
Unzip the folder then move all presets directly to the root shader folder before using.
@guest.r thank you for putting together that fixed release a few posts above, I didn’t realize last time I was here that the location of the res switch shader got moved causing those errors. I also really appreciate that new “show original image” setting you added in, let’s you see what’s going on in real time to help tweak things.
Cool as hell to see how the ntsc shader blends all those dithering effects side by side to the raw image.
Edit: Did a small retweak to the pack and put a new one up so if you already downloaded it please regrab it swap out those presets.
Welcome back! Been looking forward to another update.
Tried everything to get these to apply on my Ayn Thor and nothing works. I changed the folder location to one that isn’t sandboxed, I updated the slang shaders and the guest ones manually, I put the sonkun folder in the shaders_slang folder and I always get “failed to apply.” The only thing I’ve managed to get to work is the new sample 1080p-composite-slotmask.slangp shader and that will only load if I put it in the root “shader” folder next to the shaders_slang folder. If it’s inside the shaders_slang folder or any other it won’t apply. None of the other profiles load regardless of where I put them. Would greatly appreciate if anyone can help, I feel I must be missing something
most of his samples need to be there
That previous upload was me getting my feet wet again, been a while since I tweaked anything. Moving right along I went back into the lab to play around some more while I take you all along on my journey with me until my next actual release
New screenies:
https://www.mediafire.com/file/wrbrjztmgq53rxj/new-sonkun-preset-samples-08-13-2026.zip/file
Same as last time, place all presets directly into the root shaders folder not shaders_slang.
Yo, long time no see. I’m glad to be back, this time I’ll be around more frequently, was gone dealing with a bunch of stuff taking time away from playing in the lab but I’m back now.
There’s probably a good chance my preset pack doesn’t even work anymore since a few things got switched around since that release, I’m working on fixing all of that when I release my latest pack, I apologize for the inconvenience. In the meantime you came at the right time to see what I’m working on now to replace that old pack with, you should try out these samples and get a sneak peak. You’ll have to download this guest.r release for them to work though. After that grab my samples above then instead of placing them in the shaders_slang folder simply place them in just the shaders folder and they’ll load up from there. No HDR or other extra brightness settings on your TV needed, my presets are extremely bright already.
Thanks for the feedback. I’m assuming you mean the mountains are too “reddish”. Loaded the game up real fast and right away I knew which setting was mostly likely causing it, the “red-green tint” setting in grade.
Here it is using the sample pack from above:
Here’s after tweaking that setting and raising it up one value below 10:
I split the image between raw and shader to show it more. Is that what you were talking about?
Edit: Ran another test in a different area and yeah that setting for sure needed to be tweaked. Here’s before and after in the window area with the sky:
No, that’s not it at all. Look at the outlines on the green parts of the mountains.
Here’s a clean image:
Here’s one of your previous presets: Finally, here’s the latest standard stock guest:Your preset is creating colors out of thin air! That’s what causing my concern.
Hmm I think I may know which setting is doing that, possibly the “Mitigate Mask on Edges” setting perhaps?
Here’s with it on:
Off:
You meant that? Also you indirectly helped me as well as I didn’t like how those mountains were looking, too reddish looking so I made it look more how it looks in the raw image. I’ll be putting out a new sample pack with that change as well.
No. Look at where the arrow is pointing. Those almost yellow contours? If you look at the clean or stock guest images above, you’ll see that whole area’s supposed to be one solid green.
First, these are beautiful sonkun, thank you. Need help installing your presets.
For regular sonkun presets, I installed them in RetroArch/shaders/shaders_slang/sonkun folder.
The fine details are incredible, but everything, even the warmest presets, look very blue:
I’d also like to try the 1080p-sonkun-guest-advanced-hd-rgb-shadow-mask-ddt-xbr-lv1 type shaders, installed them in RetroArch/shaders below shaders_glsl and shaders_slang,
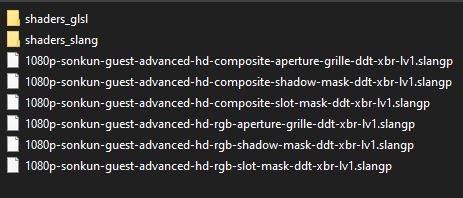
but they don’t load with “failed to apply shader preset.” If it’s important, the regular guest.r shaders load and look great.
Appreciate any advice.
Round 3 of tweaking in the lab since returning, let’s try this new craziness out:
https://www.mediafire.com/file/xfej1f4ro9plpqu/new-sonkun-preset-samples-08-25-2026.zip/file
Unzip then copy and place the individual presets directly into the shaders folder not shaders_slang, you know the drill.
I see what you’re talking about there. I can’t even reproduce that from my end though so I’m not sure what’s causing that on your end. Even the pics I posted above from the same game didn’t have that yellowish line. Try these presets out and see if anything changes perhaps.
More than likely you’re getting errors because the “res switch” shader, which is a different shader than guest.r’s has been moved to a completely new location since I posted my shader preset pack last year. Basically it’s reeeeally outdated and needs to be replaced with a new working one which I’m working on doing now.
I’m currently looking for a new look before I do that though so I’ve been posting up these small sample packs for you guys to try out. You should try them out as well but instead install this guest.r shader update as that’s needed to work with these new samples. Try them out and see how these look to you. Instead of placing the folder in the shaders_slang folder unzip the download above, copy all all the presets inside and paste them in just the “shaders” main folder and load them from there.
Been playing FFV Pixel Remastered and wanted to try it your preset as I did not like the built in one. It is not a perfect port, mainly due to the difference in resolution, but it is not bad!
This is the 4k composite preset.
Unfortunately, same as before.
OK, now that is interesting! On my monitor the yellowish line comes through clear as day in each of your screenshots!
Wow 4k high resolution pics, that’s interesting. I never really know how my presets will look on anyone’s individual monitors or tvs so seeing pics like this will always amaze me. Well how do you like it lol? Should I keep this look? Get back in the lab and keep tweaking?
I literally have the game loaded right now as I’m typing this, face almost glued to the screen lol and this is on a 65 inch tv yet it’s not showing that on my display, super weird. @guest.r and @Arviel do you guess see that yellow line in that Pic from your end? And if so @guest.r what could possibly causing that?
It was mostly a “can i do it?” sort of thing, i was surprised it even came as close as it did. It doesn’t quite match the look of running it in RA with low resolution consoles, which is to be expected. I’ll try to tweak to see if I can get it a bit closer.
This is just a silly side project though so don’t take my feedback on the visual seriously! Your shaders are still my favorite.
That should be easy to do. In the parameter settings go down to the “Interlacing options” and put the “Internal Resolution” setting to 1.00, I believe that’s the look you’re trying to get.
Oh no I actually want feedback good or bad lol. I’m putting out these small packs to see if there’s anything I should add, take away, lower, raise etc.
@DukeSkinny Try lowering the “Horizontal bloom/halation sigma” setting and see what happens. I’m just gonna assume it could be some glow related issue until I can get to the bottom of it.
Standard:
‘Horizontal bloom/halation sigma’ at minimum: ‘Mitigate Mask on Edges’ at minimum: Both settings at minimum:Don’t know what’s visible on your end, but both settings seem to “enhance” an artifact that’s already present earlier in the chain. With both settings at minimum, the issue is greatly reduced. Everything is clear on the vertical axis, but there are still yellowish pixels running horizontally.
Yes through the images I see everything clearly, I see the most difference when that mitigate setting is lowered or disabled. So I guess it was a combination of both of those settings. Maybe you can go a step further and lower those other glow sigma settings as well, both the horizontal and vertical ones.
For whatever reason those settings help enhance the image from my end especially that mitigate setting, maybe it’s just the way my TV is outputting the image I don’t know.