
I guess so, please check the first post for “useful links”
Thought to translate a Duimon graphic to show what it would look like. I just wasn’t able to figure out how to translate the bezel color over.
#reference "../../shaders_slang/bezel/koko-aio-slang/Presets-ng/Base.slangp"

GEOM_WARP_X = "0.340000"
GEOM_WARP_Y = "0.420000"

DO_BEZEL = "1.000000"
	BEZEL_INNER_ZOOM = "-0.165000"
	BEZEL_FRAME_ZOOM = "-0.024000"
	BEZEL_R = "0.000000"
	BEZEL_G = "0.000000"
	BEZEL_B = "0.000000"
	BEZEL_CON = "0.700000"
	BEZEL_RFL_ZOOM = "-0.070000"
	BEZEL_CORNER_DARK = "0.300000"

DO_BG_IMAGE = "1.000000"

DO_AMBILIGHT = "0.000000"

DO_GAME_GEOM_OVERRIDE = "1.000000"
	GAME_GEOM_ASPECT = "1.375000"
	GAME_GEOM_HSHIFT = "-0.010000"
	GAME_GEOM_ZOOM = "0.970000"

monitor_body_curved = "images/bezel/SNES.png"
bg_under = "images/bg/SNES.png"

1 Like
If you’r referring to this:
Try this:

Cannot be 100% accurate ofc, Duimon’s gradients use hue shifts towards the shades on the bezel frame, while here you’re limited to a single hue, but close enough, maybe a little more blue is needed.
1 Like
Yeah that was what I meant. I couldn’t think of the way to translate it from the hsv in Mega Bezel to rgb in koko-aio.
1 Like
Just a snippet from docs-ng.md file in case you were missed it
        Draws a monitor frame with simulated reflections from the game content.<br>
        The monitor frame is an image loaded by the shader and is shipped<br>
        in the "textures" shader subdirectory, named:
        monitor_body_curved.png and monitor_body_straight.png
        It has been made with the following rules that may come handy<br>
        only if you want to edit it; otherwise go on.<br>
        - The red channel represents the luminance information<br>
        - The green channel represents the highlights<br>
        - The alpha channel in the inner frame represents the part of the bezel<br>
          that will be filled by the game content<br>
        - The blue channel represents the part of the bezel that will be filled by the game reflection.<br>```
If you need it, textures gimp projects have been moved here.
2 Likes
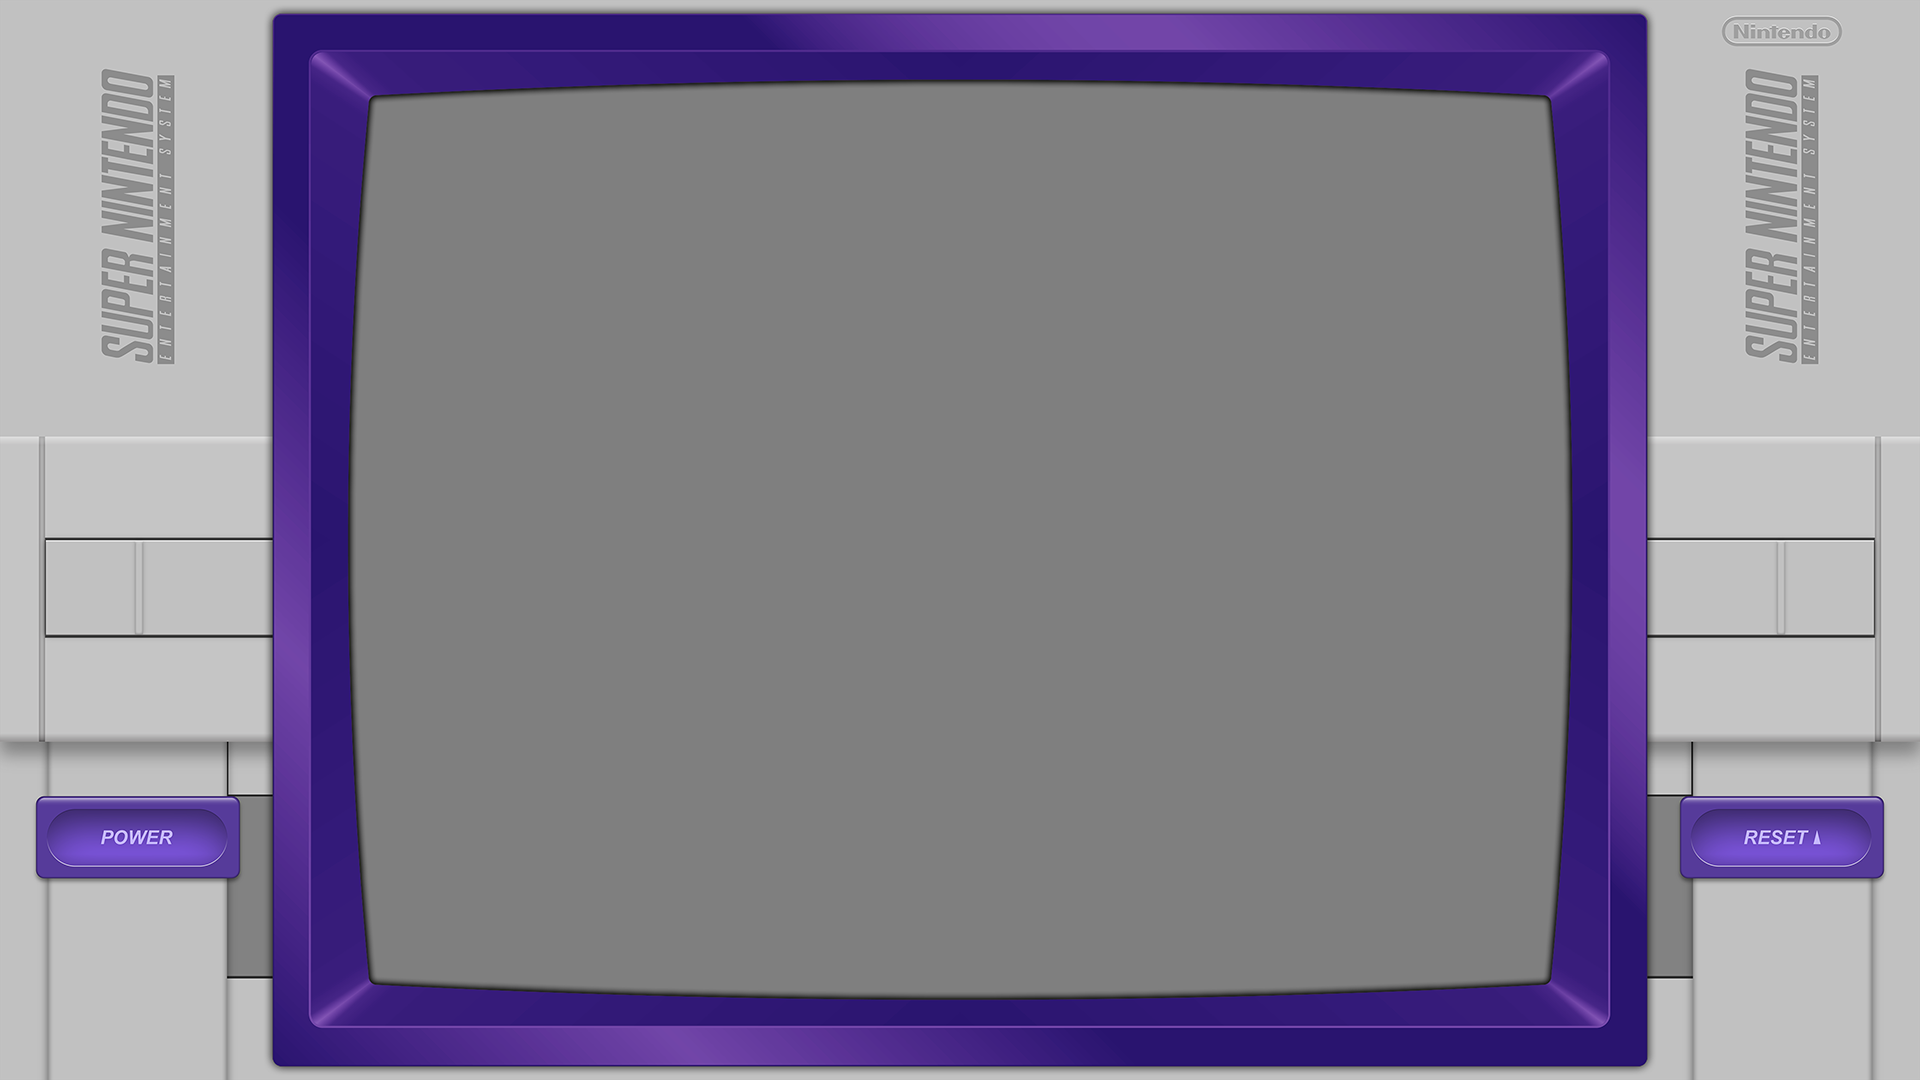
Made a few changes and added the right bezel color.
#reference "../../shaders_slang/bezel/koko-aio-slang/Presets-ng/Base.slangp"

GEOM_WARP_X = "0.500000"
GEOM_WARP_Y = "0.700000"

DO_BEZEL = "1.000000"
	BEZEL_INNER_ZOOM = "0.048000"
	BEZEL_FRAME_ZOOM = "0.000000"
	BEZEL_R = "0.050000"
	BEZEL_G = "-0.010000"
	BEZEL_B = "0.180000"
	BEZEL_CON = "2.000000"
	BEZEL_REFL_STRENGTH = "0.000000"
	BEZEL_SPCL_STRENGTH = "0.700000"
	BEZEL_RFL_ZOOM = "-1.500000"

DO_BG_IMAGE = "1.000000"

DO_GLOBAL_SHZO = "1.000000"
	GLOBAL_ZOOM = "1.030000"

DO_GAME_GEOM_OVERRIDE = "1.000000"
	GAME_GEOM_ASPECT = "1.335000"
	GAME_GEOM_HSHIFT = "0.000000"
	GAME_GEOM_ZOOM = "0.730000"

monitor_body_curved = "images/bezel/SNES.png"
bg_under = "images/bg/SNES.png"

3 Likes
This looks really good. While having manufacturer logos on the lower bezel side is a nice minor addon, the console specific BEZEL_R BEZEL_G BEZEL_B values are really great.
If you decide to create more colored console bezels, please post the RGB values. 
1 Like
Using the monitor_body gimp project bezel
Color: Red = "0.175000"
Color: Green = "0.105000"
Color: Blue = "0.345000"
Contrast = "1.650000"

RGB: 85, 58, 153; HEX #553a99

2 Likes
I was able to find a formula that should help with Bezel colors. I have tested it with a few colors and they all get close to the respected RGB value.
(RGB value + 23) / 510 with Contrast set to "2.000000"
Edit: Discovered the formula only works with a solid background being used and not with any koko-aio backgrounds. I will be trying to find the secondary formula as well.
2 Likes
I appreciate the efforts, but I’m not sure I follow 
What’s that formula for and why (and what) backgrounds do interfere?
I haven’t tried yet, but what is difficult with converting HSV to RGB? Most color pickers, both standalone and in image editors, display HSV and RGB values.
Is there a discrepancy in the koko-aio output that needs to be compensated for?
BTW. With all the interest lately. I am toying with the idea of creating backgrounds (Some of my presets use a Device layer + Background layer) just for this purpose.
If @kokoko3k would contact me privately, we could decide on some details and I may put together a repo of presets myself.
I would concentrate on Bezel presets but if the creation of a layered source image isn’t outrageously cumbersome I would consider doing LCD and some of the monitor only presets. (DOSBox 5150 etc.)
4 Likes
The formula is so it’s easier to translate HSV from Mega Bezel to koko-aio Color RGB. It worked when I used different backgrounds using Duimon’s Graphics but none worked when there was no background or the default koko-aio under background was used.
The settings with Duimon’s Graphics is BEZEL_R = “0.217600”, BEZEL_G = “0.164700”, BEZEL_B = “0.350900”, BEZEL_CON = “2.000000”.
The settings to get the same color with no background is BEZEL_R = “-0.070000”, BEZEL_G = “-0.125000”, BEZEL_B = “0.060000”, BEZEL_CON = “2.000000”
I found a better one that adds Contrast: (RGB + (10 + (Contrast - 1.3) * 20) / 510
I did something similar with some help from Duimon with Mega Bezel. I take a 56, 100, 100 image and if I set the layer it uses Gamma to 0.45 then the settings would be the exact HSV.
1 Like
The problem is the Color: RGB settings are based between -1 to 1 and not 0 to 255 so it makes it a little more difficult to translate.
That looks awesome, I’ll have to learn how to apply this
Thanks, in a couple of days, I’m in a middle of a move/relocation right now
3 Likes
Found that the equation actually works as well if there is a different background set with DO_BG_IMAGE = “0.000000”. I don’t know what in the world is going on with it.
While I cannot yet figure out why the back image should be a problem, maybe it will help you to know what the shader is doing with those values.
It takes the red channel of the bezel texture and treats it as the luminance, think to it as a grey canvas like 128,128,128 (128 or whatever is the red value in the straight and curved bezel textures shipped by default, I don’t remember).
Then it adds/subtracts the shader’s R G B parameters to it, so if you have a red channel on the bezel texture of 128, and set the shader rgb parameters to, say, -10,+64,-1, the resulting color will be: (128,128,128)+(-10,+64,-1)=118,192,127.
(correction: the shader works in the range -1…1, with -1=-255 and +1=255; so to add a 64 red to the gray canvas, you’ll need to set the red parameter to 64/255=0.25)
The contrast setting “stretches” or “compress” each component by the specified amount, with 1 being the neutral setting, > 0 will cause higher values to become higher and lower values to become lower, and < 0 will cause the value to collapse to the middle.
It comes handy if you want to give more contrast to the result in case the canvas has some shades, but you can ignore it, and set it to neutral i think.
I wrote alot, but it is easy.
@kokoko3k, figured out that it wasn’t with the background and was that I was using two different bezels. I exported an individual bezel with GIMP and pixelformat to automatic.
Edit: It was being exported with pixelformat as 16bpc rgba
1 Like
Yup, pixelformat needs to be set to 8bpc, I left a note about that for myself and my poor memory in a text file near the gimp project too
1 Like
Somehow found the other equation which wasn’t too hard. The main problem is finding the max and min values, which were actually -0.395 and 0.395.
(RGB - 128) * .0030859375 where Contrast = 1.30
0.0030859375 is simply 0.395/128
Test

Edit: Found that it’s more accurate if the full results are placed in the preset setting.
R: 85, -0.1326953125
G: 58, -0.216015625
B: 153, 0.0771484375
3 Likes