Koko-aio shader discussions and updates

>> Starting from the code from 2024-June-13, Koko-aio needs at least Retroarch 1.16 to work <<

Version NG-1.9.30 is up on github and should be available via online updater in Retroarch.


Hi guys, first post here. In the past I made a shader for FS-UAE (Amiga emulation), but since i found that retroarch has a pretty good support for whdload games, I ported it to slangp so that it can be used with other emulators too.

I’m not that expert with technical terms, but i’m fortunate enough to own an old 15khz slot mask crt monitor inside an arcade cab loaded with Advance mame and other old emulators, so I used it as a reference. Why using a shader, you may ask, instead of the almost “real thing™”?

Actually that thing is big, heavy and power hungry and since it is running on an old AthlonXP i expect it to break sooner or later and i’ll not have spare time to fix, that’s for sure. Also, i’ve finally got an awesome oled 4k tv and i think that with that amazing (low) pixel persistance and resolution, we can get pretty damn close to the “real thing™”

One of the main goal of this shader is to be usable on integrated GPUs.
Granted, don’t expect it to run on a Raspberry pi, but the actual target is
Intel Haswell, the one on which I develop it, where it perform with all the features
enabled, when dealing with 240p content, on 1080p at resolution ad about 85/90fps.


Click to read features
  • Scanlines
  • Screenlines
  • RGB phosphors
  • RGB deconvergence
  • NTSC/PAL CVBS color bleeding
  • Aperture grille, slot mask, shadomask.
  • Input signal glowing
  • Output signal glowing
  • Blooming
  • Gamma, contrast, saturation, luminance, color temperature adjustments
  • Black frame insertions through alternate blanking
  • Interlace flickering, forcing and emulation
  • Antialiasing
  • Curvature
  • Ambient lights
  • Vignette and Spotlight
  • Bezel (Thank you HyperspaceMadness for allowing me to rip his automagically generated bezel!) https://github.com/HyperspaceMadness/
  • Background images
  • Full screen glowing
  • 3D rotation/tilt
  • Integer scaling
  • Background image Night mode
  • Support for backdrop images for BW game/CABs that use mirrors
  • NTSC emulation with selective artifacts smoothing
  • Temporal bloom
  • RF Noise
  • Dot matrix display emulation with grid, shadow and motion blur (gameboy mono)
  • Monochrome display “colorization”
  • TATE mode
Click to read relevant changes over previous releases

Relevant changes in release NG-1.9.30

  • REMOVED: Removed support for Retroarch versions prior to to 1.16 due to the use of the rotation uniform.

  • REMOVED: Removed dot matrix debug parameter

  • REMOVED: Y-Tilt FOV option gone.

  • NEW: Adjust content/bezel size by also taking width into account

  • NEW: Add presets for PSP

  • NEW: New parameter: “Interlaced scanlines brighness push” used to lower input gamma When emulating interlaced screens: Useless for fast response screens such as OLeds

  • NEW: Scanline inflation turned into a generic Warped glow setting which can be applied to x axis too.

  • NEW: Add a new subfolder “Presets_HiresGames_Fast” containing speedy presets

  • NEW: VGA Dobulescan monochrome green and amber presets

  • CHANGE: Corners now have a 4:3 aspect

  • CHANGE: Y-Tilt does not require you to tweak Bezel tilting

  • CHANGE: Lowered default flicker power across the presets (but the flicker one).

  • CHANGE: General Presets tuning

  • CHANGE: Docs update

  • FIX: Keep Deconvergenge constant across input resolutions

  • FIX: CVBS color bleed: keep the size constant across input resolutions intended for Hi resolution content (640x480+) that don’t use 2x internal processing

  • FIX: Back/Foreground image: correctly scale offset so that it is in “sync” with content position

  • FIX: Fully commented config-user.txt, sync’d with config.inc

  • FIX: Usual work to enable specific workarounds for D3D11,12

  • FIX: Lowered RESSWITCH_SAMPLING_POINT because too near to the screen border

  • OPTIMIZED: Slightly optimized fn_border

  • OPTIMIZED: Optimized halo vs scanlines blending

  • OPTIMIZED: Skip unneded alpha channel assigningments to FragColor

  • OPTIMIZED: Debanding: spare useless calls to scale_to_range()

  • Overall performance vs previous release lowered from 111 to 108 fps measured by my standard benchmark on Haswell. this is mainly due to new warped glow feature.


Useful links

  • Make sure to read the docs!
  • Main development done on this Github repo
  • Stable releases should be available through Retroarch’s online updater
    (shaders_slang/bezel/koko-aio/) or here.
  • Click here if you want to try the latest in-develompent shader and unpack the zip somewhere inside your -already in place- shader directory.
    I do not ensure you it will work as expected nor that your cat will be safe.
  • Texture “source” projects for main monitor frame/bezel and other misc files has been moved to another repo to lower the download size.
  • More presets and additional artworks: koko repo || estefan3112 repo || Starman99x repo || Duimon repo

  • If you want to boost your fps and you don’t mind tinkering with text files, take a look to the file config-user.txt in the shader folder and follow the instructions; on intel IGPs, I’ve seen fps boosted by 45%.

Please, tell me what you think, any comment is really appreciated.

Dynamic room lights (immersive preset)

Hires content

Overmasked

Antialiased

Mask experiments

Handhelds

Ntsc selective blurring and sharpening

monitor-Commodore_1084S-Night

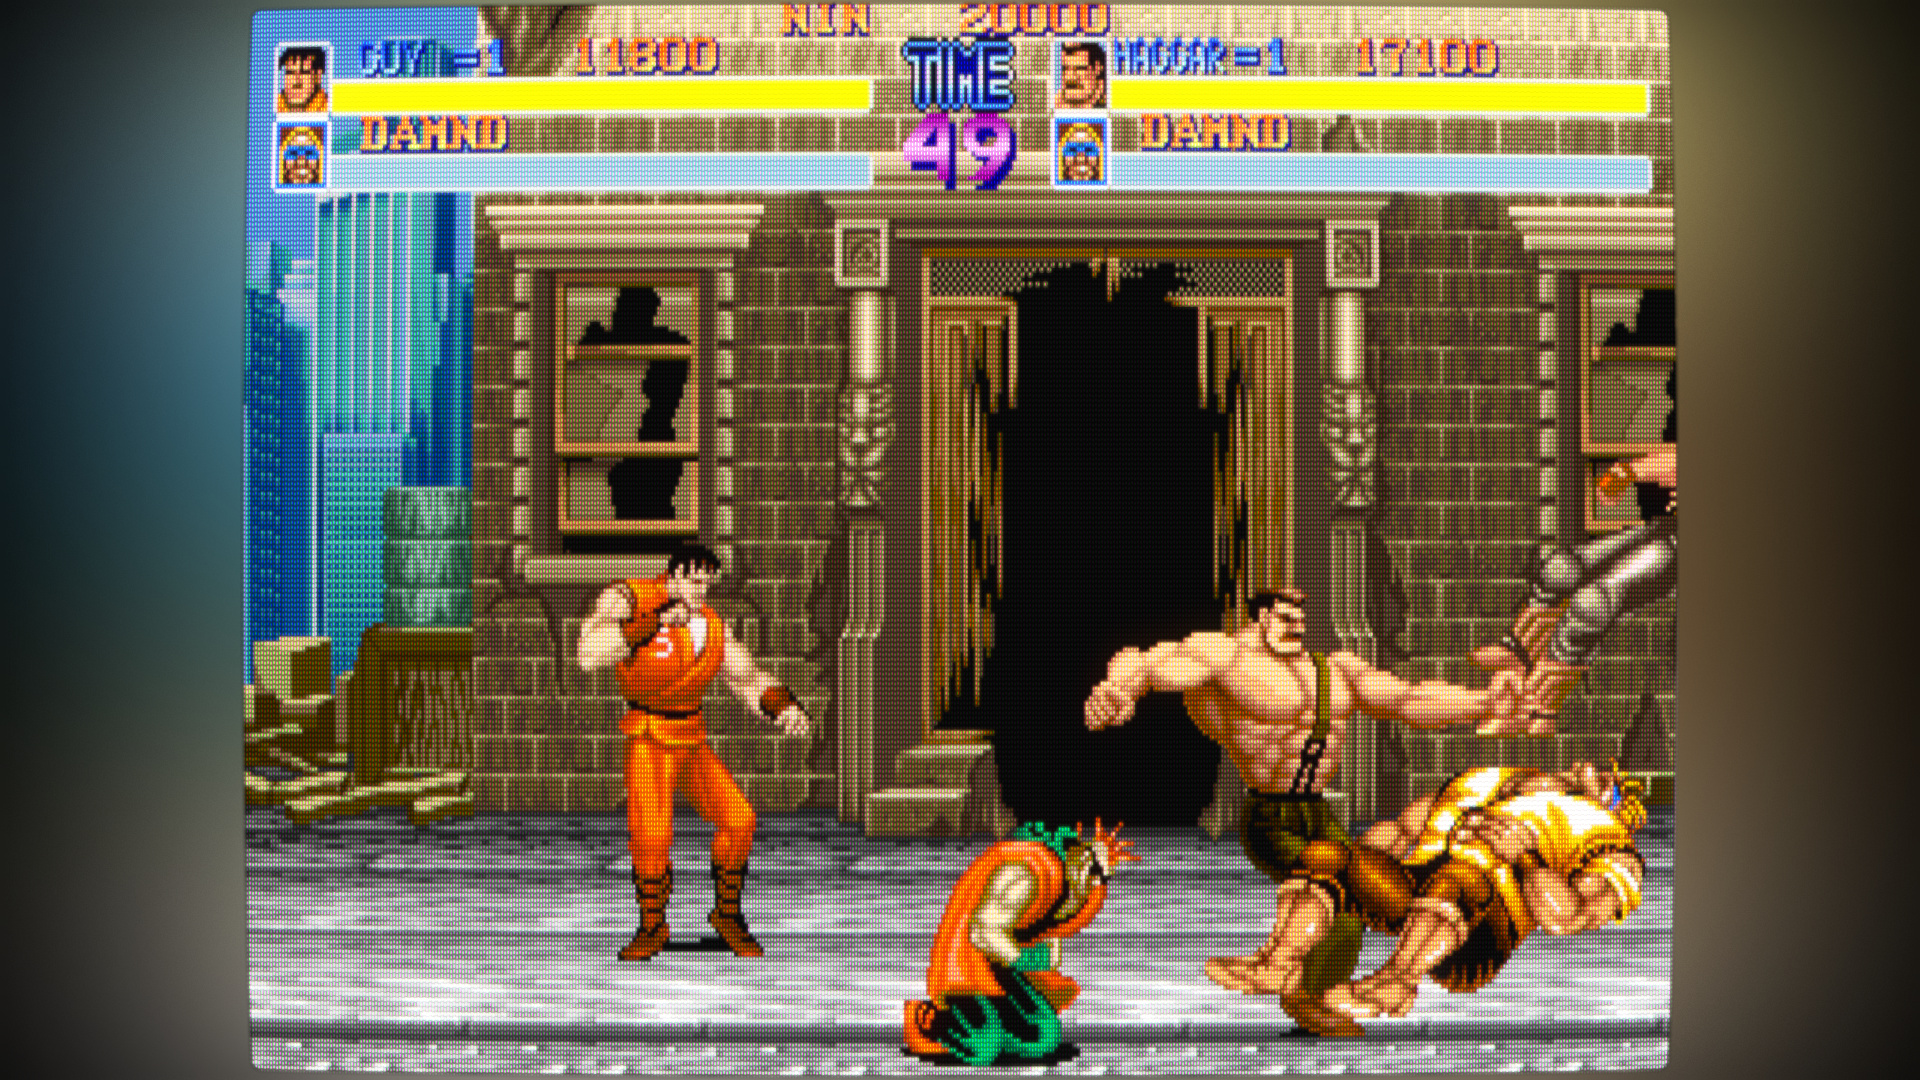
monitor-slotmask-bloom-bezelwider - Arcade - Final fight

monitor-Commodore_1084S-wider - Amiga - ProjectX SE

tv-PAL-my-old - Master System - Trans Bot

tv-NTSC-1 - Genesis - Sonic 2

tv-NTSC-2 - Snes - Aladdin

tv-aperturegrille-bloom-bezel - Amiga - Leander

gameboy_mono_colorized.slangp - Gameboy mono - Super Mario Land

27 Likes

Screenshots look great!

I tried testing it, but looks like you forgot to add curvature.slang to your repository. Retroarch gives that error.

4 Likes

Yep, sorry, and thanks! Just updated!

4 Likes

Thanks! It worked now! I like your slotmask-bloom preset, using scanlines. Good for my tastes. I’m not very technical about crt shaders, so I just gave a completely subjective opinion.

3 Likes

Looks really good! We’re now at a point where we’re spoiled with choices for great looking CRT Shaders!

You can take a look at what I’ve been able to come up with here as well as some other cool CRT Shader projects:

CyberLab Mega Bezel Death To Pixels Shader Preset Pack

Sony Megatron Color Video Monitor

The Guest-Advanced NTSC thread

The Guest-Advance, 100% mask strength thread

Example videos:

This is what CyberLab Turbo Duo for Blargg + Blargg_NTSC_Turbo_Duo_SNES_PSX_S-Video_CyberLab_Special_Edition looks like today!

CyberLab Turbo Duo for Blargg + Blargg_NTSC_Turbo_Duo_SNES_PSX_S-Video_CyberLab_Special_Edition

This is what CyberLab SNES looks like today!

CyberLab SNES

This is what CyberLab Genesis for Blargg + Blargg_NTSC_Genesis_S-Video_CyberLab_Special_Edition looks like today!

CyberLab Genesis for Blargg + Blargg_NTSC_Genesis_S-Video_CyberLab_Special_Edition

This is what CyberLab NES for Blargg + Core Blargg NTSC S-Video looks like today!

CyberLab NES for Blargg + Core Blargg NTSC S-Video

CyberLab NES for Blargg + Core Blargg NTSC S-Video

CyberLab NES for Blargg + Core Blargg NTSC S-Video

You can use MPC-HC, MX Player or VLC Player to view the videos.

Here’s a look at my latest preset!

CyberLab Ultimate Virtual Slot Mask CRT-1P2RTA

New Preset and System Recommendations

TVch34 Overlay

Plus

TVch34 Overlay + Mega Bezel

1 Like

Yeah, I’ve seen your presets, they are great. It seems to me they are targeting 4k resolutions, since you draw the triads horizontal gap too, right?

Do you have any comment or critic specific to work?

1 Like

Thanks!

My presets target 4K mainly but I’ve also tested and optimized presets for 1080p and to a lesser extent 1440p.

Most of them use RGB Mask including at 4K which uses the same mask with a size of 2 which would make it RRGGBB. This is mainly to remain compatible with displays that can’t do RGB Full 4:4:4 at 4K60Hz resolution, like one of my TVs.

Even after testing RRGGBBX masks initially, at 4K60Hz RGB Full 4:4:4, I still preferred RRGGBB because RRGGBBX TVL seemed lower.

However since I realized that in order to get “phosphor” triads to look properly on OLED TVs, I needed to use RRGGBBX mask with reversed Layout, I’ve started to include presets like that for use with OLED TVs.

I’m not one to be too critical, as I don’t even use a real CRT as a reference. I just tweak until stuff looks good to me and your work looks good!

I would just try to avoid making things even the slightest bit blurry especially when viewed from a distance because it’s tough on my eyes.

Keep up the great work!

2 Likes

With the new update you can now:

  • Emulate monitor curvature
  • Emulate a light spot (in the screenshot it is in the top/right corner)
  • Emulate a vignette effect (see in the screenshot that the monitor uniformity is uneven)
  • Emulate led ambient lights; by now the fade speed is slow and costant, but i plan to add a scene change detection euristic somehow to make the fades instant when the scene changes:

This is a WIP, you need to set aspect ratio to full in retroarch for the ambient light border to work. Also, the aspect ratio may be wrong in some configurations.

8 Likes

Love what I’m looking at here , great stuff , I was wondering if it was possible to reduce the bloom radius less than 0.5 , Ideally to pixel perfect level ? the bloom can help restore some color but the “fog” bleeding can reduce the vibrance

The image below settings were adjusted to my display saturation ,it might look too saturated

1 Like

For that maybe you can just disable blooming and use ‘halo’ setting?

1 Like

In the latest commit i discovered the usefulness of mipmaps over retroarch downscaling :slight_smile:

I may be wrong, but when scaling down using simpler scale#n=, even with bilinear filtering turned on, it seems to just discards whole lines.

Indeed I was in the need of a fast way to get the average luminance of the screen, and just scaling down to a 1x1 textures using absolute scale#n gave me just a pixel, probably from the middle of the texture.

Using mipmapping with a looow precision worked good instead and it gave me the perfect average luminance. This was handy to cheaply detect when a scene change.

That way, the “ambilight™” like effect is slow and not distracting when the scene is the same, but will instantly change when the scene changes.

The change is available in the latest commit.

4 Likes

Yes, you’re correct. Using the mips is the best way to get a fullscreen average.

2 Likes

Right then, so I need to rethink some other downscaling passes made for (big blurs) bloom and ambient lights itself. Thank you

edit: also, I wonder if downscaling this way is the correct behaviour of retroarch; since specifying bilinear filtering doesn’t change a thing; same very bad quality; It’s more like a decimation filter than a down scaler.

If you set mipmap_input on for a pass it automatically takes a mipmapped version, so smoothed together if the resolution is lower.

I do this in a few passes in the Mega Bezel, an example is below, the first pass is really almost like the stock shader, but it linearize it so the blurs work properly and blend in linear space.

// Reduce Resolution  ----------------------------------------------------------------
//      Reduce the resolution to a small static size regardless of final resolution
//      Allows consistent look and faster at different final resolutions for blur
//      Mipmap option allows downscaling without artifacts
shader17 = ../../shaders/HyperspaceMadness/hsm/hsm-linearize-crt.slang
mipmap_input17 = true
filter_linear17 = true
scale_type17 = absolute
// scale_x17 = 480
// scale_y17 = 270
// scale_x17 = 960
// scale_y17 = 540
scale_x17 = 800
scale_y17 = 600
alias17 = "BR_MirrorLowResPass"

// Add Blur for the Reflection (Horizontal) ----------------------------------------------------------------
shader18 = ../../shaders/HyperspaceMadness/hsm/hsm-blur-outside-screen-horiz.slang
mipmap_input18 = true
filter_linear18 = true

// Add Blur for the Reflection (Vertical) ----------------------------------------------------------------
shader19 = ../../shaders/HyperspaceMadness/hsm/hsm-blur-outside-screen-vert.slang
filter_linear19 = true
alias19 = "BR_MirrorBlurredPass"

// Reduce resolution ----------------------------------------------------------------
// Reduced to a very small amount so we can create a blur which will create a glow from the screen
//      Mipmap option allows smoother downscaling
shader20 = ../../../../blurs/blur9x9.slang
mipmap_input20 = true
filter_linear20 = true
scale_type20 = absolute
scale_x20 = 128
scale_y20 = 128
alias20 = "BR_MirrorReflectionDiffusedPass"

// Add Diffused glow all around the screen ----------------------------------------------------------------
//      Blurred so much that it's non directional
//      Mipmap option allows downscaling without artifacts
shader21 = ../../../../blurs/blur9x9.slang
mipmap_input21 = true
filter_linear21 = true
scale_type21 = absolute
scale_x21 = 12
scale_y21 = 12
alias21 = "BR_MirrorFullscreenGlowPass"
3 Likes

So If i understood properly, this means i just need to set mipmap_input in the slangp preset and then normally use its scaling parameter and normal texture() lookup instead of textureLod() to get the mipmapped texture?

That would be handy!

1 Like

Yeah that’s what it seems to do, as if it was doing textureLod() and giving the correct mipmap level

4 Likes

Hi there, I just released 3.0 version.

The shader is faster (its gpu usage is under 65% with all of the features enabled on my poor Haswell igpu) and also looks better than ever to me.

The biggest addition is the bezel emulation for which I have to say a big thank you to HSM for allowing me to rip his automagically generated monitor frame to a simple png file.

However, the code implementation is very different from Mega Bezel, because koko-aio needs transparent areas for tube.
Adapting Mega Bezel backgrounds should still be possible with little work.
That said, standard/classic overlays works just fine, you just need to replace background.png and adapt zoom levels, curvature and image border right from the shader options. (see screenshot)

One thing still missing are presets for HiDPI screens.
If you like how the shader looks @1080p and have some free time, there are several options in the Mask area to hopefully make a preset that looks good with higher resolutions.

Yes, screenshot or it didn’t happen, ofc.

Fake, but cheap ntsc emulation:

Running with all bells and whistles and zoomed-in monitor frame

Zoomed out and with a background image reacting to ambient light,
cold color temperature

A standard Overlay, I just elarged “the hole”
with Gimp to allow the reflections to pass through too,
aperturegrille, shamelessly over-bloomed, because why not?

Some relevant changes from the latest releases:

  • Better denoise function
  • Allow to zoom out the output
  • Bezel and reflections
  • Interlace flickering emulation (you should see it live)
  • Several performance improvements (about 5% faster now)
  • Tweaked ambient light leds parameters
  • Better Bezel hilights and reflections
  • Whole image zooming depending on the content brightness
  • Improved scene detection logic for Ambient led lights
  • Bloom: allow to choose how much it affects bright colors
  • Allow to set an RGB Mask size for HiDPI screens
  • Allow to draw a gap between rgb mask triads
  • Presets tweaking
  • VMASK: implemented green-magenta to rgb subpixel layout
  • Add support for RGB offset
  • Add Contrast, brightness and color temperature controls
  • Add support for background or alpha driven foreground images
  • Add new “vibrant tv” and “fake ntsc” presets
  • Improved bloom look
  • Add simple chroma bleed option
  • Code cleanup

Comments always appreciated, critics needed, have fun!

12 Likes

Hi there.

I just saw the new version of the shader. I tested out the NTSC profile of the shader. Do you know how to get a more accurate NTSC effect so that dither patterns and vertical lines like those you see on Genesis games get blended better? Or do I have to mess around with the bandwidth limited chroma bleeding option? Nice shader by the way!

Hi, full NTSC encoding/decoding is just not implemented (yet), so the specific “patterns to color” feature is something you cannot achieve. All of my systems was PAL, so I wasn’t interested in implementing it and by now the only thing you can do is to play with chroma bleeding, blur (input glow) and RGB shifting, but it will trick only untrained, naked eyes :slight_smile:

1 Like

Ah ok, that’s a shame. I really like the “blurry composite” feel of the shader though.