New CRT shader from Guest + CRT Guest Advanced updates

This is looking great :star_struck:, the mask is now monochrome which seems like the right thing :slight_smile:

Yeah ideally we would have only one vignette which is applied at the end/after the crt effect. I had left the one in Grade in the mega bezel chain since it seems to work pretty well, but it works internally by adjusting the “contrast” value inside the pass, It wasn’t obvious how I could ensure exactly the same effect, which is why I hadn’t extracted it from grade.

@guest.r in terms of how the vignette darkness is added in grade vs guest-dr-venom, do you think there is much difference? (Basically Grade multiplies the “contrast” and guest-venom multiplies the color value)

3 Likes

In gdv-advanced, the vignete darken is linear resized to the viewport resolution to avoid banding. I think it can be an advantage with sharper horizontal filtering. Otherwise grade vignette is also very nice, to change contrast can have more appeal.

2 Likes

Yeah I agree, I was concerned that putting the gradient before the upscale might cause problems, and I think this is what @TheNamec was seeing.

Maybe I can figure out how to extract the contrast effect from grade and do the vignette after the crt effect…

2 Likes

I don’t have a lot of experience with monochrome CRTs, but I think they shouldn’t have any mask at all. That is, they definitely don’t have a shadow/slot/aperture mask, and I think they have a phosphor coating instead of individual phosphor segments (like, the whole thing acts like one big phosphor that the single electron gun shines on).

Does anyone have access to one? A black and white TV or an old Apple IIe or whatever would be great.

3 Likes

I had no idea I needed monochrome Soldier Blade, until now.

6 Likes

Awesome! Reminds me of my thread a few months ago. Thanks for integrating this into the shader. BTW, how can I change the color of the cast? Nostalgia tells me the green tint should be a bit on the turquoise side. green

4 Likes

I think the same way and it can be arranged trough shader settings. I guess it’s still better that some effects don’t add invasive tinting.

Standard green P1 phosphors tinting is used here, as with Apple III etc. There are a lot of other options though for green. You can change this by editing the deconvergence pass vec3().

5 Likes

Hello @hunterk! Please give a look to the Mega Bezel thread, we are discussing this as we found some evidence of monochrome displays with some kind of masking. :pray:

4 Likes

Hey @c9f5fdda06, I think I’ve found your green-turquoise! It P31, a late low persistance phosphor.

Look at this, looks like there are many variations

6 Likes

Yoooo, that was cool af, it was really interesting to see those drastically different phosphor decay times. (Ik that wasn’t the purpose of that post but damn boi)

6 Likes

Hey @guest.r

Great shader. I’ve been playing around with the down sampling. Some observations:

You’re using a 3 by 3 kernel somewhat similar to a gaussian to “pre-sample” i.e. blur the input in linearize.slang. The size of this kernel over the source image is controlled by the downsample_level params, but the colors weighted by the kernel here are nearest neighbor samples not linear right? So really you’re just kind of making the blur skip information, if I’m understanding the code correctly. Maybe better would be to increase the kernel size to “catch” more pixels as downsample level increases? Also might make sense to make downsample_level params move in increments of 1.0.

EDIT: Apparently, I must have misunderstood the code. Non integer values of downsample_level do indeed affect the blur.

Also, when downscaling 480p to 240p, I couldn’t get things to look quite the same as a photo of a BVM using hardware downscaler. The shader seems to be averaging every 2 lines, but the wrong two lines. Look at the first and third line of the green “1” from the top:

mvc2-mimo2-bvm

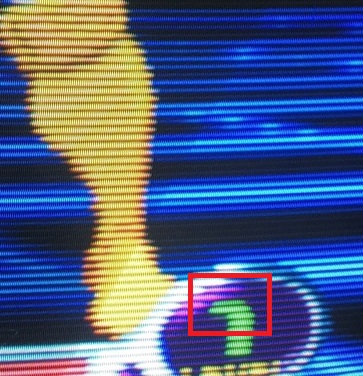
A review of the hardware downscaler used (http://retrogaming.hazard-city.de/mimo.html) writes about a different unit that required vertical shift tweaking to achieve the correct result:

The Benchmark to meet is an Emotia setup tweaked using an Extron interface with vertical shift function (see the two pics above). If set to 240p output, the Emotia will average two adjacent lines of the 480p source signal into one line. On a direct feed the Emotia begins with line 2 and merges it with line 3. The result will be a nice looking progressive 240p signal, but it will not offer perfect sharpness and won’t look 100% like the PCB. For perfect results, the incoming signal has to shifted by one line (up or down). Some games (like Cave’s XBox360 titles) have internal controls to do this and so does MAME. Overall it’s still easier to use an Extron interface to do this. The following two screenshots show the difference. Standard alignment on the left, tweaked alignment on the right (easy to see on the big “1” on the top left, which is originally three pixels high, but spread over four lines without the alignment adjustment)

EDIT: Giving this a little more thought, I don’t think it makes sense. Offsetting by one either way would make line 1 or 3 less green, but in the photo it looks as though both are more green, so maybe it’s a different issue altogether.

Nevertheless, maybe an offsetting feature would be valuable anyway. Do you think it belongs in the shader? I’ve already made a small adjustment to the masks (I added a reversed mask 8 for BGR displays as mask 9), and I’m thinking this sort of thing either belongs in the linearize pass or the main shader. Or, maybe this should be a core / front end feature instead? I think some cores’ overscan features work like this already, so maybe it shouldn’t be a shader feature.

3 Likes

EDIT: I’ll keep this post in case someone runs in to a similar issue, but tl;dr update your drivers

Oh @guest.r I have a bug to report. There’s a huge difference in masking behavior for me between the “vulkan” and “glcore” drivers for me on an Nvidia card. On “vulkan” everything behaves as it should. On “glcore”, it seems floating point precision is better, so e.g.

pos.x = fract(pos.x/3.0);
if      (pos.x < 0.333) mask.r = 1.0;
else if (pos.x < 0.666) mask.g = 1.0;
else                    mask.b = 1.0;

Never goes down the second branch. It’s always just green and blue.

Not entirely sure what the cause is. Well, I do know something, which is in glcore pos.x ends up being 0.3333… 0.6666… and then some number bigger than those two. I know this cause when I changed the comparisons to < 0.334 and 0.667, it fixed it, but turns out only for glcore because in vulkan the number goes something smaller than 0.333, 0.3333… and 0.6666… which is what the code expects and makes sense.

It’s late where I am so I might think about it more tomorrow and see if I can find the actual issue.

EDIT: Updating my driver fixed it lol. Oh man that drove me nuts.

3 Likes

Hey there! I’m glad you’re having fun with the shader. :smiley:

If i talk about ‘dowsampling’ it might be also addressed as ‘fast approximate downsampling’ as i try to avoid some situations with it, like double filtering to output resolution. My motivation to introduce it is definitely nicer interlace/interpolation mode with increased original resolutions, where ordinary filtering would either need a much more complex filter or at least a consistent (horizontal and vertical) pre-filter.

If fast downsampling is combined with standard horizontal filtering and bilinear vertical filtering, then the results are quite nice, maybe some fine tuning is required.

For scanline mode it’s more advisable to use subtle vertical downsampling since any quality would also add some sort of ghosting regardless. HW downsampling is similar to no-dowsampling, it happens in the shader by default.

I adopted/copied this segmenting scheme from the ‘dotmask’ shader, which mostly consists from lottes masks and didn’t find any issues yet. Rounding the values to one digit should be bullet-proof though.

A BGR mask could be added, i guess it makes a difference on a appropriate display.

New Release Version (2021-09-04-r1):

Notable changes:

  • Mask 9 added for BGR panels.
  • Mask calculations ‘improved’. Should work as intended with some drivers now.

Download link:

https://mega.nz/file/R9ZywbxD#6wCfas_GMSuax2TaxRLGBtP94XfWIXyRMoIjWu1a6ts

8 Likes

Hello there. I have been messing around a little bit with your preset(s). It’s very cool for crt looking, thank you a lot for sharing !!

I have made this little modding but not really sure if may fit some of your taste guys, if you would have any suggestions to improve this little preset I’d appreciate it quite a lot !

CRT guest.r main folder shall be placed in shaders folder as well as the preset from above.

This is how would be looking in action:

3 Likes

Seems to the Overscan X pixels is missing

1 Like

Yeah, why not. :smiley:

New Release Version (2021-09-07-r1):

Notable changes:

  • OverscanX option added.
  • Overscan range expanded to max. 100 px.

Download link:

https://mega.nz/file/tsYRnaLL#FFJdAyuHRmteDetE7dvTQ6_C3_IwAMYvvgl3pgf_eA4

6 Likes

Hey @guest.r! Here’s the video for C1201 monochrome dark amber gameplay, an exclusive sneak peek of homebrew Prince of Persia on Commodore 64 Breadbin from my work in progress Mega Bezel Commodore Pack just for you!

Once more, I’d like to thank you and mighty @HyperspaceMadness for your black magic dev support! :v:

4 Likes

That’s very nice! Not to mention the playing skill… :smile: I guess it will look even more interesting with the NTSC preset, even although i’m from a PAL region. See no harm in it if we adopt the excellent NTSC shaders for a while. :grin:

4 Likes

Sooner or later we will have NTSC and PAL passes in our Mega Bezel toolkit… I’d like to try and replicate those crossed artifacts we observed in our monochrome quest!

For now, we have to enjoy plasma hi-definition sharpness :grin:

5 Likes