
Okay, thanks. There certainly are a lot of settings to play with. One thing I noticed is my presets look a bit soft and need a bit sharpening.
1 Like
Yeah, many times i noticed that “playable” also correlates with a bit more sharp appearance.
Some presets, also from my tweaking, look very appealing on screenshots, but i like to play games with other tweaks and setups involved.
With guest-advanced standard shader you can also crank up the Smart Edges Effect Strength parameter. It sharpens the edges quite well without general pixelization, which can be annoying.
2 Likes
I think it will be nice to have it as an option even if it not accurate, unlike the case of other CRT/Analog things/effects I think this effect dont need to be that accurate in act like the real crt, I think this effect will give the experiment better vitality (similar to the need of RF noise effect and others)
this is a nice update for “NTSC Preserve Font”, anyone using it with other presets will need to check the settings since old presets will need an update since any old value now will mean “NTSC Preserve Font = off”
2 Likes
Yeah, i thought about it too, some new improvements are incorporated, but parameter range and functionality has reverted in the last version.
This is a multiplex problem, it’s either computationally very intensive or extra passes are needed - for a moderate line brightness analysis. It starts how mip maps work, only bi-directionally and ends with breaking preset compatibility. If i add this to what i already wrote then hesitation is the only logical thing to do. I’m open for improvements, but the whole situation must be accounted, even the effect popularity. 
2 Likes
I did more tests, and I find that the “fine” text in RE1 in PS1 is not that readable even with 0.60
here some images form real CRTs


2 Likes
Unless a game produces a lot of 2D dithering, which look quite nicer when blended, then it’s much better to find a different artistic approach to play it with shaders. MDAPT is an option too, if you find an example of a game, full with “blended” text and dithering which responds to the font feature in a bad manner.
That’s the basic idea of the font clearing feature.
It’s quite simple to add an alternative implementation, but this would resolve too many unwanted “bar” situations. That’s why the current implementation (i tested a couple alternatives) is the best compromise regarding font clearing. Namely contrast based font clearing. RE1 could have low contrast fonts, then unresolved situations can happen.
Regarding the screenshots, these menu fonts definitely fit into the “large font” category. They shouldn’t be a problem and NTSC font clearing feature is more or less for “1px” fonts, which get blended.
2 Likes
New Release Version (2026-07-12-r1):
Notable changes:
- PAL Delay Line parameter value descriptions added
- PAL alternate UV chroma filter changed
- PAL minor tweaks and cleanup
- NTSC “4-phase” chroma now looks like 3-phase
- PAL Chroma Scaling/Bleeding parameter added
- PAL Big De-dithering Booster fidelity improvement
- Various small improvements (PAL, NTSC)
- NTSC Preserve Fonts improvements, better false-positive mitigation
Download Link:
https://mega.nz/file/AoxBSBAL#xp4_17q_AYXbiq2miPmAUleSXsxSIylS02sgaTa-4yo
14 Likes
Apologies if this has been asked, this is a huge thread and search doesn’t help much.
I can use the 3 ntsc passes on their own if I’d like in a custom preset, but pal is a bit different in that pal-pass2 wants to use the output of “InterlacePass” and not “PrePass0”. Is the interlace pass actually needed or can I safely ignore it (and just use the “InterlacePass” alias for the prev pass I guess).
2 Likes
You are right here.
You should include the original interlace pass, if you want it’s functionalities, but a stock shader or any effect shader with regular RGB output with an appropriate alias (InterlacePass) will work also.
2 Likes
Greetings @Guest.r I’ve been trying to optimize my shader chain to make it as efficient as possible without altering it’s visual output. I know the stock pass is supposed to be just a passthrough shader. Claude AI suggested that it was safe to remove the stock pass #9 across my preset pack.
I would like to know if there are any potential downsides to this and what was the original intended purpose of including this stock pass there in the first place?
Claude AI’s output:
What I checked
I traced every one of the 19 passes’ actual data dependencies (not just guessing from names) — who reads whose output, which passes need feedback/history, which need specific resolutions.
 Verified safe: Pass 9 (
 stock.slang , aliased “PrePass”) is dead weight.
It’s a pure 1:1 copy pass ( FragColor = vec4(texture(Source, vTexCoord).rgb, 1.0) ) whose only purpose is to expose its output under the name “PrePass” for later passes to sample. I grepped every downstream shader this preset actually uses (the -ntsc / -new variants) and none of them reference “PrePass” by name — they all read “NtscPass” (pass 8’s alias) directly instead. This is a leftover from a more generic version of the preset. I also confirmed pass 10 ( avg-lum-ntsc , the very next pass) already independently requests the same mip/filter settings pass 9 was providing, uses only .rgb (not alpha), and pass 8 already outputs alpha=1.0 same as pass 9 did. Deleting this pass is 100% output-identical. → 19 passes → 18.
On another note, would it be possible for you to add a 3rd “true” BGR Mask Layout option in addition to the current RGB and RBG which are less than optimal visually and in terms of subpixel and subsequent phosphor appearance on my BGR display?
I have collected several photos pf the screen which I can share if you need further visual confirmation of the “issues” with using the “wrong” subpixel layout at least in my case.


1 Like
Is this a thing that can actually be done??? :o
3 Likes
This was with my extended mip-map testings when i implemented the “redundant” stock pass:
If a pass had mip-mapping enabled, then sampling from a smaller buffer size (which the custom-fast-sharpen.slang does, as it has some pre-sampling included - namely the ntsc shaders scale 2x horizontally later), then texture sampling always blurred the image output. Claude can be a wonderful tool, but it’s lacks real-time and first hand testing abilities in regular cases IMO.
So this stock pass saved the situation, it was not like a part of an experiment and then forgotten by coincidence. 
So to say, a pass with usable and active output produces blurry sampling in RA with relevant drivers if it has mip-mapping enabled. The stock pass does not produce usable products besides for the avg-lum-ntsc.slang in which it’s referred as Source.
Long story short, a referenced pass with mip-mapping enabled was a no-go for further passes.
It should not matter too much with aperture masks, but it would make slot-masks out of alignment in many cases - most current RBG masks (zoom included) work as intended, some have some special hacks on it.
The R, G and B sequence when comparing ‘RBG’ and ‘BGR’ is identical, it’s only shifted. So the panel interaction should be the same.
But you can test it yourself in deconvergence passes:
deconvergence-ntsc.slang, line 512:
if (mask_layout > 0.5) mask = mask.rbg;
Just change .rgb to .gbr.
or replace with:
if (mask_layout == 1.0) mask = mask.rbg; else
if (mask_layout == 2.0) mask = mask.bgr;
And increase mask_layout parameter upper range to 2.0.
1 Like
This is quite interesting. How would I know which shaders are optimized and which aren’t? Is this a trivial optimization? Is it something that can be coded into a separate shader or incorporated into adaptive-strobe-koko itself?
I’m guessing that this applies to any shader appended at the end of the chain as well?
This sounds really amazing! I’d like to see this kind of optimization everywhere!
1 Like
Thanks so much for this @guest.r, just sharing this little snippet of code has opened my eyes tremendously and has demystified quite a bit concerning the structure and syntax of slang code.
I’ll only be able to test later but I have already made changes to the file, however, I chose approach B and I added BRG one time just for good measure.
Is there anything I should be concerned about with respect to line 783:
`if( zoomed ) { if (mask_layout < 0.5 && bsm_offset) sm_offset = 1.0; else if (bsm_offset) sm_offset = -1.0; }`
Since it is based on conditions which consider only the first two Mask Layouts 0 - RGB and 1 - RBG, would this line or section of code need to be expanded to take into consideration the new variables/scenarios posed by the new, additional Mask Layouts?
1 Like
There was a lot of testing involved, also a line above is a part of these adaptations. Just want to say that in general the relative RBG and BGR layouts favour and “dislike” same panel types. BGR would need a set of slotmask specific hacks though - with lots of testing involved.
One can add multiple layouts, the only limit is relevancy. And it’s to be minded that layouts which produce the same sequences, only with shifts, are more or less to be considered as a “same thing” unless the TVL is unrealistically low.
1 Like
Can you elaborate into simpler language please? I don’t want to pretend that I’m 100% sure I know what you’re talking about. I know in the past I’ve read that you can’t use a literal 1:1 RGB Mask Layout with a display that has an RGB subpixel layout and that the mask needs to be reversed. Firstly, is this correct and secondly is this what you’re referring to above?
I don’t mind doing some testing if it might help me get cleaner, more 1:1 looking subpixel masks on my display.
It’s just about panel subpixel shifts:
RGB:  RGBRGBRGBRGBRGBRGBRGBRGBRGBRGBRGBRGBRGBRGBRGBRGBRGBRGB
RBG:  RBGRBGRBGRBGRBGRBGRBGRBGRBGRBGRBGRBGRBGRBGRBGRBGRBGRBG
BGR:  BGRBGRBGRBGRBGRBGRBGRBGRBGRBGRBGRBGRBGRBGRBGRBGRBGRBGR
It’s definitelly as close as could it be to “same thing” (RBG and BGR) on panels with horizontally aligned subpixel triads.
It eludes my imagination a bit (without testing) how it affects non horizontally aligned layouts like
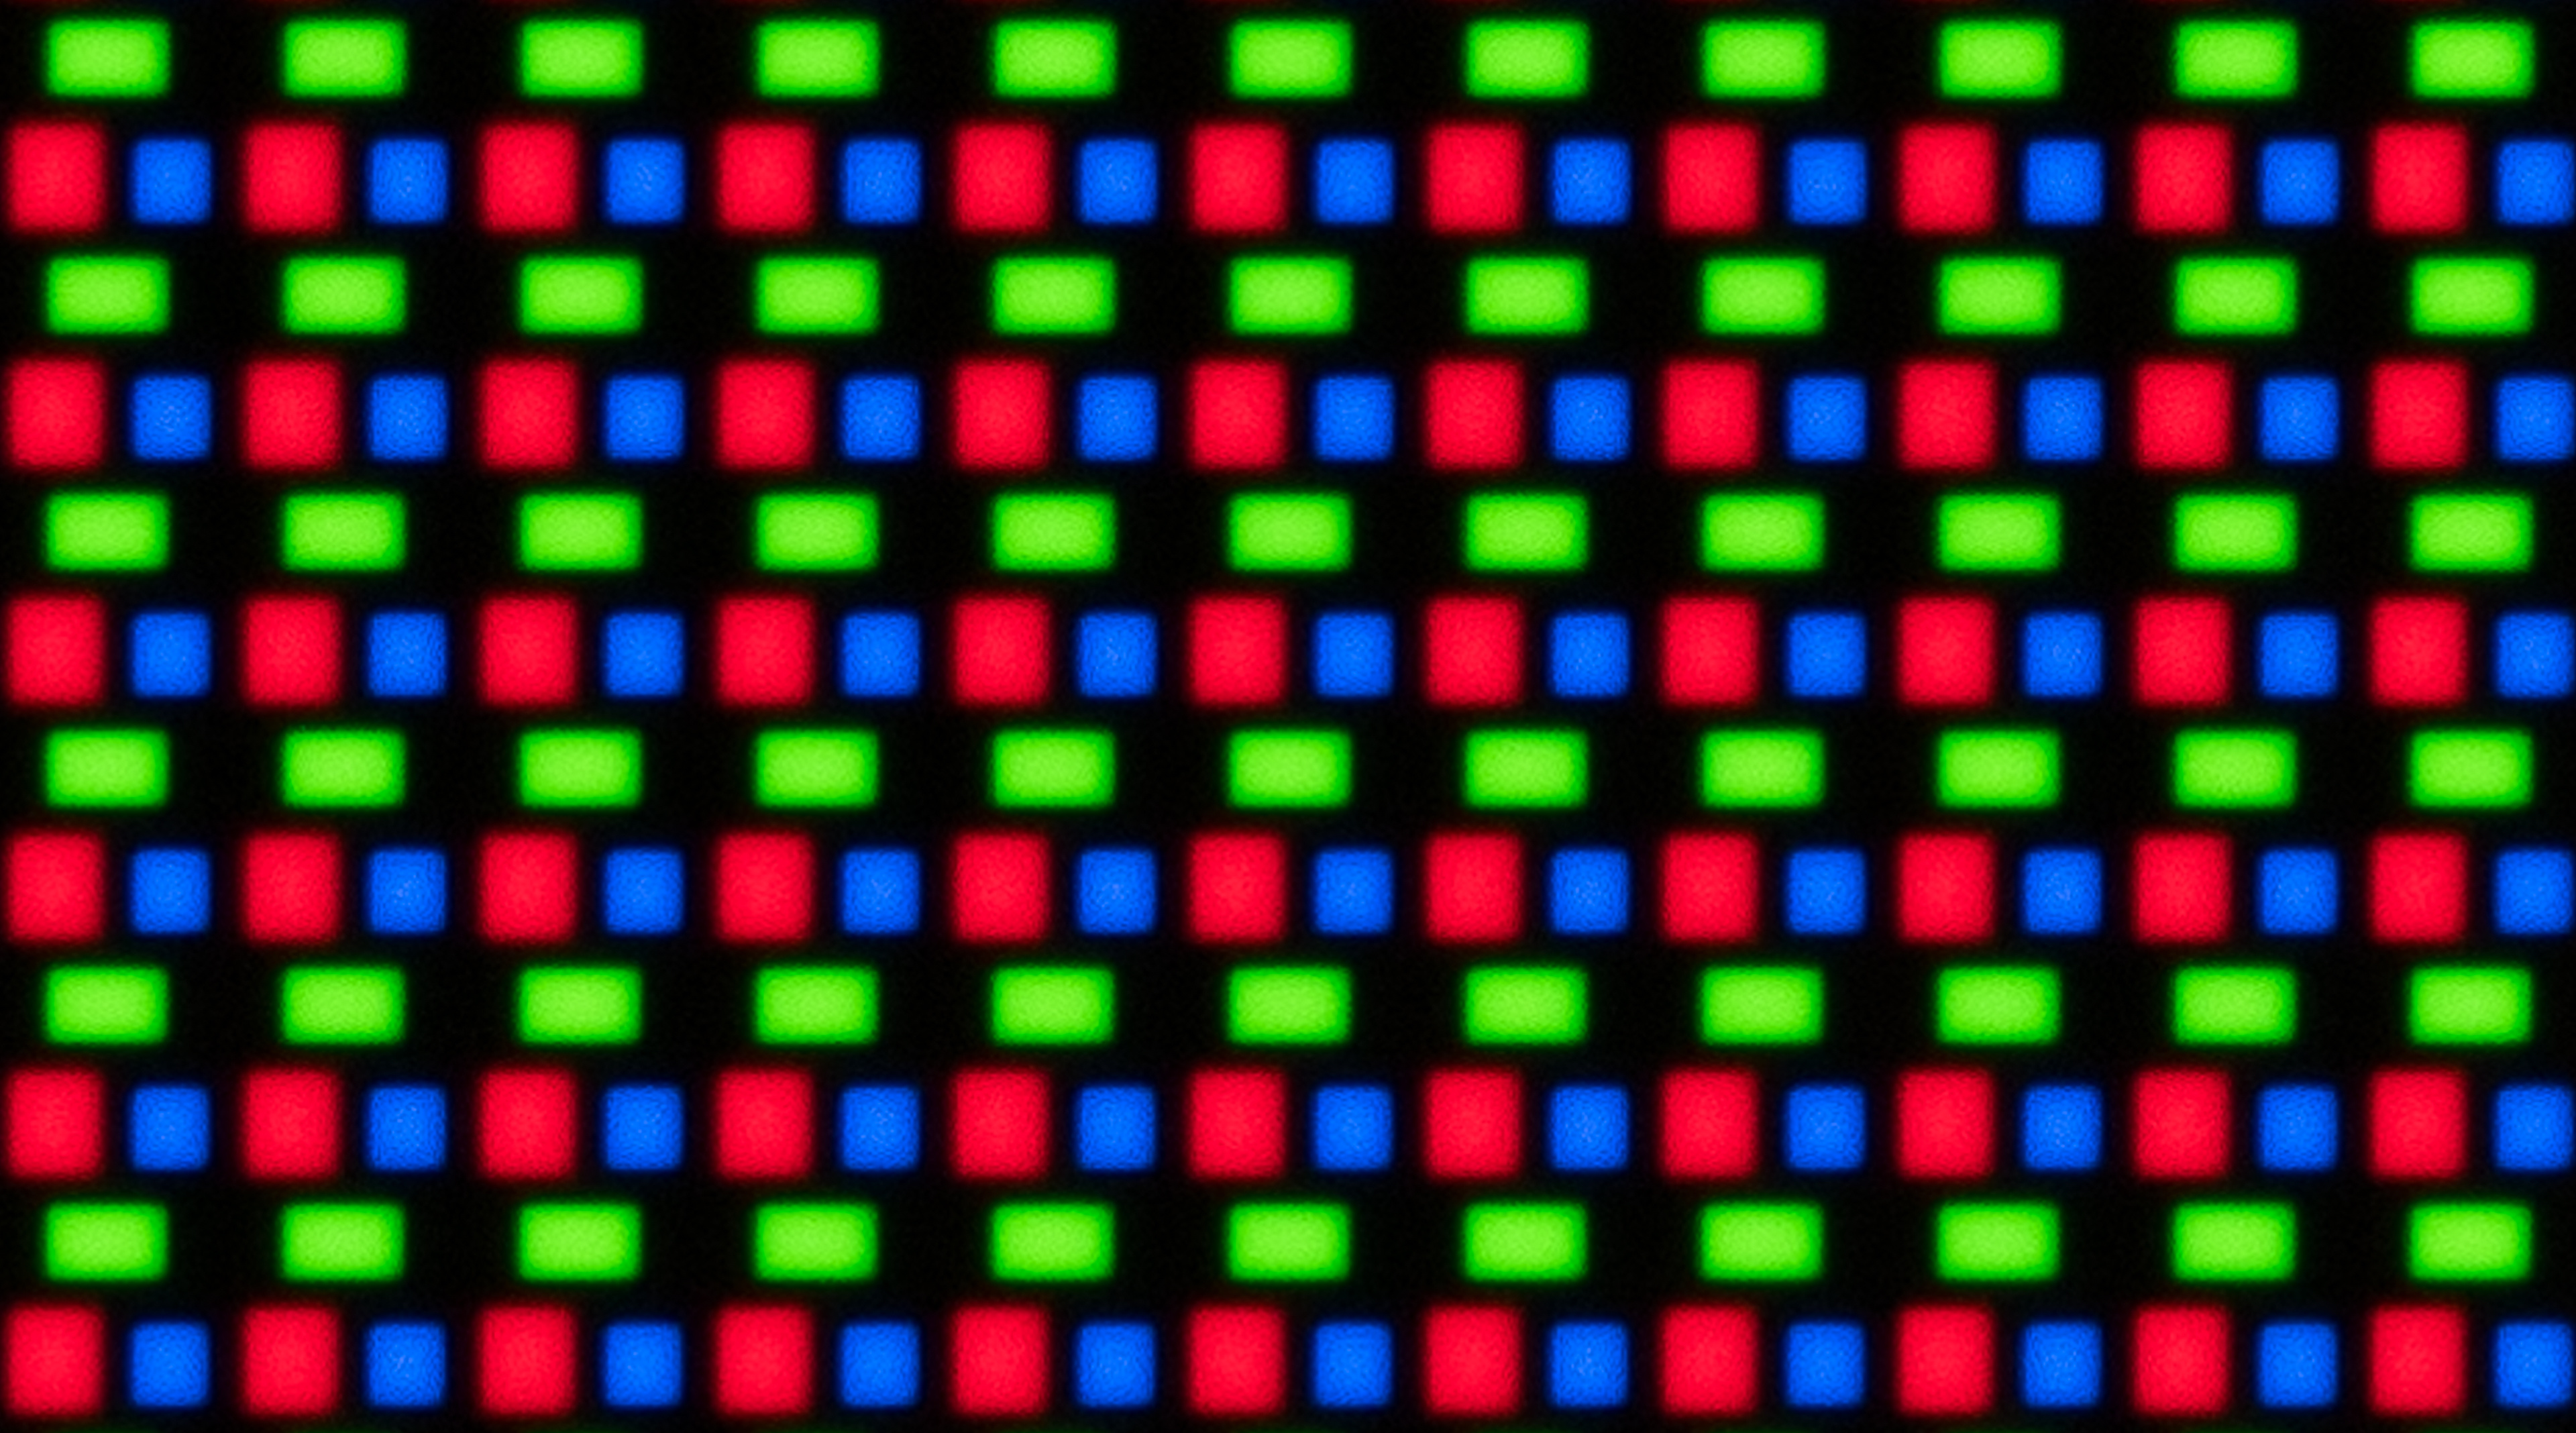
So i’m not rushing to offer some solutions, maybe even BRG is relevant…i guess some feedback is needed first.
2 Likes
The case of RWBG WOLED displays shows us that at least for those panel types RBG and BGR are not interchangeable.
In my case, from the photos I took and my observations, RBG looks like Magenta/Green on my display, which led me to question my display’s subpixel layout. I resorted to using the RGB layout, however on closer inspection this seems to produce tight clumps of red green and blue subpixels flanked by proportioally larger black gaps where everything is supposed to be evenly spaced.
Now that I have edited the Mask Layout options, further testing and confirmation is sure to follow.
As far as whether or not BRG is relevant, we’ve already documented how poorly WOLED displays can perform when paired with the “wrong” subpixel layout. My extensive testing has confirmed this, xxxx’s frustrations with his 1440p WOLED panel confirms this as well as @PU786’s initial photos also suggest this, however we need to get further confirmation since his display might have inadvertently been in ycbcr422 colour fdormat.
Based on what we’ve been seeing so far, it is not far fetched to at least hypothesize that the subpixel order in the mask can have a significant impact on whether or not the mask is rendered correctly or a garbled mess, at least or especially on WOLED displays.
1 Like
If anyone wants to test it, here is the modified deconvergence-ntsc.slang (2 more layouts added).
It’s just to be copy/pasted into the right folder after extraction.
1 Like