Didn’t make a difference for this issue, so best we stick to the standard level of precision.
Edit: Totally unrelated to the issue at hand, but i just had the thought that those Luma primaries are only correct for Rec 709/sRGB. So we might want to use alternate Luma coefficients for other gamuts. (Rec 601 would be 0.299, 0.587, 0.114 for example.) I’ll experiment with this at some point down the line. It might be correct to just use the 701/sRGB values at all times anyway, since we are starting from a 701/sRGB baseline.
Good idea but shame it hasnt resolved the issue. My guess its something to do with the built in functions giving poor precision - I cant remember whether Ive put the high precision tag into it (I think its a pragma).
Scratch that its a glsl thing - thats a point does this behave the same across hlsl and glsl - both vulkan and d3d11. Lilium doesnt work for vulkan does it.
It does. You have to uninstall the DirectX version of ReShade and then install the Vulkan version. (Or you can try to install both at once, but that was crash-prone for me when i tried it.)
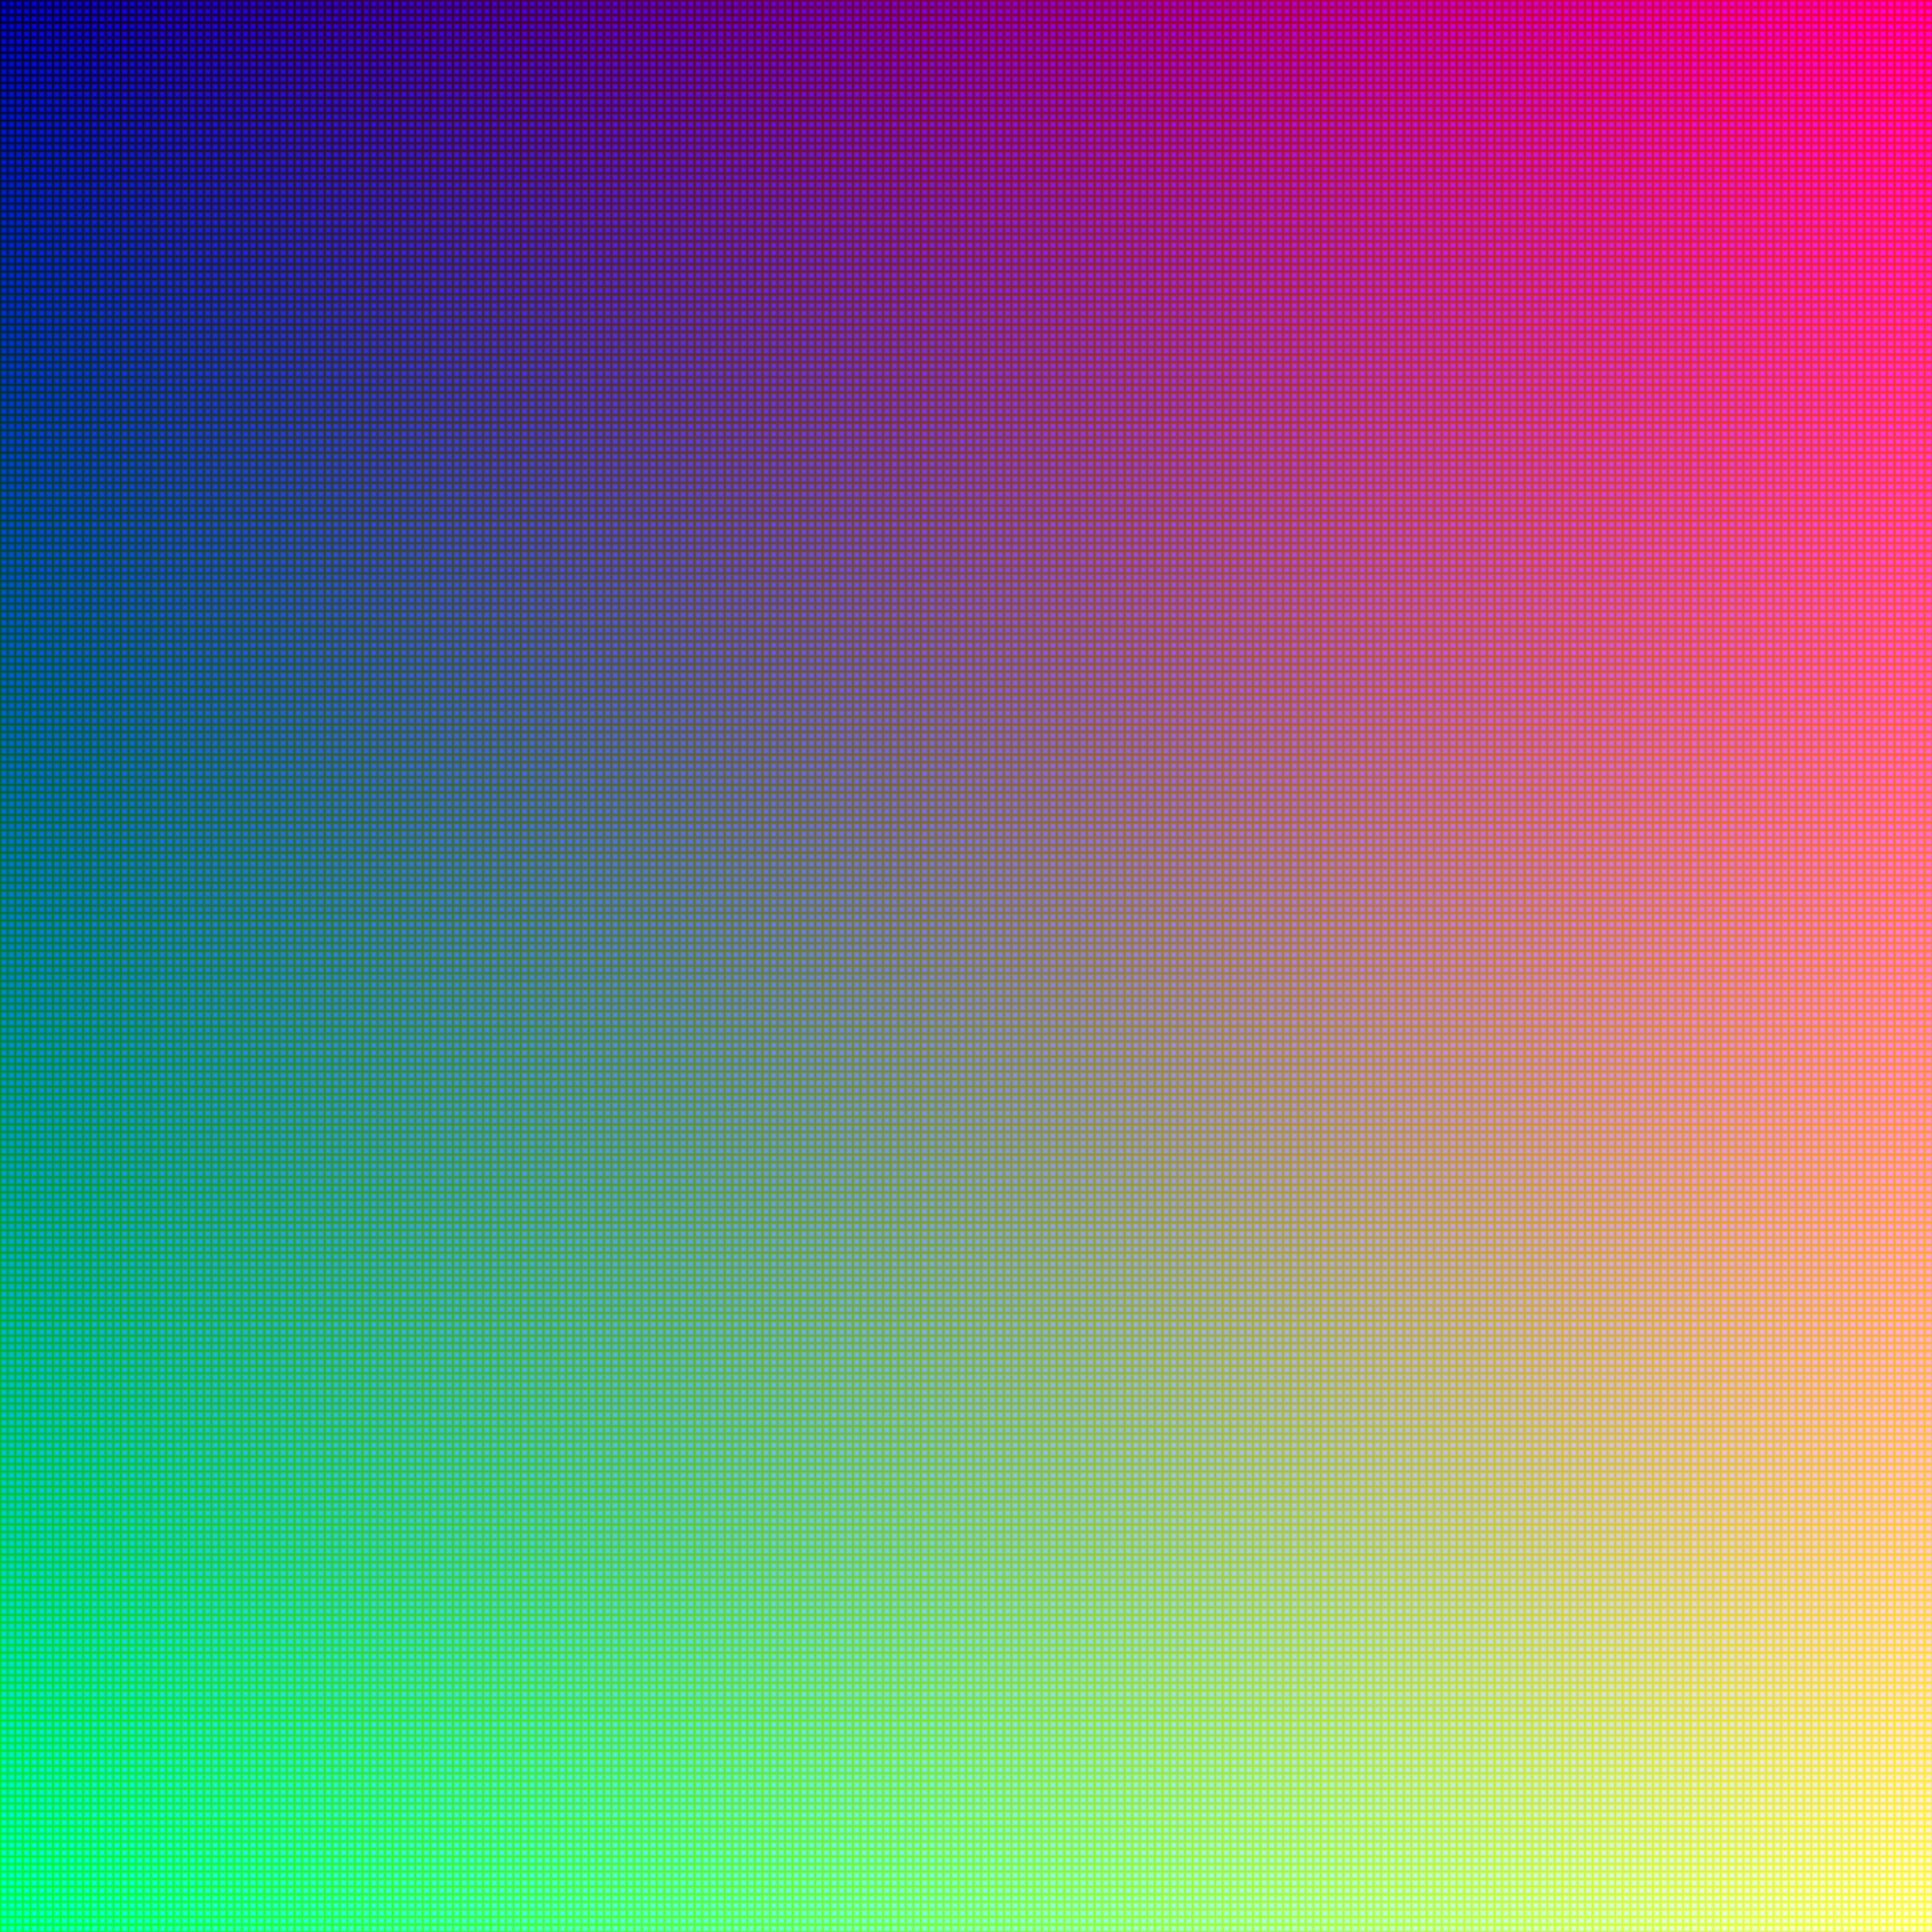
Loading the previous image results in the same gamut pattern as it did previously, so something about the difference between the two images seems to effect the way the error presents itself.
So i strongly suspect something in the “Inverse Tonemap section” is part of the problem, at least for RetroArch’s internal HDR.
Partly because bypassing it by changing
vec3 InverseTonemap(vec3 sdr)
{
   vec3 hdr;

   if (global.inverse_tonemap > 0.0f)
to
vec3 InverseTonemap(vec3 sdr)
{
   vec3 hdr;

   if (global.inverse_tonemap > 1.0f)
eliminates the more extreme error color dots. This isn’t an actual solution to the problem unfortunately, as it also makes the black dots (missing colors?) within the target gamut more prominent, and undersaturates/undershoots the red primary.
Relatedly, what was the “Inverse Tonemap section” based on/derived from? As far as i’m reading, the usual method for mapping SDR content into HDR is something like:
Mapping from SDR (BT.709) to HDR (BT.2100 PQ)

The conversion consists of the following sequence of transformations.

1. Mapping the SDR content (signal E’SDR) out to linear display light (FD_SDR) using the
BT.1886 EOTF (gamma 2.4) assuming the screen luminance (LW) reference setting is
100 cd/m2, and screen luminance black (LB) is 0 cd/m2.

FD_SDR709 = BT.1886_EOTF( E’SDR709)

2. Converting the colorimetry from BT.709 to BT.2020 using the color conversion
matrix as specified in the “M2” transformation in BT.2087.

FD_SDR2020 = BT.709toBT.2020 ( FD_SDR709 )

3. Scaling the peak white to 200 cd/m2.

FD_HDR = SDRtoHDRscaling ( FD_SDR2020 )

4. Mapping the HDR linear to PQ using the PQ inverse-EOTF.

E’PQ = BT.2100_PQ_EOTF-1(FD_HDR)

The BT.1886_EOTF and BT.2100_PQ_EOTF-1 are applied to the individual red, green
and blue components.

The SDRtoHDRscaling function is a simple multiplication of each component by a
factor of 2.0.
I see where step 2 (“HDR10 section”) and step 4 (“LinearToST2084”) are happening in RetroArch, but the “Inverse Tonemap section” seems to replace both step 1 and step 3 using a methodology i’m having trouble understanding?
It seems scummvm is particular bad with this issue which the screenshot was taken from. I can alleviate the artefacts in other cores by adjusting vertical attack.
In fact, the exact same games in dosbox aren’t displaying this issue like they are in scummvm so I’m guessing it’s related to how the latter is scaling 320x200 to 4:3? It isn’t an issue with other shaders in scummvm though
These are the most convincing shaders I’ve used! It took me a while to get it to work on retroarch with my LG C1, I had to switch to d3d12 drivers and disable then re-enable HDR based on some other users advice earlier in the thread. Once that worked, I was blown away!
I was just wondering; the shaders are quite darker than what I’m used to (vs when using HDR with no shaders, it’s eye searingly bright and using black frame insertion is no problem). Is this inherent to the shader or is my TV just not bright enough?
I noticed that once an HDR shader is enabled, none of the HDR settings in retro arch and the shader parameters do anything anymore (ie changing contrast, paper white, luminance). This problem goes away when the shader is disabled.
They definitely are in terms of accuracy at the moment.
Yeah, it might be a bit tricky to setup at first since they’re so different. In addition to that there was a bug which completely broke things when using the Vulkan driver but that has since been fixed so I suggest you update your Slang Shaders using the Online Updater. Then you should be able to use Vulkan again.
I can relate to this. No hyperbole.
Your model TV should be more than bright enough.
Could be some bugs. Update your shaders be sure you’re using the latest RetroArch and I’m not sure if the built-in presets were updated to accomadate a recent change to the shader but you can also try my preset pack as starting point if you wish.
You really need to get your Paperwhite and Peak Luminance values correct. Do note that on some LG OLED TVs, HDR Game Mode is much darker than the brightest HDR Picture Mode (which happens to be called HDR Bright Mode on my TV) so if you calibrated things using the brightest HDR Picture Mode and maybe switched to HDR Game mode after, things may not look correct and vice versa.
My preset pack is tuned for HDR Game Mode on my TV.
You’re supposed to get the Peak Luminance Value from RTINGS (or some similar source) then set the Paperwhite Luminance to where it looks good.
You can probably use the 240p Test Suite or a game with a white screen being displayed to assist in adjusting this.
Here’s my preset pack, feel free to post an update as to how things worked out.
Be sure to tell others how awesome this shader is and there’s even a ReShade version!
On another note, can anyone figure out and share how to properly screen capture both stills and video while using this shader so that if another user watched it will trigger HDR mode on their display and they should see something that’s at least close to whay was recorded barring any differences in subpixel layout?
Can you talk a little more about this? It may be unique to different models. On my LG brightmode is for SDR content and what it does is unlock the white subpixel to push brightness.
The HDR modes all force unlock the white pixel.
On my TV it’s clearly darker in “HDR Game Mode” than “HDR Bright Mode” - which is what the brightest HDR Picture Mode is called on mine. On other models the names might be different for example I think I’ve read that HDR Vivid is the brightest Picture Mode on another model but even on that one HDR Game Mode was darker than the brightest mode. Meaning out of the box brightness when you switch between the modes.
I’m not sure if this would have any limiting effect on our ability to use the maximum potential of our TVs using HDR Game mode because we set the brightness to whatever we want using the Peak Luminance and Paperwhite values.
This is what RTINGS has to say about the relative brightness of “HDR Game mode” on 3 different LG OLED TV models.
In all cases HDR Game mode was not the brightest possible HDR Picture mode. My TV is an E6P, so that makes 4 models so far where HDR Game mode is not the brightest HDR Picture Mode.
I’m not talking about any SDR modes at all. On my LG OLED TV the white subpixel doesn’t come into play at all when using Sony Megatron Color Video Monitor because it uses the RGB subpixels to generate all colour including white. I’ve tested and proven this. If I pull up the RetroArch menu overlay then the white subpixel becomes active.
Unless something has changed that I don’t know about LG WRGB/W-OLED Panels use a maximum of 3 subpixels at the same time per pixel. Never 4 so never WRGB on at the same time. These shaders address the RGB subpixels directly so I don’t see how or what is going to cause the white subpixel to turn on when the shader tells the display to use max RGB values to get max white.
This has to do with the mask accurate vs color accurate setting. The mask accurate clamps color to RGB and the ‘accurate’ mode will allow the use of the white sub-pixel to better achieve the paper white you selected – I believe this to be the case. For example, 200 nits paper white isn’t HDR so no need to ‘push’ using white. 500+ paper white (and color accurate) and it will definitely make a difference.
I don’t use Colour Accurate Mode because I’m trying to simulate RGB phosphor triads so I don’t want to see any additional subpixels being lit and I also don’t like to see any other colour subpixels besides RGB. That’s just my preference however.
The Colour Accurate mode also causes additional subpixels to be lit due to differences in the primaries requested by the shader which may not quite match the subpixel primaries of the display. You can feel free to test the “white subpixel being active in order to better achieve the selected Paperwhite brightness” though.
Whether or not it will make a difference isn’t really that relevant to me because I’m getting all the brightness that I need and the phosphor appearance that I prefer even without it being active. I can’t even understand or remember why we’re discussing the white subpixel.
Are you having any brightness issues using either Colour Accurate or Mask Accurate Mode?
Feel free to take a read from this post which touches on some of what we have been discussing here:
OK, no problem; just sharing some of my findings. BTW any idea if/when the OLED mask will be integrated into some of the other shader projects? I’d like to try it with the guest.r shaders.
I also have a C1 and have found Megatron to be sufficiently bright with Retroarch’s internal BFI set to 1 and the C1’s BFI off.
RetroArch’s internal HDR settings should be disabled when Megatron is active, so that is normal. Megatron’s shader parameter settings not working is odd tho.
Just to verify, setting the Megatron’s shader parameter paper white to 0 isn’t making game screen go black?
No problem and thanks for sharing. When you said you “believe this to be the case”, I thought you might have taken the next step and done some further testing and provided us with some photos for example.
That mask layout came from CRT-Guest-Advanced. It’s Mask Layout 1 (BGR).
These are the kinds of real world experiences that I like to read about. I could just imagine how buttery smooth that must be.
hello I have a friend who will lend me a Sony BVM-HX310 so I will be able to do a lot of tests so I would like to know if it is a good screen for megatron shaders or if there really is no point in doing tests on such a screen
Of course this should be a good screen for the Megatron Colour Video Monitor Shader. The only thing is @MajorPainTheCactus is busy these days so he might not be able to respond to your request in a timely manner.
As for me, I don’t mind if you put my Sony Megatron Shader Preset Pack for a spin and give me some feedback.
You have to at least take some high quality photos and video of it in action though! This could be a real opportunity to showcase what this Shader is truly capable of. Feel free to ask for some recording/photography tips.
Remember your room should be completely dark with the camera properly stabilized. Use Manual, Fixed Focus, Fixed WB and 1/60 Shutter Speed. Set an ISO that will properly represent the real world brightness and black levels (so not too bloomy looking) when played back and lower your ISO if capturing from close up so that we can see the correct RGB phosphor colours without the bright colours being overblown (overexposed).
Remember to set the Mask Layout to match the layout of the display.


