Working scanline overlays, aperture grill 5x overlay

Since many of the scanline overlays that come with retroarch don’t work right, I made some that do.

Since I wasn’t happy with the Mame RGB effects that I could find (with the exception of mame-cools-4x) I also made an aperture grill overlay for 5x scale at 1080p. I also made a 4x scale version.

I think the 5x aperture grill overlay looks pretty good at an opacity of no more than 70%, with the backlight (NOT brightness) of my display at 100%.

However, I’m noticing some strange artifacts when I try to use the aperture grill overlay on my raspberry pi. Most noticeable is a diagonal line going through the middle of the screen that starts in the bottom left corner and goes to the upper right corner. The top half of the screen is slightly darker. This is most noticeable when opacity is set to 100%.

Can someone please test this to see if they can replicate it? I’m wondering if this is an issue specific to how the raspberry pi is rendering video and I haven’t tested it on another machine yet. I only notice it with overlays that draw a lot of fine vertical lines across the entire screen.

edit: another retropie user with a pc tested the overlay and confirmed that the problem is occurring on the raspberry pi only, so it’s either something to do with the version of retroarch (Linux?) or something to do with how the raspberry pi is rendering video. Can someone with a Linux PC test this? That way I’ll know if it’s the version of retroarch or the raspberry pi that is causing the problem.

Here are the links to the overlays.

scanlines 1280x720 3x scale:

scanlines 1920x1080 4x scale:

scanlines 1920x1080 5x scale:

scanlines+aperture grill 1920x1080 5x scale:

scanlines+aperture grill 1920x1080 4x scale:

handheld (Gameboy, Gameboy Advance, Game Gear) overlays;

double-post

bump… can these be added to the repository?

added a bunch of overlays for use with handhelds

I haven’t tried the handhelds yet, but the only one of the scanline/aperture grill overlays that’s matching up on my machine is the 1280x720 one. The others are all uneven here using windowed integer scales.

That’s odd because I tested all of these and everything is fine on my end. Dumb question maybe but did you set your video output resolution to match the overlay resolution? I know that for me the overlays get scaled if they are larger/smaller than the screen size and this causes unevenness.

Also, are you sure you are getting the right file? I don’t think right clicking the image will work; I think you have to follow the download link.

Did you try opening the file in GIMP to see if there is unevenness there? They look fine, here.

Uneven was the wrong word. The spacing is fine, but they’re not matching up with the pixels.

That’s strange, I just double checked them and they all work here.

Here’s what I’m doing:

Video output resolution is 1080p Retroarch render resolution is set to use video output (1920x1080) Integer scale is on and I have set a custom resolution where the Y scale matches the scale of the overlay, so for example if my Y axis is set to 5x, I use the 5x overlay Windowed fullscreen is on Fullscreen is off

Can you try the following: Follow the above settings, setting snes9x-next to use 4x4 or 5x4 integer scale Make sure retroarch is rendering at 1920x1080 (no custom fullscreen) Apply the 1920x1080-4x scanlines

I think he means that overlays don’t match, it’s just lines drawn on top, it’s not a true scanline effect.

Well, I’m puzzled as to what the problem could be. Here are the pictures demonstrating that they do in fact work. Only thing I can think of is that the wrong overlay is being selected for the display resolution and vertical integer scale that’s being used.

To view these at original size, you have to click the image and then click on the zoom icon on the page it takes you to.

Scanlines 1920x1080-4x:

Scanlines 1920x1080-5x:

Aperture Grill 1920-1080-5x:

yeah they do seem fine… idk then, last time I tried a scanline overlay I hated it

Yeah, those look good in your shots. Not sure where the discrepancy is coming in. I’ll do some testing and let you know. Perhaps some others can try the same in the meantime.

crop overscan may be having an effect. I know I can’t get overlays to line up right using snes9x-next unless I leave crop overscan ON, but it generally needs to be off for other systems.

thanks so much for these! i’ve been messing around with scalines and scaling for the past few days (quite the rabbit hole), as with the raspberry pi 2 you are limited with what you can do with shaders. i’ve realised i’m ok with cropping bits from the top of the screen, rather than having borders, even if that means losing some screen real-estate. eg, the neogeo runs at 320×224, with no overscan area, so by using 5x scaling (1520x1120), you only show 320x216 (missing 8 lines). however those 8 lines are normally just a bit of the score, or the amount of credits, so i can live with it!

i’ve found i like the scanlines at .35 opacity, best. the arpeture grill overlay is interesting but it seems a bit fuzzy to me (if probably the more true to life!). it also doesn’t seem to show the horizontal scanlines, for some reason. i’ve been using the scanlines overlay at .35 opacity and the dotmask shader and that seems a bit more subtle, but i’m not sure whether it’s impacting performance (the framerate option never seems to do anything!)

there’s so much of this i feel like retroarch eventually could automate, but i’m not sure if it has awareness of the resolution of the actual rom being emulated. with things like MAME/FBA it looks like many roms have to manually configured, as the resolution (and therefore scaling) vary. the dream is you just select ‘i want scalines at X opacity’ and it dynamically creates the overlay at runtime, based on the visible emulated pixels.

anyone else finding they’re spending more time tweaking than playing? :slight_smile:

Going back on what I said, the cropping of the screen at 5x integer scaling DID end up bothering me, so I had a play around with non-integer scaling, and I think I’ve got something I’m happy with. I posted this on the retropie forums - it goes over some old ground, but anyway!

THE PROBLEM Most console systems and arcade games from the 80s until the mid 90s, output in ‘raster’ resolution, which seems to almost always be 320x224. With a modern 1080p screen, you have an issue where there’s no way of dividing the vertical number (224) in to 1080.

Your options are: [ul] [li] scale each pixel to represent 4x4 1080p pixels (ie, 4224=896 pixels high), BUT this leaves you with black borders on the top and bottom of the image[/li][li] scale each pixel to represent 5x5 1080p pixels (ie, 5224=1120 pixels high), BUT this means you will cut off the top and bottom of the image, which often contain important score/credit info[/li][li] turn off integer scaling and let the emulator work it out, BUT this ends up with ugly thick rows of pixels where they’ve clearly been expanded at a different size to their neighbours, to make the maths work[/li][/ul]

Option 1 works for many people and is absolutely the best way to get a 100% correctly scaled scanline image on a 1080p screen. Option 2 is sometimes acceptable - eg, the NES seems to always treat the bottom and top 4 lines as an overscan, so you can crop that image without losing anything useful. Option 3 bugged me. How come I’m noticing one row of pixels being 1/1080 bigger than another?! This set me off…

THE SOLUTION (SORT OF!) By default in Retropie, Retroarch runs at 640x480, regardless of your video output setting. This explained the scaling issues to me - in trying to fit 224 into 480, it has to DOUBLE the size of the occasional row of pixels. If you change your Retroarch render resolution to ‘output’ in the launch menu (press ‘x’ on a keyboard when a rom is loading), it will render at your output resolution (1080p), and suddenly scaling is much better! I can’t notice any thick rows of pixels at this resolution.

What about scanline overlays? These have the same issue. How do you create a scanline image which fits 224 scanlines, in 1080 pixel high image? The maths doesn’t work! What I’ve done is tested out a variety of image scaling techniques, and believe I’ve found the best fit with ‘linear’ scaling. I’ve generated a 1080p overlay .png, with 224 lines of scanlines. If you look closely at the screen, you might see a few instances where the lines aren’t exactly lined up with the pixel edge, but it seems very rare, and unnoticeable (to me!). <strong>NOTE:</strong> I always set my scanlines to .35 opacity. This keeps them visible, but doesn’t darken the image (much). You may want something else…

This last bit is optional, but I’ve had good results with the dotmask retroarch shader. It gives a subtle ‘aperture grill’ effect on the image, softening the edges a little, without blurring. To add this, go into the the Retroarch menu (select + X for me), core options > video > shaders > shader pass to 0 > select the dotmask.glsl in opt/retropie/emulators/retroarch/shader/crt/, leaving both options as ‘don’t mind’
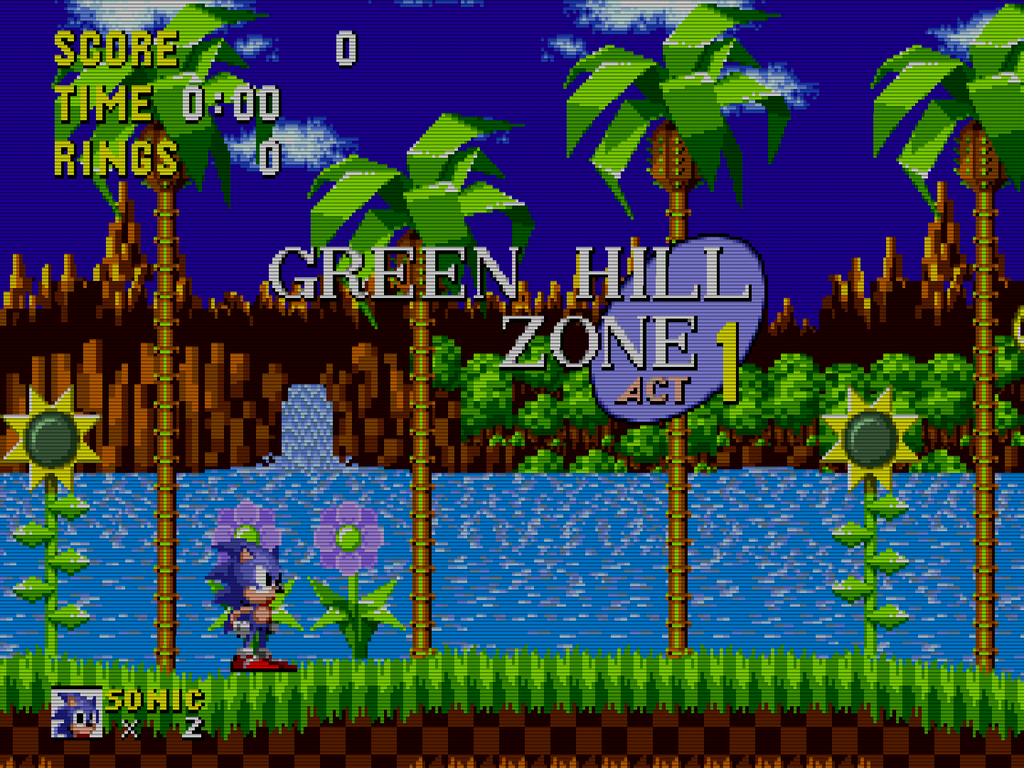
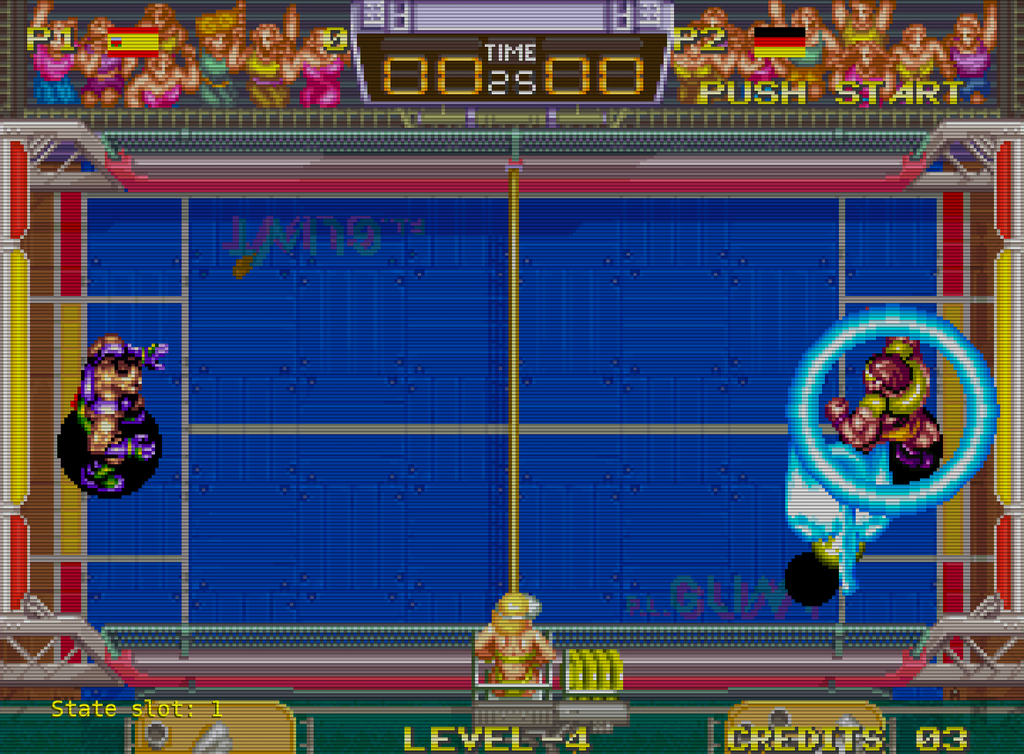
RESULTS Here are a couple of screenshots. Will probably look weird at anything less than 1080p, but you can get the full thing if you download them.

INSTRUCTIONS

[ol] [li] Extract the attached .zip file to /opt/retropie/emulators/retroarch/overlays[/li][li]launch any game on the system and hit X during load to get into the launch menu. Set ‘Retroarch render res’ to ‘output’[/li][li]Go into the retroarch menu (select + X by default)[/li][li]Frontend Settings > Video Settings > Turn OFF Integer Scale[/li][li]Frontend Settings > Video Settings > Turn OFF HW Bilinear Filtering[/li][li]Frontend Settings > Video Settings > Aspect Ratio Index to ‘config’ (not sure what this does but it helpfully refreshes the display)[/li][li]Frontend Settings > Onscreen overlay settings > Display Overlay ON[/li][li]Frontend Settings > Onscreen overlay settings > Overlay preset > select the one we uploaded in step 1[/li][li]Frontend Settings > Onscreen overlay settings > Overlay Opacity 0.35 (try higher if you like darker scanlines)[/li][li]Frontend Settings > Onscreen overlay settings > Overlay scale 1.00[/li][li]Core Settings > Shader Options > Shader Passes 1[/li][li]Core Settings > Shader Options > Shader #0 > opt/retropie/emulators/retroarch/shader/crt/dotmask.glsl (leave both settings as ‘don’t mind’)[/li][li]Core Settings > Shader Options > Apply Shader Changes[/li][li]Frontend Settings > Configuration Settings > Save Config on exit to ON (this saves when we exit the game - might want to turn this off later, in case you mess anything up later by accident)[/li][li]Exit the menu (select + x again) and have a look :)[/li][/ol]

Hey, it’s been a couple months and I was wondering if this could get some attention. Scanline overlays are now more important with the realization that shaders add input lag (I’ve been reading Hunter’s blog). I’ve tested these overlays on multiple machines- one running Linux and the other running windows 7, and I can confirm that they work fine.

What do you want to happen? do you want these to be added to overalys-common?

I could never get Nesguy’s overlays to line up properly, but he clearly has a method to his madness and his pictures looked right, so I assume it’s something strange with how the RPi renders stuff. Likewise, the scanline overlays I made work great everywhere I tested them but didn’t work for him, so it’s probably the same deal.

That in mind, I went ahead and nuked the old, weird scanline overlays that just didn’t work anywhere (anymore?) and replaced them with my working ones and then made an rpi directory to house Nesguy’s effect overlays.

[QUOTE=hunterk;26432]I could never get Nesguy’s overlays to line up properly, but he clearly has a method to his madness and his pictures looked right, so I assume it’s something strange with how the RPi renders stuff. Likewise, the scanline overlays I made work great everywhere I tested them but didn’t work for him, so it’s probably the same deal.

That in mind, I went ahead and nuked the old, weird scanline overlays that just didn’t work anywhere (anymore?) and replaced them with my working ones and then made an rpi directory to house Nesguy’s effect overlays.[/QUOTE]

Sweet, thanks!

I’ll check out the new ones when I get chance.

Hi! I’ve tried 1280x720 version on 5" 720p screen and it’s perfect! (i’m also using CRT-Pi shader with scanlines=off; curvature=on)

But now I’m looking for a way to add this scanlines to my bezels which resolution is 2560x1440

Simple copy/past and transformation give me this result:

What is the best way to proceed and which version should I use?

1 Like