
Nice work everyone on the Game & Watch performance fix and presets
2 Likes
Hello Koko,
Thank you for these shaders, Hmask-Screen_Slotmask_Taller preset is excellent for 1080p gaming, however I would like to use it at 4k; which settings should I change to adapt it to that resolution? Is it just cell size multiplier and phosphor width adjustments under horizontal mask section?
Horizontal mask -> Cell size multiplier
and
Vertical mask -> Height divider
My advice is to keep them integer for better result.
Also the Clears hives patterns parameter can be lowered, probably to 0.0 too as its purpose is to hide weird slotmask patterns visible at 1080p.
Phosphor width is resolution agnostic and represent how much each rgb phosphor is allowed to glow/grow overflowing in another cell.
keeping it to the default 0.05 will keep it strict inside its space.
Also keep in mind that 4k itself is not telling much, as making everything bigger also requires a bigger visual -> a bigger screen seen at the same distance.
at 4K you may play with Monitor-slotmask-TVL500-for_1080p which curves the phosphors over X and Y axis if you like it. That preset is labeled 1080p because the phosphor width is big on purpose to avoid moire patterns, but on 4K I think you can shrink it, if you like.
1 Like
Monitor-slotmask-TVL500-for_1080p indeed works well at 4k. Slotmask_Taller however doesn’t look right if I don’t increase phosphor width, becomes too dark and mask is not visible. I have to increase it to 0.15 or 0.20.
1 Like
Oh thanks, good find!
Maybe it depends on the mask width multiplier. I’ll see If I can fix in automatically.
-EDIT-
Nope 
Added a new preset that has a mask like crt-lottes in Presets-ng/Monitor-Lottes-ShadowMask.slangp
7 Likes
I’ve seen you found the option, good.
Anyway I think the unwanted ffwd glitch with Vulkan should be solved in the dev version.
2 Likes
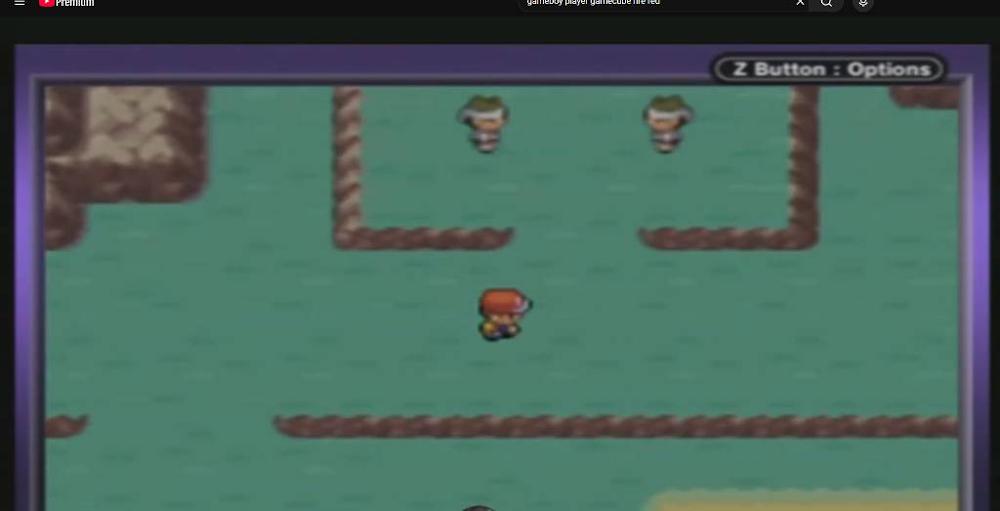
Hi guys! I need your expert help to replicate this exact look of a Game Boy Player (GameCube) running Pokémon FireRed on an HDTV.
As you can see in my attached picture, the colors are very specific: the grass has a deep, dark olive green tone, the character’s cap is a deep brick red, and the overall image has that authentic analog smoothness/hardware blur. It looks totally different from the default, washed-out handheld GBA colors.
I am using RetroArch with the mGBA core. Which shader passes, color profiles, or specific parameters (like Gamma, Saturation, or Hue shifts) should I use to lock down this exact color palette and texture? Thanks a lot!
Hey, great presets! Any recommendations for ps2 core? Also would love to know if FXAA in aperturegrille presets was added as default to somehow mimic the screen? What was the process of using that kind of effect? Thanks in advance
Thenk you!
For Ps2, I use:
/Presets-ng/Monitor-New_slotmask_gm.slangp
or the faster (slghtly lower quality version)
Presets_HiresGames_Fast/Presets-ng/Monitor-New_slotmask_gm.slangp
FXAA has been added to some aperturegrille presets and to some slotmask presets just because it could be nice for someone; those kind of interpolators are not to be used to mimic CRT looks, they don’t work that way.
Thanks for recommendation and explanation!
I play on lrps2 using software mode, does FXAA alter accuracy of effects in software mode or altering FMV quality>
Yes, FXAA is a full screen effects that alters everything on screen, including FMV.
I just made a new release, it is 1.9.101
Some changes were already pushed to main Retroarch repo, anyway the relevant changelog versus the previous release is:
NEW:
- Adaptive strobe: Add experimental parameter to apply it just to changing areas.
- Add xbrx upscaler.
- Add a file based plugin system (now used in lcd antighosting and adaptive strobe)
- Add a leds plugin (currently used by Denise emulator)
- Add a lottes-like shadowmask preset (Monitor-Lottes-ShadowMask.slangp)
CHANGES:
- Presets tweaks
- Allow “static” (RF like) noise, just use a negative strength parameter.
FIXES:
- Diorama shadow, make it not dependant on input resolution
- Warpedglow strength must not depend on input resolution
- FIX regression, bg_under is supported again
- Ambientlight: prevent glitches when final view final viewport size changes.
- Screen shake speed: scale by total subframes
- Dot matrix ghosting: scale duration by subframes
- pixel persistence: scale duration by total subframes
- persistence: scale by total subframes
- breathing: scale by input fps and total subframes
- Adaptive black: scale by input fps and Total Subframes
- Ambientlight speed: Scale by input fps and total subframes
REMOVED:
- Removed old/inactive/dead code.
- Remove support for long time deprecated config-user.txt
- Remove Slotmask(fake) width override parameter (PIXELGRID_OFFSET_CORE_W)
PERFORMANCE:
- Great speed increase for all supported antialiasing and upscaling methods.
9 Likes
When adaptive strobe is on, NES games have a radial looking pattern interference with the shader. Turning on integer scaling under the override geometry options seems to get rid of it, but it’s so zoomed in that the bezel is off-screen. I’ve only noticed this with NES so far, so it might be a resolution thing.

1 Like
Oh, that has a specific scientific name:
"THE INFAMOUS MOIRE’ EFFECT"
Unfortunately there’s no known way to predict when it will be visible, as it depends, as you correctly wrote, by the input resolution, but from other factors too, like output resolution, scanlines shape/visibility, curvature settings and last but not least content brightness.
I always try to minimize the effect balancing it trough tradeoffs, but it is clear that adaptive strobe put that under higher stress, so it needs special care.
I’ve seen Duimon’s koko-aio presets and they seem to reference:
"#reference "…/…/…/shaders_slang/bezel/koko-aio/Presets-ng/Monitor-Screen_Hmask-Screen_SlotMask.slangp"
But I see you are using NTSC emulation, so if I did not make mistakes unrolling Duimon’s references, you already edited it somehow; is that right?
I’m writing that because there is a shader feature that helps hiding moirè by through the use of fake slotmask obtained by staggering scanlines.
I can guide you activating it, but before that, I’d need to know how you tweaked Duimon’s presets first.
I have a composite shader on through the core settings. But I did modify the preset file by turning off global shaders and turning on local shaders with the CRT mask value set to 08 (I believe 15 is the default). There’s also the screen flickering when the Retroarch menu is open but that happens regardless of console.
Got it, by enabling 08, you’re referencing an aperturegrille preset: (08. Monitor-New_aperturegrille_gm)
If you’re ok in making it a slotmask-like one, proceed as follows:
- Find the sweet spot:
- Open the parameter list inside retroarch
- Tweak: Slotmask(fake) offset parameter under the scanline section
- Stop when/if moirè patterns go away, remember the value you set (usually between 0.15 and 0.30).
- Tweak Duimon’s preset with it:
- Open /Duimon-koko-aio/res/overrides_shader/tweaks.param
- Comment every line not commented by prepending "// " to them
- Add an uncommented line: PIXELGRID_OFFSET_CORE = “x.x” (where x.x is the value you found) and save the file.
- Enable the tweak by uncommenting the line: "//#reference “…/…/res/overrides_shader/tweaks.params” " in the file “Presets/Nintendo_NES/Nintendo_NES-[Bezel].slangp” (or whatever the preset you use is) and save the file
->> Every change done to tweaks.param requires a shader/preset reload… <<-
Another thing that helps in hiding moire, is disabling the the Curvature just along the Y axis:
in tweaks.params comment everything and add: “GEOM_WARP_Y = 0.0”
I think now you got the way to do it, you can also lower the scanline strength:
Test live by setting the “★ Scanlines (===) (0 to disable)” parameter from 1.0 to something lower.
Put “DO_PIXELGRID_H = x.x” in tweaks.param
1 Like
Forgive my ignorance. I am wanting to try these shaders. I see them in the “bezels” shader folder. Is this where they are all located? Do they all have bezels? I would have never thought to look for bezel-less shaders in the “bezels” folder.
I am particularly interested in the phosphor persistence repeatedly mentioned. Is whatever contained in these shaders different from the standard phosphor-persistence shader?
Hey there, you’re welcome.
“Shader” is somehow the improper name for “Presets”, that’s where the confusion comes from.
The shader is the underlying code that supports parameters.
Presets are parameters lists that drive the shader behaviour,
Koko-aio comes with both a shader and some presets; now since the bezel itself can be turned off via parameters, you will find some presets that drive the shader in a way the bezel is not shown; they are mixed with the bezel enabled ones (which are the most common anyway).
Phosphor persistence is a koko-aio features (whose implementation was done from scratch, so different from the shader you mentioned) that can be turned on and off and by now the feature is enabled in vector presets but if you want it, you can enable whatever you want; just pick a preset from the koko-aio/presets* folder and then move into the parameter list and find this:
★ Persistence of phosphors enable? (ppe)
    Early decay (blue)
    Late Persistence (blue)
    Red decay time multiplier
    Green decay time multiplier
…enable the former and tweak the others.
From koko-aio documentation:
Emulates the unexcited phosphors that continue to emit light.

Early decay (blue): is the immediate light cut after the blue phosphor is no more/less excited.
Late persistence (blue): modulates the time the residual blue light will stay on screen
Red/Green decay time multiplier:
	   Chemical composition makes different phosphors have different decay times.
	   Highering this parameter will make them slower than blue.
2 Likes
Thanks for the reply.
For what it’s worth, I tried the mega drive preset with the minimal bezel and actually found it pretty cool!
2 Likes