
Let’s see what happens, if guest pulls this off that’ll only further cement his shader as the greatest of all time. I’m waiting to update my shaders until further notice on this
2 Likes
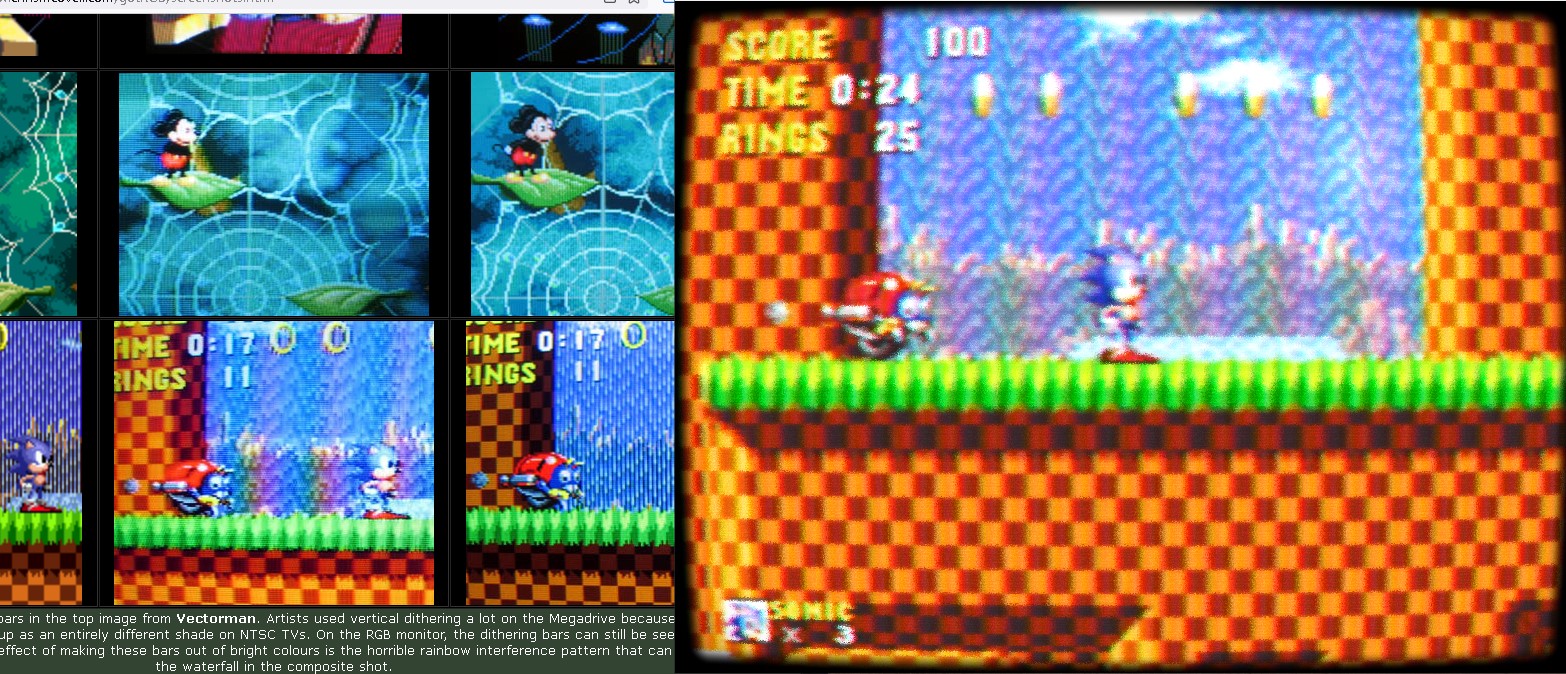
Doesn’t MDAPT Mode 3 also de-dither “jail bars” (Sonic Waterfall) pretty well? It’s what I use for my Blending and Transparency preset.
Feel free to correct me if I might have misunderstood something.
I second that motion!
It can be merged already with replacing the first two stock passes, but in general i try to avoid too many mainstream presets. Probably i’ll tweak the existing ntsc shaders for a bit more sharpness though. Screenshots of genesis games do indeed show the diagonal banding / rainbow effect, while with current ntsc shaders it’s a temporal horizontal effect (2-phase encoding/decoding).
It seems that GDAPT does a great job too with some parameter tweaks, and it’s only a 2-pass shader.
Jinc2 and similar de-dithers can’t do it properly and that’s what i had in mind. 
5 Likes
Hi @guest.r,
I came across some interesting reading. I immediately thought this might be of interest to your shader. Note that the documents are from 2011, so it surpasses sRGB specification by quite some time.
SpectraCal’s Director of Software Development, Joel Barsotti, argues that the BT. 1886 gamma function (EOTF) more accurately matches legacy CRT technology than previous power law based functions. The argument is that it properly takes into account the legacy “contrast” and “brightness” controls on CRTs.
I was especially surprised by how much focus there is in the documents on matching legacy CRT monitors.
In a Calman FAQ document https://kb.portrait.com/help/bt-1886-10-questions-10-answers some of the advantages are mentioned.
BT.1886 offers several clear advantages over previous practice. First, BT.1886 more closely mimics the behavior of CRTs than previous power functions
Previous gamma functions additionally do not adequately account for independent adjustment of brightness and contrast controls on a display.
BT.1886 makes little difference at the bright end of the gray scale, but it makes a substantial difference at the black end.
Note these documents are from 2011, so are surpassing the sRGB spec / considered a worthwhile improvement on sRGB EOTF.
If you’re interested, please see Annex 1 on page 2 and Appendix 1 (Informative) EOTF-CRT matching on page 3 of the ITU recommendation document: https://www.itu.int/dms_pubrec/itu-r/rec/bt/R-REC-BT.1886-0-201103-I!!PDF-E.pdf
For the shader I was especially triggered by the comments in Appendix 1 (Informative) EOTF-CRT matching, which focuses on matching a CRT for which you know (or can measure) the black level and brightness level:
The EOTF specified in Annex 1 is considered to be a satisfactory, but not exact, match to the characteristic of an actual CRT. When it is desired to match a CRT, the Lw and LB parameters of the EOTF can be set to the corresponding values of the CRT that are being matched.
Do you think that this BT. 1886 implementation of contrast and brightness control directly with the EOTF could improve on the current brightness and contrast controls in the shader?
EDIT: In appendix 2 there’s also the noteworthy comment:
In measuring the EOTF of a large number of CRTs it was determined that the EOTF of the CRT was in fact highly variable when the brightness/contrast was adjusted, it is therefore not possible to 100% emulate CRT capability (or limitations). Users of this Recommendation in combination with the new technologies should be able to achieve a higher degree of image presentation repeatability than that offered in the past.
3 Likes
I took some looks to the paper and other documentation and i feel somewhat obliged to clarify some issues:
The ‘GDV’ shader with it’s default settings is gamma neutral. It means that which source images are provided, they get out neutral (luminatively same) if other settings are neutral (mask, brightness controls…). The shader’s gamma purpose has basically nothing to do directly with LCD gamma, although different values of input/output gamma can compensate odd gamma feels of the ‘LCD’.
This means that the gamma function can have different application purposes. For consistent looks colors in the shader need to be interpolated and there are several reasons the shader interpolates in linear space, like to match the ‘crt horizontal interpolation’, shape the scanline interpolation respectively, define the glow effect etc.
I’m saying that there is nothing wrong with current gamma implementation as long as the precision offered by the buffer used is sufficient.
With my experimenting with the sRGB 2.4 gamma and buffer the only practically visible difference could be at pixel junctions, but nothing positively observable. The negative is that the user is limited to both gamma values of 2.4, glow looks much worse etc.
The standard for the sRGB buffer was developed with memory savings in mind while still providing decent results. Today 16 bit float buffers (per component) are nothing uncommon and shader registers / processors operate with 32 bit floating precision (mainstream).
The main benefit there could be with the BT.1886 gamma are better contrast controls, but not to forget there are two displays to be considered: target crt and the user’s display. The general approach is simple enough i guess, even if there are more parameters, for a reasonable crt feel.
5 Likes
Proof I could get about the Rainbow banding in Sega Genesis games: (@sonkun)
- Real hardware Sega Genesis (model 1) VS RetroArch Genesis Plus GX (my rainbow sega preset v2.7)

- Real console proof by HunterK vs some fast tweak I did to replicate with mame_hlsl for GenesisPlusGX core
https://www.chrismcovell.com/gotRGB/screenshots.html
Rainbow sega preset available in here: Rainbow with composite - MOD preset for Sega Genesis Games
- More serious dithering + rainbow effect exposure from real Genesis console:

- This is some old preset named rainbow sega v3.0 which gets some Rainbow comparison to real Genesis console:
- Some other video comparison from rainbow sega v4.0 and 4.1 presets I did to compare Rainbow effect with original Genesis console model 2
some other video samples for the original Rainbow looking:
https://youtu.be/SwotQNShPvs?t=380 (model 2)
")
- some of my attempts to replicate this source video sample with my preset v6.291
https://youtu.be/EtNjgW5RtyI?t=365 (Genesis Model 1 VA6.8 )

- All the NTSC-Rainbow intended shaders available I have tested around with the exception of mame_hlsl, actually have delivered to me a wrong Rainbow banding in Streets of Rage 2 for the Genesis console. Which the results are somehow similar to this:

Big thanks to the author from this video that delivers such a wonderful Streets of Rage 2 gameplay demostration to check the proper Rainbow:
https://youtu.be/bpqmPjpfN1k?t=342 (Genesis Model 2 with Composite-video)
This is a little proof of how the same game look like with my preset rainbow sega v6.26:
…
Many thanks to all the nice people who recorded all of these great classic games and served for this case situation.
6 Likes
Got it, no problem at all. In that case I’ll just post up my shaders as is, like you said I can still get the look by just adding in that pass.
I report a nice success with new ntsc-sharpness implementation. More info in the release notes.
New Release Version (2022-05-21-r1):
Notable changes:
- only ntsc-based changes with this version
- new ntsc-sharpness implementation, nice new looks are possible
- sharpness and de-dithering are mutually exclusive at some point, so a pair of great
gdaptshaders are now included with the preset, which was updated, de-dithering has to be enabled with a parameter though - ntsc-sharpness shader is no longer needed, so it was removed from the preset
- with testing the shader performance is about the same
- new sharpness feature works great with 3-phase mode, just mentioning
Download link:
https://mega.nz/file/4gY0gJZR#t0or-vPntGVn3li_nnVYwA2iKO5RYbGpnXGe7q4S6jg
Screenie:

11 Likes
Thanks. Will try it out when I get the chance. Also forgot to say thanks for the luma noise. It’s great! No more ruined black level!
Though there’s something odd about the randomness of the noise. It doesn’t seem very… random. Can’t quite put my finger on it. (Not specifically luma noise. Both types give the impression of a repeating pattern. Kind of…)
3 Likes
Ik exactly what you’re meaning by the noise feels like it’s on a patterned/loop. I’m not sure what’s going on but I experience a seemingly similar situation.
1 Like
Randomness in shaders is a tough nut to crack. There’s no way to get truly random values, and the built-in “noise” value has apparently never been implemented in a useful way (it always returns 0.0, which is arguably technically correct, since the values it returns are supposed to average out to 0.0…).
The alternative is to generate pseudo-random numbers inside the shader, but this is computationally expensive and has performance vs quality (i.e., visible patterns/looping) tradeoffs, as well as GPU/driver-dependent quirks. For example, there’s a famous one-liner PRNG that relies on inconsistencies in fract-ing certain floating point values, but it falls apart on mobile GPUs.
Similarly, many of the common PRNGs you can find online fall apart (or get out of hand, computationally) when the seed value–usually FrameCount in our case, so it moves around each frame–gets too high, so you have to modulo the value to keep it in a usable range, but whenever it loops, you get a sort of “reset” back to the minimum value, which is often visually noticeable and is exacerbated by happening at consistent intervals (every 783 frames or whatever is hardcoded in the mod() function).
One option here may be to sample a robust noise LUT using a pseudo-random texture coordinate, so you get the visual benefit of random-on-random without having to generate both of them on each frame.
6 Likes
This update just had to come after I updated my presets lol. Adding in that gdapt shader definitely was unexpected, I tested it out a little and for some reason I’m just not getting good results with it, seems buggy actually unless I’m just not tweaking it right. I get a nice sharper clearer picture when using the jinc2-dedither shader in my shader chain since it comes with it own sharpness setting as well (I played around with every dithering shader in that dithering shader folder even sgenpt-mix and none of them produced the same kind of image as jinc), kind of wish you had used that shader instead. Still a nice feature though and that updated sharpness is nice as well. Should be simple to update my presets with this new release since I plan on sticking with the jinc2-dedither shader that I ended up using in my last update.
1 Like
Hello, I’m trying to get a bigger slot mask. One image is from the Master System’s Psycho Fox, and the other NES Legendary Wings, both with integer scaling on. (NES has banding while SMS does not.) I’m assuming the slot mask is resolution dependent and there is now way to have it work on both without changing the numbers?
shaders = "12"
shader0 = "shaders_slang/crt/shaders/guest/advanced/stock.slang"
filter_linear0 = "false"
wrap_mode0 = "clamp_to_border"
mipmap_input0 = "false"
alias0 = ""
float_framebuffer0 = "false"
srgb_framebuffer0 = "false"
scale_type_x0 = "source"
scale_x0 = "1.000000"
scale_type_y0 = "source"
scale_y0 = "1.000000"
shader1 = "shaders_slang/crt/shaders/guest/advanced/stock.slang"
filter_linear1 = "false"
wrap_mode1 = "clamp_to_border"
mipmap_input1 = "false"
alias1 = "StockPass"
float_framebuffer1 = "false"
srgb_framebuffer1 = "false"
scale_type_x1 = "source"
scale_x1 = "1.000000"
scale_type_y1 = "source"
scale_y1 = "1.000000"
shader2 = "shaders_slang/crt/shaders/guest/advanced/afterglow0.slang"
filter_linear2 = "false"
wrap_mode2 = "clamp_to_border"
mipmap_input2 = "false"
alias2 = "AfterglowPass"
float_framebuffer2 = "false"
srgb_framebuffer2 = "false"
scale_type_x2 = "source"
scale_x2 = "1.000000"
scale_type_y2 = "source"
scale_y2 = "1.000000"
shader3 = "shaders_slang/crt/shaders/guest/advanced/pre-shaders-afterglow.slang"
filter_linear3 = "false"
wrap_mode3 = "clamp_to_border"
mipmap_input3 = "true"
alias3 = "PrePass"
float_framebuffer3 = "false"
srgb_framebuffer3 = "false"
scale_type_x3 = "source"
scale_x3 = "1.000000"
scale_type_y3 = "source"
scale_y3 = "1.000000"
shader4 = "shaders_slang/crt/shaders/guest/advanced/avg-lum.slang"
filter_linear4 = "true"
wrap_mode4 = "clamp_to_border"
mipmap_input4 = "true"
alias4 = "AvgLumPass"
float_framebuffer4 = "false"
srgb_framebuffer4 = "false"
scale_type_x4 = "source"
scale_x4 = "1.000000"
scale_type_y4 = "source"
scale_y4 = "1.000000"
shader5 = "shaders_slang/crt/shaders/guest/advanced/linearize.slang"
filter_linear5 = "true"
wrap_mode5 = "clamp_to_border"
mipmap_input5 = "false"
alias5 = "LinearizePass"
float_framebuffer5 = "true"
srgb_framebuffer5 = "false"
scale_type_x5 = "source"
scale_x5 = "1.000000"
scale_type_y5 = "source"
scale_y5 = "1.000000"
shader6 = "shaders_slang/crt/shaders/guest/advanced/gaussian_horizontal.slang"
filter_linear6 = "true"
wrap_mode6 = "clamp_to_border"
mipmap_input6 = "false"
alias6 = ""
float_framebuffer6 = "true"
srgb_framebuffer6 = "false"
scale_type_x6 = "absolute"
scale_x6 = "800"
scale_type_y6 = "source"
scale_y6 = "1.000000"
shader7 = "shaders_slang/crt/shaders/guest/advanced/gaussian_vertical.slang"
filter_linear7 = "true"
wrap_mode7 = "clamp_to_border"
mipmap_input7 = "false"
alias7 = "GlowPass"
float_framebuffer7 = "true"
srgb_framebuffer7 = "false"
scale_type_x7 = "absolute"
scale_x7 = "800"
scale_type_y7 = "absolute"
scale_y7 = "600"
shader8 = "shaders_slang/crt/shaders/guest/advanced/bloom_horizontal.slang"
filter_linear8 = "true"
wrap_mode8 = "clamp_to_border"
mipmap_input8 = "false"
alias8 = ""
float_framebuffer8 = "true"
srgb_framebuffer8 = "false"
scale_type_x8 = "absolute"
scale_x8 = "800"
scale_type_y8 = "absolute"
scale_y8 = "600"
shader9 = "shaders_slang/crt/shaders/guest/advanced/bloom_vertical.slang"
filter_linear9 = "true"
wrap_mode9 = "clamp_to_border"
mipmap_input9 = "false"
alias9 = "BloomPass"
float_framebuffer9 = "true"
srgb_framebuffer9 = "false"
scale_type_x9 = "source"
scale_x9 = "1.000000"
scale_type_y9 = "source"
scale_y9 = "1.000000"
shader10 = "shaders_slang/crt/shaders/guest/advanced/crt-guest-advanced.slang"
filter_linear10 = "true"
wrap_mode10 = "clamp_to_border"
mipmap_input10 = "false"
alias10 = ""
float_framebuffer10 = "true"
srgb_framebuffer10 = "false"
scale_type_x10 = "viewport"
scale_x10 = "1.000000"
scale_type_y10 = "viewport"
scale_y10 = "1.000000"
shader11 = "shaders_slang/crt/shaders/guest/advanced/deconvergence.slang"
filter_linear11 = "true"
wrap_mode11 = "clamp_to_border"
mipmap_input11 = "false"
alias11 = ""
float_framebuffer11 = "false"
srgb_framebuffer11 = "false"
scale_type_x11 = "viewport"
scale_x11 = "1.000000"
scale_type_y11 = "viewport"
scale_y11 = "1.000000"
beam_max = "1.300000"
shadowMask = "13.000000"
maskstr = "0.800000"
slotmask = "0.800000"
slotmask1 = "0.800000"
double_slot = "3.000000"
slotms = "3.000000"
post_br = "1.200000"
textures = "SamplerLUT1;SamplerLUT2;SamplerLUT3;SamplerLUT4"
SamplerLUT1 = "shaders_slang/crt/shaders/guest/advanced/lut/trinitron-lut.png"
SamplerLUT1_linear = "true"
SamplerLUT1_wrap_mode = "clamp_to_border"
SamplerLUT1_mipmap = "false"
SamplerLUT2 = "shaders_slang/crt/shaders/guest/advanced/lut/inv-trinitron-lut.png"
SamplerLUT2_linear = "true"
SamplerLUT2_wrap_mode = "clamp_to_border"
SamplerLUT2_mipmap = "false"
SamplerLUT3 = "shaders_slang/crt/shaders/guest/advanced/lut/nec-lut.png"
SamplerLUT3_linear = "true"
SamplerLUT3_wrap_mode = "clamp_to_border"
SamplerLUT3_mipmap = "false"
SamplerLUT4 = "shaders_slang/crt/shaders/guest/advanced/lut/ntsc-lut.png"
SamplerLUT4_linear = "true"
SamplerLUT4_wrap_mode = "clamp_to_border"
SamplerLUT4_mipmap = "false"
3 Likes
Add " ``` " at the top and bottom of your preset without the " ". If you want I mean 
2 Likes
Well, the new NTSC sharpness setting certainly does sharpen. You can make it so sharp your eyes will bleed if you want…
3 Likes
I think i can re-balance it for even better results, maybe new noise implementation is also around the corner, will probably post an update soon.
5 Likes
I don’t have any issue with the current implementation and I use it in all my presets. Will the new implementation resemble more closely something that goes on in a real CRT?
I use noise very subtly in most of my presets just to simulate a scanning effect of the scanlines. They don’t necessarily have to scan in the direction or manner as on a CRT but just by not not being static it certainly adds something to the image.
I’m hoping this new implementation isn’t going to take away from the way things are right now, which I feel are in a very good place.
I certainly don’t mind improvements though.
1 Like
I compared it with an other popular noise function and current implementation was way better, so i optimized it a bit for a more random feel, in general, it’s a bit more ‘random’ and nicer.
3 Likes
New Release Version (2022-05-22-r1):
Notable changes:
- ntsc sharpness feature greatly improved
- small noise function optimization
- small cleanup
Download link:
https://mega.nz/file/w1hCmSAD#SlOcEN_vk4RDzim8dSZLip3A1vUy-W-_AupT2pAcw7A
Edit: small improvement to the ntsc-shaders, ntsc-fast blend mode default is now 2.0.
11 Likes
Thanks for the noise. 
For people using luma-type noise, make sure to increase “post brightness” slightly, as the image gets darker with noise. For example for DOS, I use a noise value of 0.28 with noise resolution 1.0, and I have to edit the saved preset to set post_br = "1.035000" to maintain the same overall brightness. (The menu control for post brightness is too coarse and the smallest available step of 0.05 makes the image too bright.)
As for the sharpness setting, it does appear to be much cleaner now. Not sure what the terminology is, but previously the image would look like it was hacked by a saw at high sharpness levels.
2 Likes