Koko-aio shader discussions and updates

…correct, but that does not seem to be the issue anyway.

Yup, this is coherent with the theory that steep masks put the display controller under excessive stress.

Try the development version with the presets which contain the TVL keyword, I think they will be fine, then you can tweak the TVL parameter itself to make the mask wider or narrower.

2 Likes

OOh yes the tvl presets seem to be the ticket. Look fantastic but I’ll have to play around a bit to find what looks best. Thanks for the pointers! Also unrelated but I really love the ambilight effect you have.

1 Like

@Superdonkeyjack, @Elessar84

Tweaked this preset:

Preset
#reference "../koko-aio-ng.slangp"

GAMMA_OUT = "0.400000"
DO_CCORRECTION = "1.000000"
IN_GLOW_POWER = "1.300000"
BRIGHTNESS = "0.050000"
CONTRAST = "0.050000"
TEMPERATURE = "7200.000000"
SATURATION = "1.200000"
VIBRANCE = "0.500000"
NTSC_MIX = "0.700000"
NTSC_FILTER_WIDTH = "9.000000"
NTSC_FILTER_SCF = "1.000000"
NTSC_FILTER_FC = "3.300000"
NTSC_PHASE_SHIFT = "1.000000"
NTSC_ARTF_TRSH = "0.360000"
NTSC_SHOW_ARTF_MASK = "1.000000"
DO_SAT_BLEED = "1.000000"
SAT_BLEED_PAL = "1.000000"
SAT_BLEED_STRENGTH = "3.049999"
SAT_BLEED_SIZE = "3.000000"
DOT_C = "0.360000"
DOT_C_YUV = "1.000000"
DOT_C_SPEED = "-8.000000"
DO_SHIFT_RGB = "1.000000"
OFFSET_STRENGTH = "0.250000"
DO_RF_NOISE = "1.000000"
RF_NOISE_STRENGTH = "0.090000"
RF_NOISE_SPARK = "0.140000"
DO_IN_GLOW = "1.000000"
IN_GLOW_SPREAD = "2.000000"
IN_GLOW_W = "0.800000"
IN_GLOW_H = "0.800000"
DO_PIXELGRID = "1.000000"
DO_PIXELGRID_H = "0.600000"
PIXELGRID_MIN_H = "0.500000"
PIXELGRID_MAX_H = "1.000000"
PIXELGRID_H_PRST = "4.000000"
PIXELGRID_MAX_W = "0.300000"
PIXELGRID_BASAL_GRID = "0.600000"
PIXELGRID_Y_MASK = "1.000000"
PIXELGRID_Y_MASK_OFFSET_DEHIVE = "2.300000"
PIXELGRID_Y_SPARK = "8.000000"
DO_HALO = "1.000000"
HALO_POWER = "0.500000"
HALO_SHARPNESS = "6.000000"
HALO_GAMMA = "1.400000"
HALO_VS_SCAN = "0.250000"
DO_BLOOM = "1.000000"
BLOOM_MIX = "0.340000"
BLOOM_SIZE = "2.500000"
BLOOM_GAMMA = "10.000000"
BLOOM_GAMMA_OUT = "2.200000"
BLOOM_POWER = "2.200000"
BLOOM_EYE_ADPT_SRT = "0.300000"
DO_CURVATURE = "1.000000"
DO_BEZEL = "1.000000"
BEZEL_R = "-0.190000"
BEZEL_G = "-0.190000"
BEZEL_B = "-0.190000"
BEZEL_CON = "2.180000"
BEZEL_REFL_STRENGTH = "0.370000"
BEZEL_DIFFUSION_STR = "0.150000"
DO_GLOBAL_SHZO = "1.000000"
GLOBAL_ZOOM = "0.991500"
AMBI_SMP_INT_OFFSET = "0.130000"
DO_VIGNETTE = "1.000000"
V_SIZE = "0.500001"
UNIFORMITY = "0.800000"
DO_SPOT = "1.000000"
S_SIZE = "0.780000"
S_POWER = "0.100000"
4 Likes

Vignette effect has got some love.

There is now a “pillow” parameter:

  • The default 1.0 will act as the legacy behaviour.
  • Setting it to a negative value will switch the vignette to reflect a tube shaped curvature, useful when combined with curvature/WARP_X set to 0.0.
  • Setting it to a value near 0.0 will morph the shape from a bell to a pillow.
    I think pillow shape is more accurate and better reflect the curvature itself.
  • The pillow shape is better used with very low sized vignette.

Examples:


Vignette with tube shape, no pillow:

  • Pillow = -1.0 (pillow < 0.0 gives tube shape)
  • Size = 0.8
  • Curvature -> WARP_X = 0.0 (to match the tube shape)


Vignette with tube shape, pillow:

  • Pillow = -0.18 (pillow < 0.0 gives tube shape and near zero -> more pillow)
  • Size = 0.32 (pillow is better with low size)
  • Curvature -> WARP_X = 0.0 (to match the tube shape)


Vignette without tube shape, with pillow:

  • Pillow = 0.18 (near zero -> more pillow)
  • Size = 0.32 (pillow is better with low size)
  • Curvature WARP_X and WARP_Y both greater than 0.0


For comparison with old and still default values, the default/legacy bell shaped vignette:

  • Pillow = 1.0 (1.0 -> no pillow)
  • Size = 1.0
  • Curvature WARP_X and WARP_Y both greater than 0.0


Real content, pillow = 0.13, size = 0.32:

-edit: pillow effect can now be applied despite the size of the vignette itself.

12 Likes

Hi, I’m looking for a shader that resembles my old Hantarex monitor, but I haven’t had any luck. The scanlines don’t seem to be as pronounced. Are there any settings I can tweak to achieve this effect?

2 Likes

What about:

Presets-ng/Monitor-Screen_Hmask-Screen_SlotMask_Taller_Brighter?/

For a more accurate result, check the not “brighter” variant.

Going lower in brightness (higher accuracy): Presets-ng/Monitor-for_HigherNits.slangp

As a general rule, If you want less pronunced scanlines, you can make: Phosphors height Min, Max higher (under scanlines section).

Also, you may want to lower the warpedglow strength under glow section (this modulates the scanline inflation, mostly absent in the screen you posted)

Btw, I would not say the scanlines on your Hantarex to be not so pronunced. Quite the opposite to me, as I see big gaps between them. However the parameters I pointed can be used either way.

Let me know!

1 Like

Hi there,

Any plans to add a glass screen type overlay? I understand the issue about what to reflect, but it could be just a spot type reflection, if that makes sense. Might be it’s already there, if so, could you point me in the right direction? Cheers.

1 Like

Check this wrong commit

It works nicely for 40% strength, but I’ve no license over it, that’s why I’ve had to remove it.

I could take a pic of my room.

1 Like

Cool and shame - or perhaps the glass overlay with a type of spot? Just thinking out loud, so to speak.

As per the spot, I think you can use the spot function of the shader, It can act as a diffused glare or a little spot.

1 Like

Thank you for your help. I’m trying to tweak the shader Monitor-Screen_Hmask-Screen_SlotMask_Taller_Brighter , but I’m not getting good results — the dots seem too far apart. I should mention that the monitor I’m using has a resolution of 1024x768 , which might be causing some issues.

EDIT: Sorry for the confusion — what I actually meant is that I’m trying to make the horizontal scanlines darker and more pronounced . My English isn’t very good, I apologize if I wasn’t clear.

Oky, let’s try to understand each other :slight_smile:

  • For “Horizontal scanlines” do you mean: “===” or “|||||” ?
  • 1024x768 is indeed quite difficult to manage for “==” scanlines, even more if you plan to put curvature into the equation, because of weird articacts that may arise, like weavy patterns without curvature or moire for curved screens.
  • What’s the real monitor? I’ll assume a 4:3 1024x768 LCD.
  • What size (inches or cm)?

I’ll try to craft a preset starting from the same base preset you were trying to tweak.

For such low resolutions (assuming low dot pitch here), trying to emulate phosphors triad can be challenging, and indeed it leads to too wide patterns (I think this is the issue with the “dots” too far apart you mentioned).

You can mitigate that by using a 2 sized mask => mask type preset set to 1:

Which will give you this:

Screenshot_20250603_130251

  • Slotmask/Curvature:
    Unfortunately low vertical resolution is not enough to emulate real slotmask with accuracy; But there are some workarounds you can use.

First is to disable real slotmask emulation:

…next is to enable fake slotmask emulation which, instead of drawing staggered tiny gaps vertically between phosphors, staggers the scanline itself; the value 0.18 is important, read on.

this will give you something like that:

Screenshot_20250603_131946

On such low resolution, koko-aio automatically switches to “fake integer scanlines”, which is a rude way to draw straight lines which align to the real screen lines, but are not curved and won’t follow the content you are emulating (to make it easy, instead of drawing a line for each core line, it will draw a straight line every 2 screen lines).
That way the weird weavy or moire patterns mentioned earlier are “bypassed”

However the fake slotmask emulation we just enabled in the previous step has the ability to trick the brain, somehow hiding those patterns to the eye, so we are going to tell the shader to draw proper scanlines. (The “0.18” earlier set for fake slotmask parameter is the one that is able to hide moire on 768p)

Next tweak is about the scanline gaps; I think your Hantares has well defined gaps, so I’d lower the min/max scanline height to 30…50 range (do not set minimum to less than 25 or moire will be visible, you can still lower the max from 50 to 30 for steeper/darker/better defined scanlines) and contextually I’d disable Haloing and any vertical deconvergence to leave those black gaps, black.

Your hantarex: Screenshot_20250603_132746

Parameters:

However haloing helps in retaining brightness, so I’m going to trade mask definition for a brighter image by highering the maximum

phosphor width:

Next step is to push some more bloom to gain even more brightness; white blooming has the ability to give you more lumninance while keeping good mask definition.

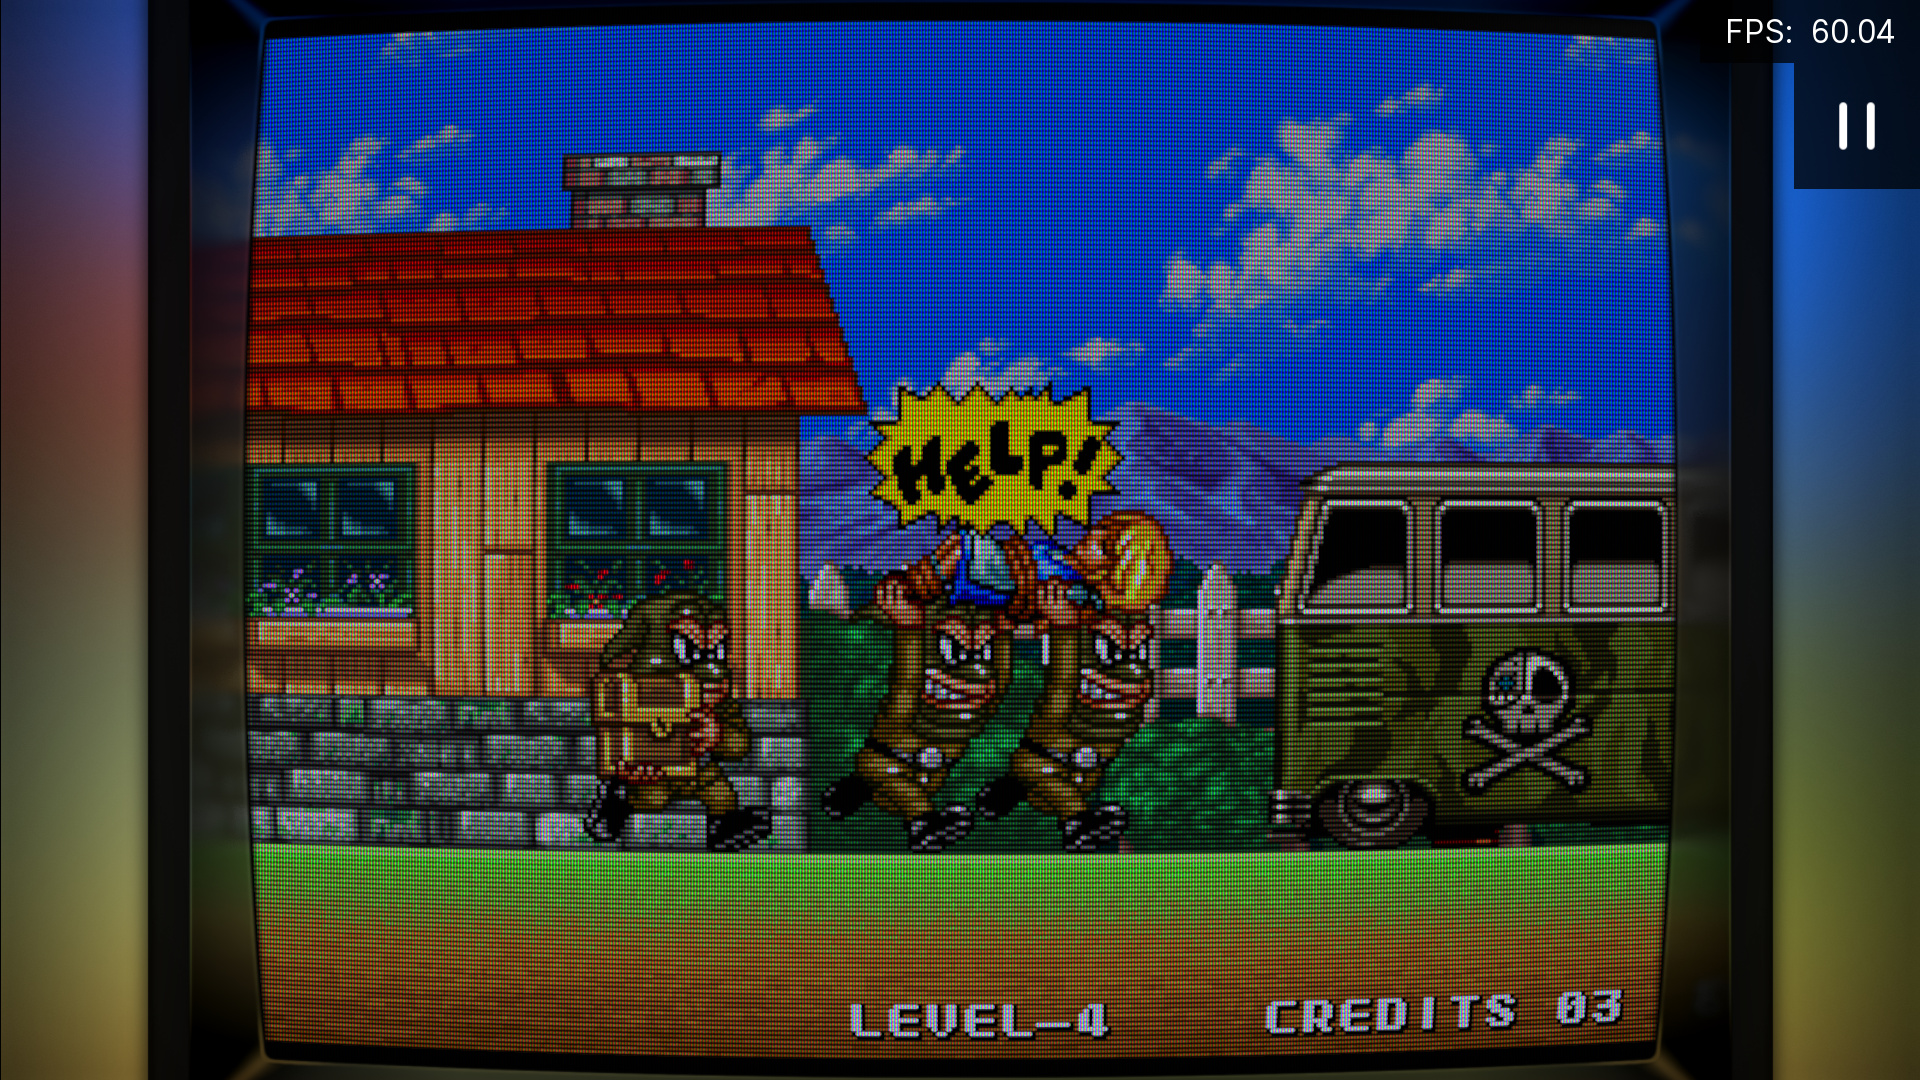
With some other smaller final tweaks to the output gamma and color corections you can see in the attached preset, we have the following:

Put the following preset in the same folder as to koko-aio-ng.slangp (or change the #reference line)

1024z768_v3
#reference "koko-aio-ng-slangp"
GAMMA_OUT = "0.380000"
DO_CCORRECTION = "1.000000"
IN_GLOW_POWER = "2.000000"
LUMINANCE = "0.100000"
TEMPERATURE = "7300.000000"
VIBRANCE = "0.000000"
DO_SHIFT_RGB = "1.000000"
OFFSET_STRENGTH = "0.250000"
DO_IN_GLOW = "1.000000"
IN_GLOW_BIAS = "0.000000"
IN_GLOW_SPREAD = "1.700000"
IN_GLOW_W = "7.000000"
IN_GLOW_H = "7.000000"
DO_PIXELGRID = "1.000000"
PIXELGRID_COREY_FAKE_SCAN = "0.000000"
PIXELGRID_MIN_H = "0.300000"
PIXELGRID_MAX_H = "0.500000"
PIXELGRID_GAMMA_H = "3.000000"
PIXELGRID_OFFSET_CORE = "0.180000"
PIXELGRID_H_DEDOT = "0.700000"
PIXELGRID_H_PRST = "1.000000"
PIXELGRID_MIN_W = "0.050000"
PIXELGRID_MAX_W = "1.000000"
PIXELGRID_BASAL_GRID = "0.020000"
PIXELGRID_Y_MASK = "0.000000"
PIXELGRID_Y_MASK_HEIGHT = "-2.000000"
PIXELGRID_Y_MASK_OFFSET_DEHIVE = "0.700000"
PIXELGRID_Y_MASK_ON_WHITE = "0.000000"
HALO_NO_PREGAIN = "1.000000"
HALO_POWER = "1.000000"
HALO_SHARPNESS = "7.000000"
HALO_GAMMA = "1.000000"
HALO_GAMMA_OUT = "2.350000"
HALO_VS_SCAN = "0.260000"
DO_BLOOM = "1.000000"
BLOOM_MIX = "0.400000"
BLOOM_SIZE = "1.000000"
BLOOM_GAMMA = "4.000000"
BLOOM_GAMMA_OUT = "1.600000"
BLOOM_POWER = "3.500000"
BLOOM_EYE_ADPT_SRT = "0.600000"
DO_CURVATURE = "1.000000"
DO_BEZEL = "1.000000"
BEZEL_REFL_STRENGTH = "0.370000"
BEZEL_DIFFUSION_STR = "0.150000"
DO_GLOBAL_SHZO = "1.000000"
GLOBAL_ZOOM = "0.991500"
DO_VIGNETTE = "1.000000"
V_SIZE = "1.200000"
V_SHAPE = "0.800000"
DO_SPOT = "1.000000"
S_POWER = "0.067000"
ADPT_STROBE_STR = "0.000000"

I think this could be a good starting point for you to further tweak as per your likings, If you haven’t already, please take a look to the docs-ng.md file, which documents all of the parameters.

4 Likes

Your face here: :sweat_smile:

1 Like

I just tried your preset and I must say: it’s a huge improvement! It now closely resembles the Hantarex CRT in my original photo: the slot mask looks convincing, and the scanlines are finally visible.

I’ll try adjusting the horizontal scanlines “===” to make them a little darker and more pronounced; a little more black between the phosphor lines would do the trick.

Thanks again for your time and dedication. Your shader is now very close to what I’m looking for.

4 Likes

I could not make the slang shaders work on rg552 no matter what cfw I tried, but I bought Retroid Pocket 5 meanwhile and there they work great as it supports vulkan (I guess? I’ve no idea how any of it works honestly). I found out apparently it is impossible (in 21st century on linux no less!) to take a screenshot on a handheld, so this is best my oneplus 10t camera can do

Thank you for the wonderful shaders and all your work!

2 Likes

Thank you very much, I own an rp5 and a flip2 as well and that screen is simply amazing.

Being so bright, I prefer Presets-ng/Monitor-for_HigherNits.slangp

Also, you can take screenshots by pressing power + Volume Down; also they defaults to png lossless format, so you’re good to go :wink:

Another tip is to go into shader menu and set shader delay to 50…100 or even more; that way android will be responsive between the game loading and the shader compilation; mitigating the “application not responding” spam dialog bug on android 13.

2 Likes

Couldn’t you add an RRBBGGX horizontal mask (~300TVL at 4K) for (most) WOLED users?

I’m afraid not; the way it handles the mask leverages the gpu internal vec4 datatype, which handles 4 values, so either it could be rgbx or rgb (which can be doubled, leading to rrrbbggxx or rrgggbb)

1 Like

These screenshots look amazing! Can you post some high quality photos or video clips including closeups showing the “phosphors” so that we can get an even better appreciation for what you’re experiencing?

Also, are you sharing these presets somewhere?

This is pretty stunning as well, almost makes trying to make a Koko-aio preset pack seem like a redundant endeavour.

1 Like

Wow, thanks! That 500TVL really stresses 1080p, indeed moire is visible on solid backgrounds on particular colors (Super Hang on!).

Initially, my intent was to create boilerplate presets to show what was possible and let other users tweak them to create new ones. However, I probably got carried away and stole all the fun. :confused:

1 Like