
If you want a mask that looks more like a real CRT’s Mask on your OLED TV, try the RRGGBBX (or XRRGGBB) Mask, Size 1 and use Mask Layout 1 (or whatever is the BGR mask layout in the Reshade port). Make sure your Desktop Resolution is 4K. On the slang version of CRT-Guest-Advanced Mask 12 is the RRGGBBX Mask, I’m not sure which one it is on the ReShade port.
1 Like

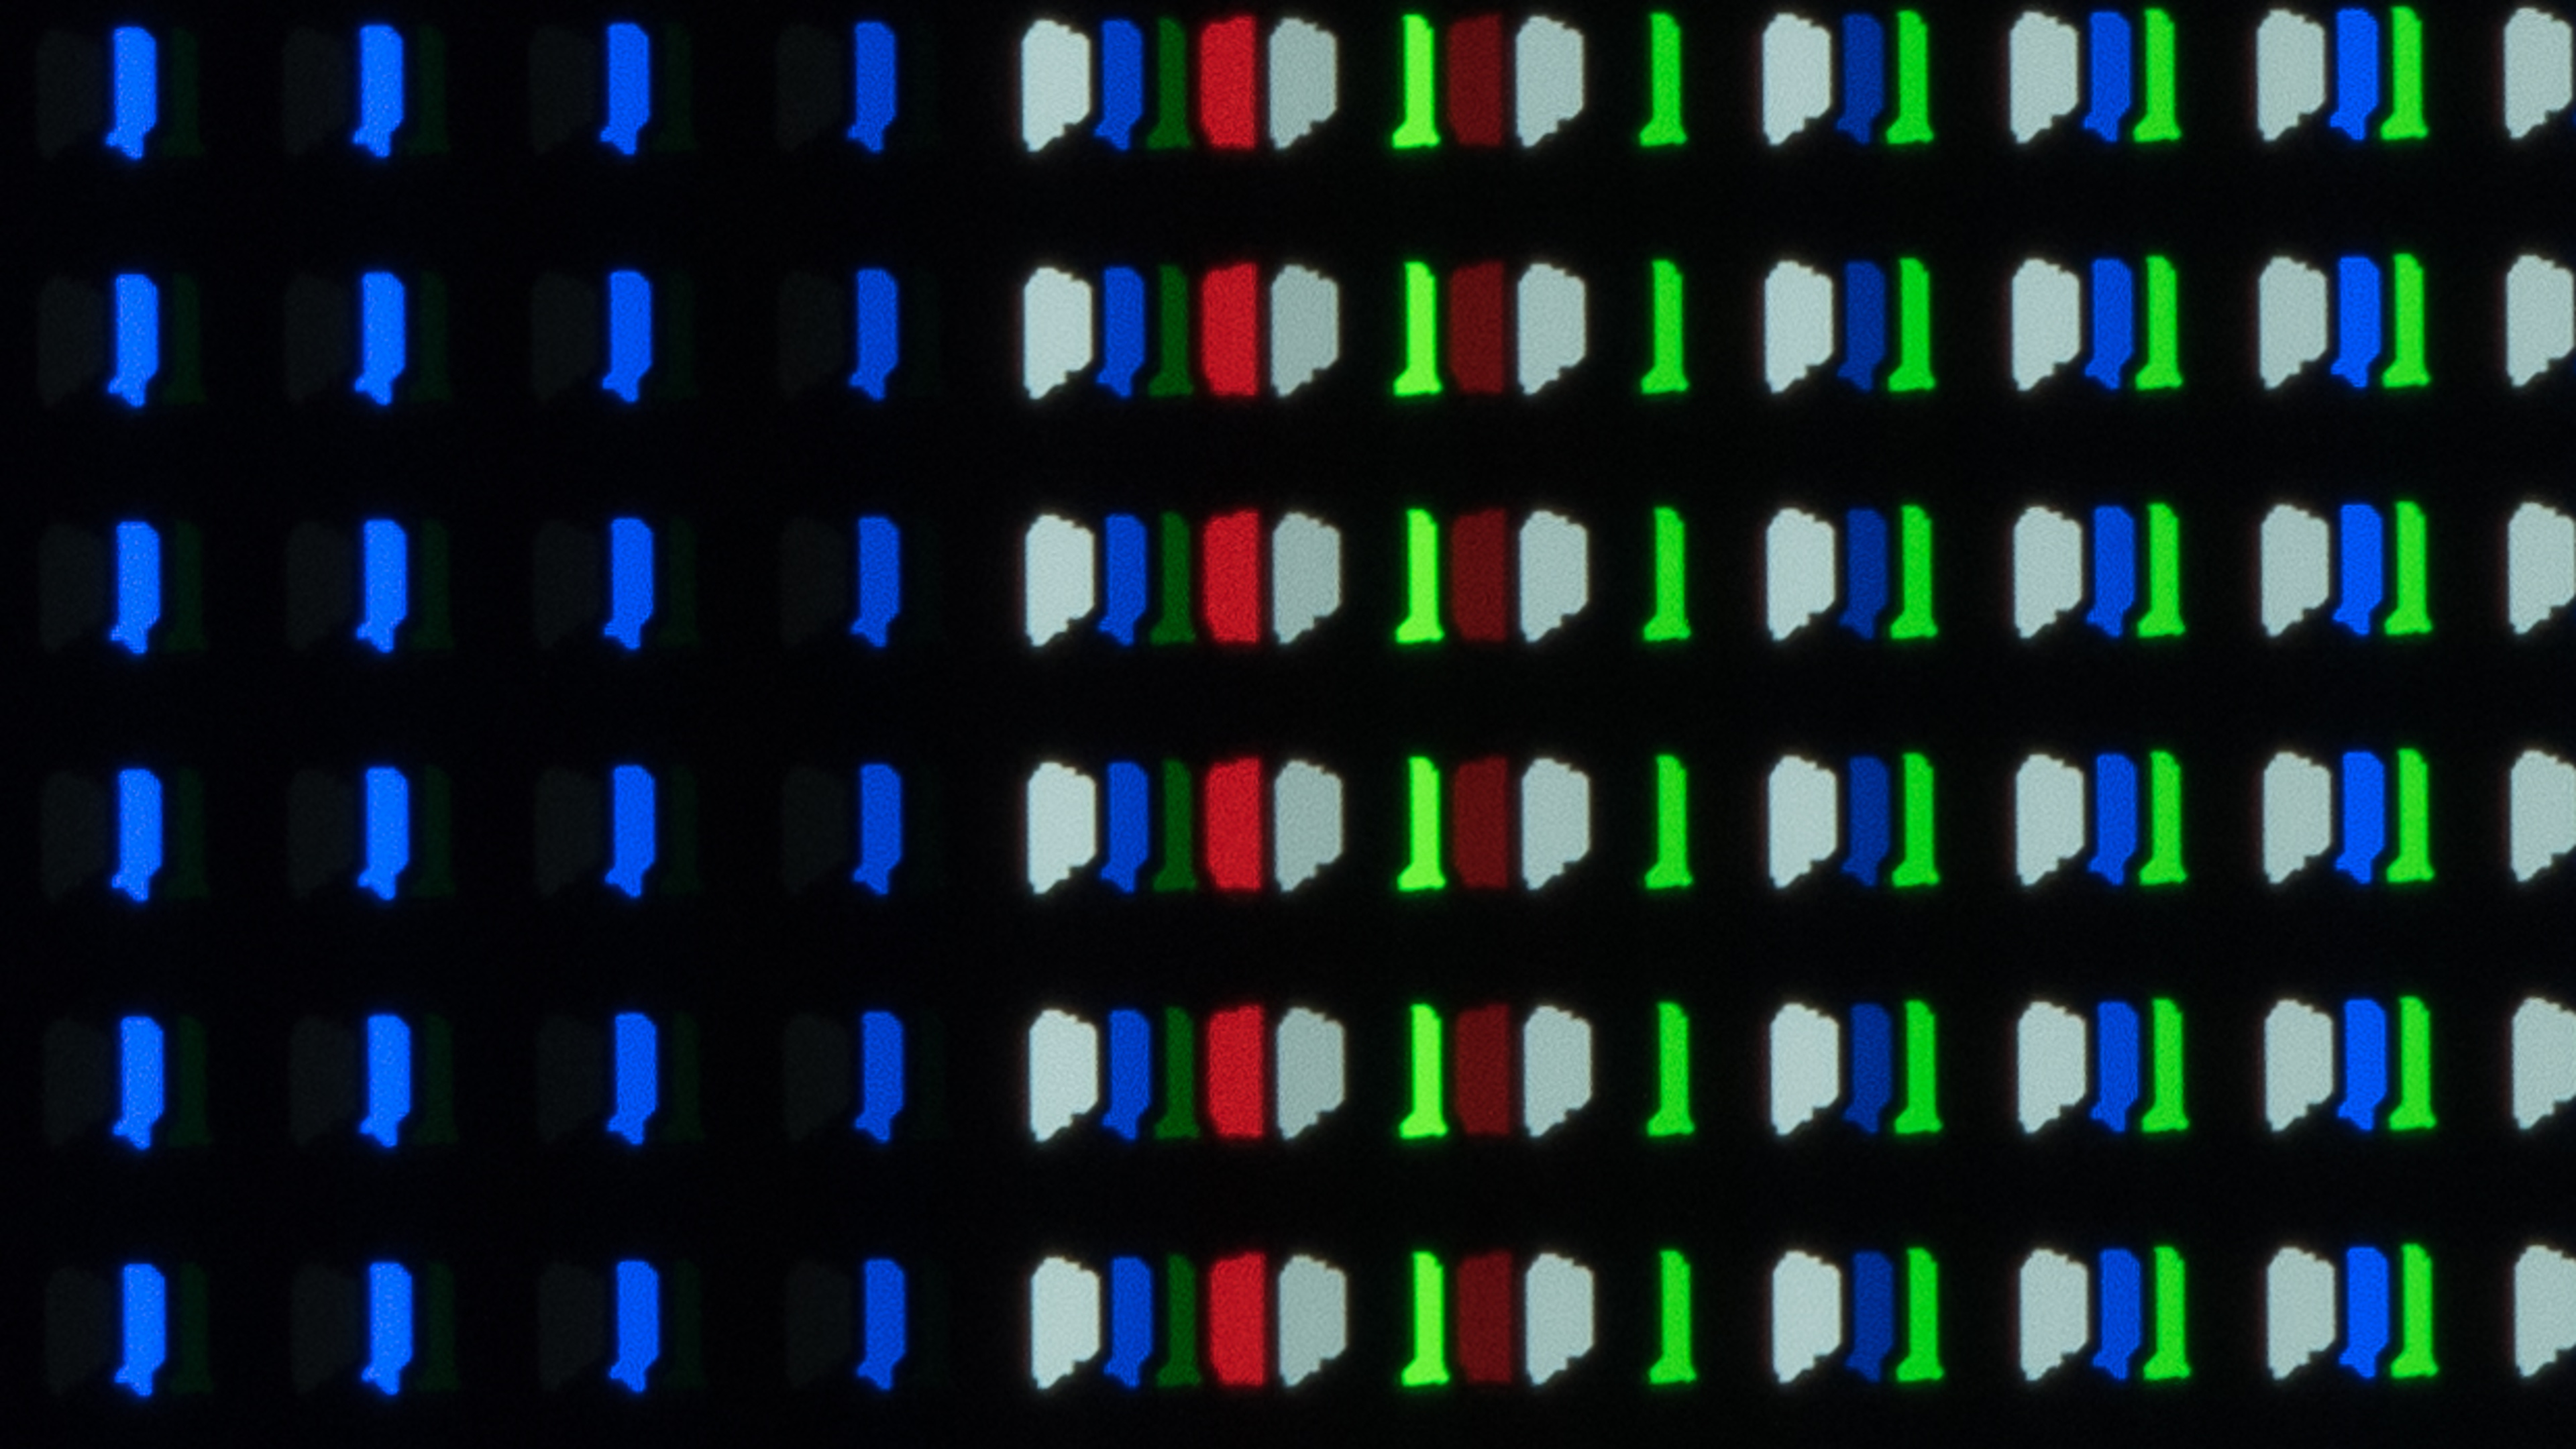
Here we go. Looks pretty good! This is 100% mask strength too.
EDIT: it does however create red artefacts on colours like yellow and white; especially on text. If I change the layout to RGB it’s mitigates it somewhat; but not entirely. Mask 9 doesn’t have it at all as a means of comparison. I took a picture but it doesn’t really show on my phone. My LG has BGRW; it’s one of the less straight forward ones…I am finding that you need to tailor settings per game!
FYI all settings in Reshade are the same, except in situations where you’d have negative values. So in a case where in Retroarch values would go from -10 to 10; in Reshade they’d go 0 to 20.
So in this instance, the parameters you mention are the same.
2 Likes
Yeah I’m seeing this behaviour in Reshade. So you can get the same look by setting Reshades preprocessor resolution to whatever the game is running at (which usually almost completely removes the effect) and then use the downsample internal resolution setting - or, just set Reshades resolution to the equivalent resolution of what the down sampling does. Exact same effect; but the shader isn’t having to do any work and you maintain FPS
As far as I know all LG WOLED TVs use an RWBG layout until the G5. Are you sure it’s BGRW? Also, I don’t think CRT-Guest-Advanced’s BGR layout actually starts on Red. It’s actually RBG but of course individual Mask Layouts could vary.
You can take a look at these threads and posts if you want to dig deeper into the topic:
Lastly for some photo tips:
Be sure your camera is stable. Use Pro/manual mode. Speed 1/60 or 1/30. ISO 100-400. WB 4000K - 5000K or Auto. Focus Manual or Auto.
According RTINGS it’s RGBW but all 4 are never on at the same time. However the images they have of the sub pixels are confusing; they look like WBGR to me but also I can see a dark green sub-pixel and a fluorescent green sub-pixel; so I have no idea what I’m looking for, probably
@guest.r I’ve had this in mind for a long time

why not using “scale_x6 = 0.25”? or “scale_x7 = 0.50” if “scale_x6 = 0.50” need to be like this
I asked this because, based on my limited knowledge of shaders, the video will be enlarged to double size horizontally, which might require more processing power
1 Like
This was an option indeed some years ago, but users kept using the 2x scaling option, since it was still available.
Default scaling options also allow better scanline dynamics and artifacting/fringing manifestation. Pixel transition would also be compromised to a degree with the actual LPF…
I guess it’s needles to say what the original standard NTSC resolution is, this all is accounted into ntsc-adaptive pass scaling.
There aren’t too many passes which would benefit from a speedup, it’s not worth to sacrifice quality.
TL;DR current implementation brings better quality regarding the whole ntsc composition.
3 Likes
I did play with it and yes I get less quality/sharping
well I was looking for a way to get some speedups since I cant use crt-black_crush-koko with 4x resolution (seems it will eat all the VRAM), and this speedup seem make it work but as you said it will do “sacrifice quality.”
1 Like
Wow, I can’t even imagine how many updates I missed out on during the months I’ve been gone, right away I went and just grabbed the last latest update and just dove right in blindly and whipped up a crazy new look, definetly plan to tweak further just throwing something out there real fast.
Right off the bat the very first two highlights I see is this new Interlaced mode 5 and this new “fonts” setting for ntsc that finally cleans up those fuzzy looking letters on 2phase games, those two new settings alone changed the game, amazing.
Here’s a couple screenies:
Interlaced 480i content and that’s Streets of Rage Remake screenies just to throw that out there:


Some before and after pics of the font setting off and then with it activated:


You can see that poster on the wall with the garbled graphics now looks clean.
I can’t believe I can finally get the colors to pop correctly with this new Interlaced setting. One thing I did notice though with the font setting is that whole it does fix the fuzzy letters, whenever a screen fades out the “fuzziness” comes back for a split second before the screen changes completely.
Here’s an example:

Here’s when the screen is fading:

You’ll notice that middle line between the “W” becomes “fuzzy” again right before the screen completely fades out, happens really fast though.
While I got some time I’m gonna get in the lab and try to whip up a new pack maybe put up a sample pack in my thread to start the new year off, my old pack really needs to be replaced asap.
Here’s a couple more screenies:


Hope everyone’s been good.
9 Likes
Heey @sonkun! Nice to see You back! Meanwhile some noise options have been added for more messy (RF) presets. Hope You stay a while and continue with you awsome tweaks…
3 Likes
Yo @guest.r been a while. Had to step away from the scene for a bit to take care of some things, I should be around for a bit. One thing for sure is this thread and this forum will forever be my home so I’ll always pop back up in some shape or form even as a ghost lol.
But yes I noticed those new rf settings as well and even a new PAL shader itself? Man I got a lot of work and catching up to do. I had mentioned in my thread yesterday that a setting within grade seems to have been broken, not sure which update this happened with but it’s the setting all the way at the bottom called “LUT 1 Toggle”, it’s currently enabled in my presets but I had to toggle it off due to displaying this weird bluish hue all across the image. On the flip side I took that as the signal to switch to a different look so I’ve already been changing some things around so not much of a biggie.
3 Likes
So I completely missed this other new setting you have added called “NTSC Filter Scaling”? Without knowing any documentation on it it seems to be a setting that goes hand in hand with the “NTSC Resolution Scaling” setting.
Ran some random tests, I tried turning the “Resolution” setting up to 0.30 and it gives me this clean composite image:

But as you see I lose the blended waterfall so I then turn the Filter setting down to about 0.83 and it now looks like this:

I get the waterfall back but lose that clean image from the first shot (you can see the difference mainly in Sonic’s nose, grass edges).
Am I using this setting correctly or is there some other way I’m suppose to use it? My composite look would be complete if I could maintain that sleek clean look from the first image but still retain the blended waterfall.
1 Like
Filter scaling does similar to luma filtering as the NTSC Resolution scaling, but doesn’t alter the chroma pixel frequency, which can be a great benefit.
Extra sharpness can be also added with deblur, i guess these are the actual options, smart low-pass filter lookup ranges are very hard to do without extra passes and a lot of logic…
2 Likes
I see. That setting seems to be what I need, I like it better than the deblur setting actually. I remember I was trying to tackle this very thing before I left the scene and remember that deblur setting “erasing” small details off of pixels the more I raised it even though it indeed sharpened the image up, that doesn’t happen with this filter scaling setting though so I see the potential there. Not sure how I’ll go about this, I’ll try playing around in other ways, if nothing else I’ll just have to make do.
1 Like
I ran some tests with this 5-pixel-wide mask. I’m delighted with the final result.
pos.x = floor(mod(pos.x,5.0));
		if      (pos.x < 0.5)  mask.r = maskLight;
		else if (pos.x < 1.5)  mask.rg = maskLight.xx;
		else if (pos.x < 2.5)  mask.g = maskLight;
		else if (pos.x < 3.5)  mask.b = maskLight;
		else                   mask.b = maskLight;

Mask zoom Sharpness = 0.0

In-game

3 Likes
I guess that’s a very nice TVL for 4k, similar to a hypothetical mask width of 2.5 at 1080p. Maks width 2 is a bit fine, mask width of 3 is already coarse…
A mask with width of 5.0 was already discussed, recently @nesguy convinced me to add mask 14, which also has a width of 5.0.
Alternatively a mask can be currently zoomed to width of 5 and sharpened a bit…mask 6 is a good candidate for this.
3 Likes
Oh yeah I saw the discussion. It was just a test, nothing more. 
I also tried to recreate a preset that I use with mask gamma 1.0 and mask zoom to make it look as close as possible to a preset without using mask zoom.
And the trick was to use mask gamma 5.0 instead, lowering scanlines (dark/bright) values and halation.
Tldr mask gamma is an interesting setting. 
Mask gamma 1.0

Mask gamma 5.0 without mask zoom

Edit:
When you use halation to achieve full brightness, you will have a bad mask separation for red - green - blue on bright colors.
You can use fine bloom sampling and sigma h/v etc. But there is another way, so remember we have two differents masks and gammas.
Now you use crt profile 2 and lut colors 4 and halation. One mask will have 4 pixels wide at full brightness and the other one 2 pixels wide ( on white colors ). 


We can see the separation in comparison


I hope this helps !
2 Likes
I guess it OK as long the image isn’t tinted by mask. Some mask widths are tricky, since they aren’t perfectly RGB symmetrical and such phenomena can occour.
2 Likes
Yes a mask 5px wide for example, can give a different tint depending on whether the mask layout is set to 0,0 or 1,0.
Also color temperature helps, I improved my preset by using “-29.10” because I was losing detail in the red colors and to rebalance the whites.
1 Like