CRT shader for Steam Deck (and possibly low res display)

Hi,

so as some of you probably know, the Steam Deck is out in the wild for about 3 months now and it happens to be a powerhouse for emulating. With EmuDeck, a nice script, you can even isntall RetroArch, its cores and other standalone emulators with a few clicks to get you going. I’m one of the lucky ones to own a Steam Deck and with it I’m into emulation again, reliving some of my childhood experiences. It’s fantastic but also new because my last emulation experience is Project64 (N64 for example) with a not so optimal performance many years ago. So RetroArch, cores, crt Shaders, it’s wild. But i did some homework, how things developed over the years, getting used to the RetroArch ui etc. Just to gove you a little picture.

Now, to get to the topic, crt shaders. People seem to be obsessed with a cool (and accurate) crt look. And i understand it. Having old games from the past to look just like the day back when we were first experiencing it on the old crt screens is a nice thing. Especially when games were taking advantages of the signals and properties you had back then on a crt. I didn’t really know any of this stuff until now. And after seeing it for myself, i can’t go back anymore. So, i wanted to have this look on the Steam Deck too. After reading a ton of stuff about crt shaders and their properties, well, I’m not really wiser than before. It’s all heavy wizardry in my eyes. And after encountering many statements that crt shaders only really shine on higher resolutions, like 1080p and upwards, I was ready to give up on this matter. The Steam Deck has a 7" screen with 1280 x 800 resolution. But then I thought… hell, screw it. Lets dive into this dark rabbit hole. And after some days of intensive testing I rise with a surprisingly long beard, indicating I was much longer down there than I thought. But still, I have no really clue what dark magic I have encountered down there besides some basic stuff.

But, luckily, I actually managed to achieve a nice crt look (in my eyes) with the things you would want from a crt shader. Yes, I’m looking at you Sonic and your damned waterfall. So, to cut this short, I’d like to share the stuff I managed to do, hoping it provides other people with a nice looking crt effect when playing retro games on the Steam Deck and maybe other systems with a low resolution. Beside that, I’m provding a list of shaders that come with RetroArch and look good out of the box on the Steam Deck. Sadly, as i don’t understand much of the stuff, I can not provide any meaningfull support for it. But at least I can give some tips from what i observed while testing.

So, first, shader presets i use that come with RetroArch. No customizing needed here.

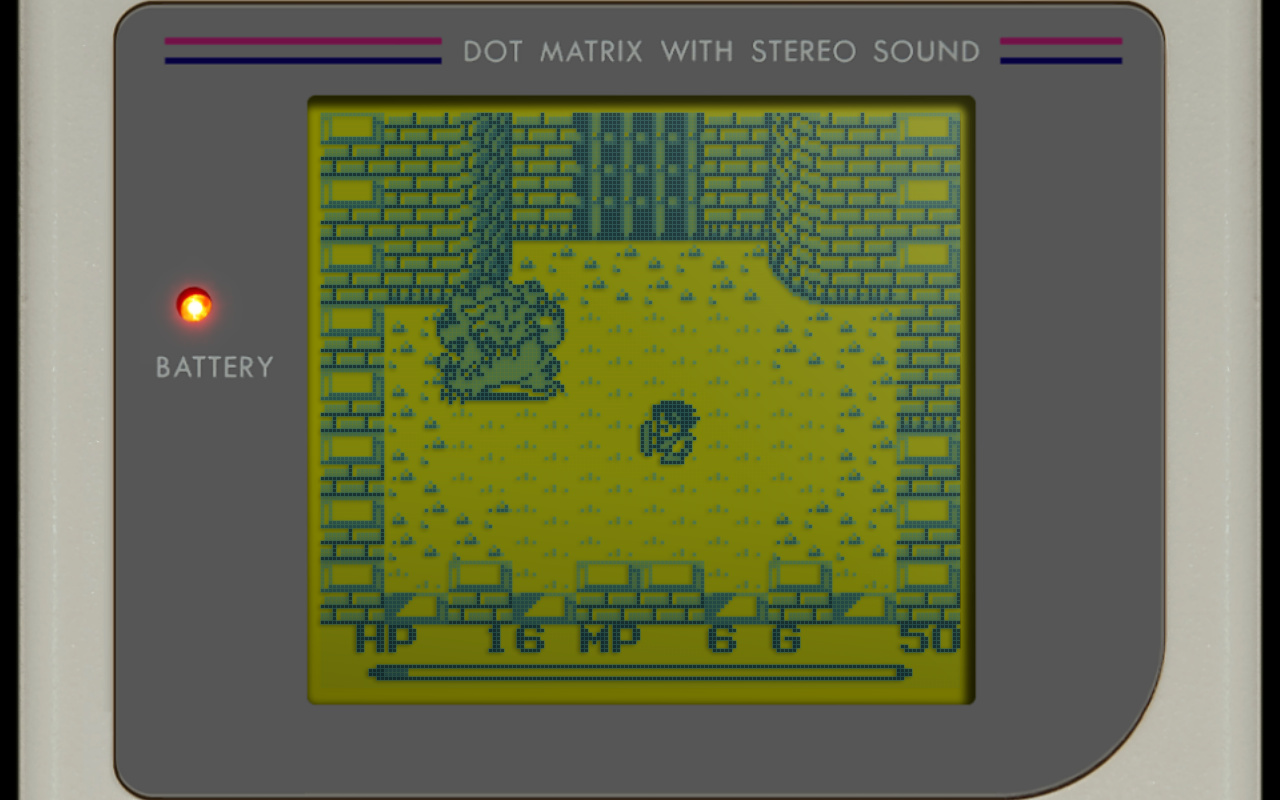
Gameboy dmg-4x.slangp under “shaders_slang/handheld/console-border/dmg-4x.slangp”

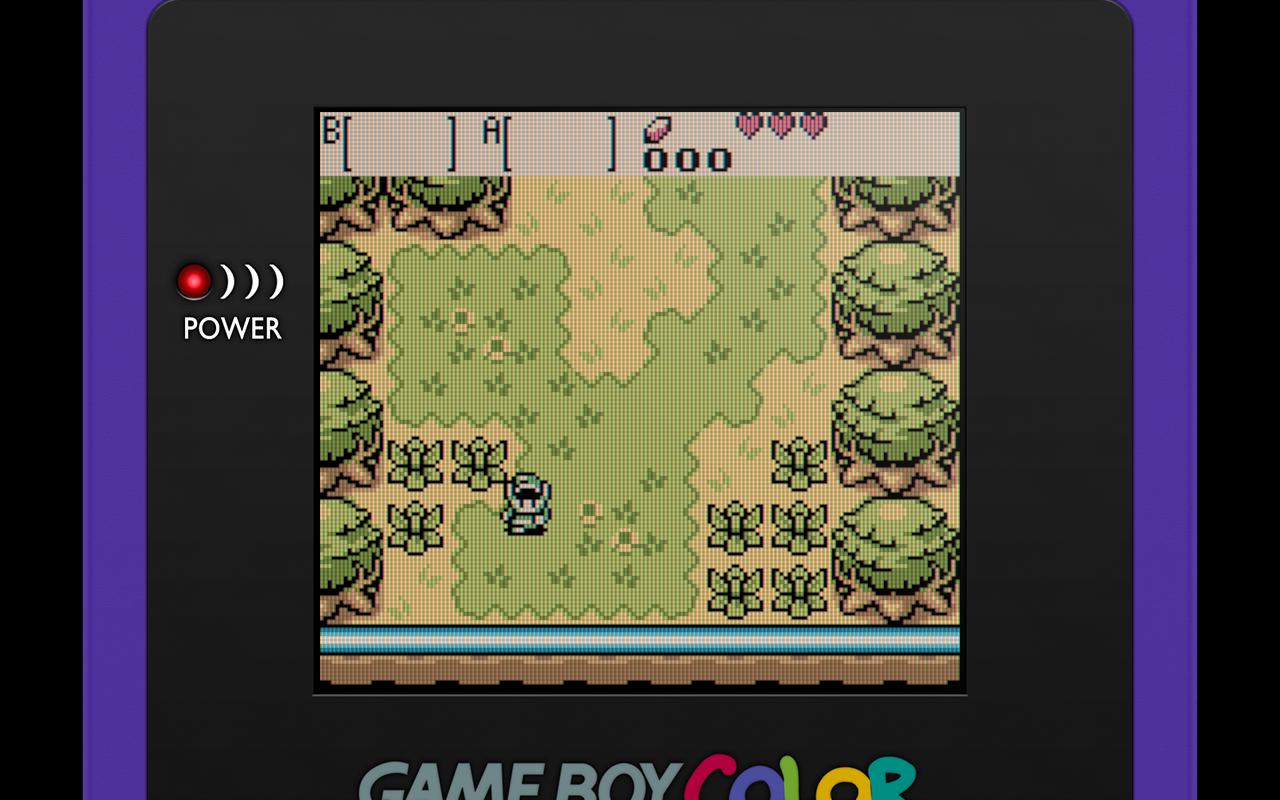
Gameboy Coloy gbc-lcd-grid-v2-4x.slangp under “shaders_slang/handheld/console-border/gbc-lcd-grid-v2-4x.slangp”

Gameboy Advance gba-lcd-grid-v2-4x.slangp under “shaders_slang/handheld/console-border/gba-lcd-grid-v2-4x.slangp”

Nintendo DS lcd1x.slangp under “shaders_slang/handheld/lcd1x.slangp”

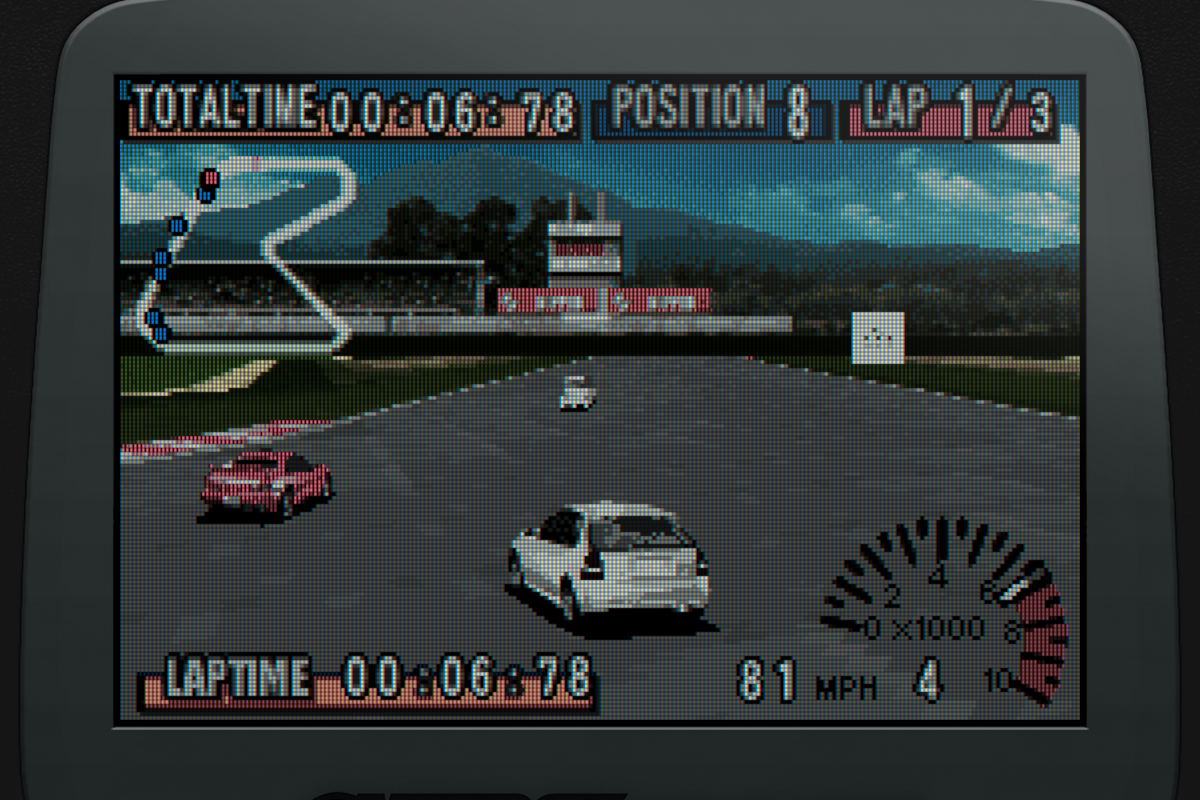
Second, I’ve got 3 Presets for the 16 Bit era (SNES / Mega Drive), 32 Bit era (N64 and Playstation) and 64(?) Bit era Sega Dreamcast.

Sadly no Gamecube as the Dolphin core in RetroArch is not working with Vulkan (for me) and with GL driver i get bad performance. So I’m using the standalone version which works fine (Vulkan). The presets use the awesome work of Guest as a base. It’s the Guest Advanced Shader Pack. All credits to him, I just changed some parameters which I don’t really understand :D. So be sure to downlad and copy the files to the right place. Here is the link:

SNES and Sega Mega Drive https://drive.google.com/file/d/11UrfZeXqLx8zzxE8igI-zQXLUby_DSPD/view?usp=sharing

Nintendo 64 and Playstation 1 https://drive.google.com/file/d/1ns-YyCTsxQ0bKcFIXBLMyfU8mjvn391a/view?usp=sharing

Sega Dreamcast https://drive.google.com/file/d/1m7jc2-_xlQngcVJx1D8Pi3Rgvqip7xcy/view?usp=sharing

Some notes:

  • It’s important to deactivate any kind of video / display enhancements in the core options or it will mess things up. So, for example, the ghosting thing in Gambette, the NTSC thing in Genesis and so on. The reason is because the shaders are providing all of these things and can be modified within the shader parameters.

  • The NTSC presets are set to S-Video. If you want to have a Composite or even RF look, just change the NTSC type to 1 for Composite and 2 for RF within the parameters.

  • The presets give you an aperture grill rgb Trinitron look (i think that’s what it’s called?). The kind of dotted thing. If you don’t like that and want to have more prominent horizontal scanlines, you change the mask typ from 6 to 5 or 0 within the parameters.

  • Strangely, on Dreamcast, I was getting a very blueish look. So i had to adjust some more things to get rid of it. That is why there is a unique preset for it. But beside that, it’s the same one as for Nintendo 64 and Playstation 1.

  • I’m using the awesome overlay pack from Duimon, though strangely the RetroArch screenhot function didn’t capture that!? Anyway, the overlays can be adjusted in the settings and it looks really cool. Here is the link: Duimon - HSM Mega Bezel Graphics and Presets - Feedback and Updates

  • I even tried the Mega Bezel Pack with the nice reflections. And while working well with the 16 Bit era, i get bad performance starting with 32 Bit era. I guess, the reflections are to much for the Steam Deck when playing with higher systems.

Some screenshots with comparison (without and with sahder and close ups):

Okay, that’s it. Feel free to change it to your likings or use it as an inspiration or base for your own thing or to develop it further.

You’re welcome!

9 Likes

Welcome to the forum!

Really nice stuff :star_struck: you got a really nice look even on a low-ish resolution display. @guest.r’s shaders really are amazing for their tweak-ability to taste.

Also the DMG gameboy shader looks great, it seems like it would feel really cool to have it handheld on the steam deck!

For @duimon’s graphics and presets I wanted to mention that if you still want to use them but need higher performance and are ok with no reflections there are a couple of options. You can switch the base Mega Bezel preset they reference to a no-reflect version, and there are the potato versions which have a baked image for the background rather than the auto-generated bezel.

For anyone following this if you want to use @Duimon’s awesome graphics/preset pack, you will also need the Mega Bezel shader pack which you can find here:

Below are a couple of examples of @Duimon’s Mega Bezel setups which might be helpful on the Steam Deck:

4 Likes

That’s actually a really good tip, thanks for that. In fact, I have trouble to get an overlay working with Nintendo DS games because the screen alignment can’t be customized in the core options of MelonDS in the way your screenshot shows. So I’ll take a look at that. One question though:

Is the newest shader from Guest already integrated in your awesome shader pack? My settings are kind of depending on it because of the new sharpening parameters in the ntsc shader.

3 Likes

The very newest is up on my Github, but not yet in the download package, the next release with the updated download package will come in the next couple of weeks.

In the current package there are simple dual screen nds presets in the variations folder, and of course Duimon has some great nds presets in his package, either screens top & bottom or left and right.

3 Likes

Thanks again, managed to do what you suggested (changing the reference) and customized the presets with my settings. DS is looking nice now. :slight_smile:

4 Likes

looks great! im particularly fan of the gba one.

1 Like

I put your slangp files in the guest’s shader pack, which is what I’m assuming I am supposed to do. Guest’s work for me but yours fail to load no matter where I put them. I just can’t seem to figure out how to load them, is there something special I do with them? Thank you for your time!

Hi,

you’ve put it in the wrong place. :sweat_smile: But I guess that’s my fault as after looking over my initial post I realize there is information about where to actually put my slangp files, sorry for that. I’ll do an edit about this (if I find out how to do that haha).

The slangp files I provide go to your “shader” folder, so before “/shaders_slang/

Keep in mind that I created and tested my files with the version 2022-06-02- release_1 of Guest shader, which is quoted and linked to in my first post. I also use this version personally as i never looked back after settling with it :smiley: . As I see, there is already a 2022-07-17- release_1, so I don’t know what effect and possible changes / addition it has. Could be none, but i can’t guarantee it for now. I should probably look into it at some day and check it out.

Have fun!

2 Likes

Thank you so much! Can’t believe I didn’t think to move it there after trying other places lol

Works great and looks great on the deck, great job.

Hi @schM0ggi, great work here! What settings would you recommand for european people that were used to RGB (via SCART) instead of NTSC?

Hi Tromzy, as said in the starting post, sadly I can’t give you any tipps or recommendations beside the ones listed above because the whole shader topic is a great mystery to me. I didn’t even bother tinkering with it further after finding the settings to my liking and just play my games because I’m satisfied with the look. The files I provide are basically the result of messing around with the parameters and comparing to other shaders I personally like. The whole purpose was to give other people, especially people like me, who own a Steam Deck and / or play with smaller resolutions a “to go” configuration with the possibility to develop it further for those who have more knowledge about this stuff. Sorry :confused: . I suggest you ask around in for example Guest’s topic. I am sure, people around there can give you qualified answers and hints and help you out.

Hello! New forum user here.

I recently got a Steam Deck and I used Emudeck to install Retroarch.

I really like how 8 and 16 bit console games look while using the 2xBRZ shader (shaders_slang/xbrz/2xbrz-linear.slangp), but I have noticed it doesn’t have any effect on DS games when using the melonDS core.

Is there a way to apply 2xBRZ or a similar effect to 2D screen elements in DS games?

Thanks in advance!

1 Like

If you’re increasing the internal resolution, it will break any shaders that use pixel pattern detection algorithms, such as hqx or xbr. However, there is a set of super-*xbr-3d shaders that will compensate for the internal res boost (pick the preset that matches your scale factor) and skip the up-rezzed polygons while smoothing the pixelated HUDs and menus, etc.

1 Like

Thank you very much for the information, @hunterk! The internal resolution upscaling was definitely messing with the shaders.

Once I changed the internal resolution to 1x (native), I saw some pretty good results using the super-8xbr-3d-6p.slangp shader. However, there was a big FPS dip, from 60 to around 45, so the emulation got choppy. That was despite the GPU and CPU utilization were nowhere close to 100%.

I then disabled the OpenGL renderer in melonDS so it switched to Vulkan. The GPU utilization went way down, but now the image while using super-8xbr-3d-6p.slangp had a lot of artifacts. I had better results with the super-2xbr-3d-2p.slangp shader: great image quality while keeping the emulation going smoothly.

While the polygons look sharper when using the OpenGL internal resolution upscaling, I’d rather have the improved 2D text and backgrounds. So far I have not been able to find a combination to “have it all”, despite testing with every shader preset in the shaders_slang/xbr folder. The shaders in the xbrz folder didn’t have any effect.

I have attached a couple of screenshots, one with no shaders applied and another one using super-2xbr-3d-2p.slangp. Both were captured at the Steam Deck native resolution (1280x800).

No shaders

super-2xbr-3d-2p.slangp

3 Likes

ah, yes, the hybrid layout causes issues, too, since it’s doing scaling there, as well.

In the ‘handheld’ directory, I have some called “ds-hybrid-view-…” for sabr and scalefx. Those will take the normal over/under image layout, do a hybrid view layout beside and scale the big image with the selected scaler. I, personally, think it’s the best way to handle this.

4 Likes

That’s a neat idea! And the new sxbr looks surprisingly good on DS games, though you have to choose both screens to appear at the same size (left/right). To work on hybrid layout I had to develop a new version specifically for that.

super-xbr (latest on repo, run in linear gamma):

And a ddt-jinc shader I’m working (gamma not corrected):

5 Likes

I went ahead and edited those hybrid presets from @hunterk and added the new xbr and super-xbr to work like that, get here:

xbr and sxbr hybrid presets.zip

To use it you need to:

  • unzip these presets inside “handheld” folder;
  • update your slang shaders to latest using update online inside retroarch;
  • Use 16:9 aspect ratio and integer scale OFF;
  • In DS CORE option choose TOP/BOTTOM layout.

Now you can load any of these presets and get this:

OBS: I’d like to know if they run fullspeed on steam deck, as I don’t have one.

EDIT2: Added the two 3D old xbr and super-xbr too (now called hd versions). They work with CORE at 2x Internal Res, so the 3D games look better (though the 2D uses old code, so the new ones are better):

I still have to rework these old “3d” versions to use new xbr and sxbr code.

7 Likes

Thanks a lot for all your help, @Hyllian!

I installed the files and followed your procedure. The graphics look good! Using Vulkan, the CPU and GPU utilization stay below 25%. The emulation runs smoothly.

There is a problem though, probably specific to the Steam Deck: when you modify the screen layout using the ds-hybrid-* shaders, the touchscreen does not work properly, as the touch zones do not match the DS screens anymore. While it wouldn’t be a big deal if you’re playing mostly on a TV, it kind of breaks using touch for handheld gaming.

When you use the melonDS built-in hybrid mode, the touch zones work properly.

1 Like

ah, yeah, this is a known thing. If you use a mouse or the analog sticks to emulate the pointer, it will still work, since you can watch the crosshairs move, but touch uses absolute coordinates that are not tracked in the shader redirection.

2 Likes

Hi @pickless83,

sorry for the late reply. Yeah, that one I had to understand myself in the beginning. Emudeck does install Retroarch from the Discovery Store, so it’s a flatpak. The mounted directory on the Steam Deck, where flatpaks are installed, is called “var” and is read only per default for the deck user, like the root directory. You could disable that, but i don’t recommend it so it’s fine.

Under your home directory, the place where you have full access and where games etc. are installed, you can find more directories and files from your flatpaks. There are in ~/.var/lib/app/. Make sure you can see hidden files in Dolphin. There, you’ll find a Retroarch directory and subdirectories for different stuff like configs and shaders. Just copy all the content in the shader directory from the read only directory into the Retroarch shader directory in your home directory. Next step is to place the shaders you like into that same directory. Then, you have to change the directory path in Retroarch for shaders to the shader directory in your home directory. That will make sure that you see als those shaders in the Quick Menu and, when updating shaders in Retroarch, they get downloaded to your home directory and you don’t need to copy them over again.

Hope I did describe it well :smiley:

4 Likes